Bringing home a new baby is full of joy, but sometimes the journey comes with a few twists. Brittany Ouimette, a first-time mom, had her world turned upside down shortly after the birth of her daughter. Her baby was diagnosed with hip dysplasia and needed treatment with a Pavlik harness. Brittany’s story, filled with honest emotion and real-life advice, is one every parent dealing with hip dysplasia will find relatable and reassuring.
Here, you’ll find Brittany’s experience with the diagnosis, the steps her family took from hospitals to at-home care, how they adapted, and practical tips for managing daily life with a harnessed baby. If you’re a parent in the same situation, this story can help you feel less alone, more informed, and a bit more confident as you start down this path.
Hearing the Diagnosis: The Start of Brittany’s Hip Dysplasia Journey
The Hospital Discovery
Brittany’s story began just hours after her daughter was born. During a routine check, the pediatrician noticed her baby’s hip “clicking” in and out of place and quickly asked, “Was this baby breech?” Brittany and her husband confirmed she was, which didn’t seem unusual until the doctor brought up hip dysplasia, a condition more common in breech babies and firstborn girls.
“We had never heard of this,” Brittany remembers. The doctor explained the basics, told them about the Pavlik harness, and suggested looking up a picture. The brace looked odd and intimidating, a reminder that their newborn might need something very different in her first weeks of life.
Early Uncertainty and Lack of Resources
That first talk with the pediatrician didn’t bring many answers. Brittany and her husband were told the condition might fix itself on its own once newborn hormones wore off. The plan was simply to “wait and monitor.”
No resources or handouts came their way. “We didn’t really do anything until she was six or seven weeks old,” Brittany shares, so she turned to the internet.
Common worries new parents may have after hearing ‘hip dysplasia’:
What is hip dysplasia?
What causes it?
What does the Pavlik harness look like?
Will my baby be in pain?
How serious is this?
What treatment will look like day by day?
How will this affect bonding, nursing, and daily routines?
Processing the News as a Parent
While some family and friends tried to reassure Brittany with, “Oh, it’ll be okay,” she needed something different. “I know it’s going to be okay, but I’m a little sad about it,” she says. What she craved was not fast comfort but understanding and real information.
“I wanted to understand what we were working towards.” She needed clarity, for her own peace of mind, but also so she’d be able to answer the inevitable questions from others.
Finding Helpful Information in a Sea of Advice
Turning to Blogs and Social Media
Like many new parents faced with something unfamiliar, Brittany hit Google and social media. She searched for stories from other moms, hoping for honest, direct parent-to-parent advice beyond just the technical medical explanations.
She found plenty of “mommy blogs,” mostly from the UK and Australia, and each seemed slightly different:
Some referred to never removing the Pavlik harness for weeks,
Others described being allowed to take it off for baths,
Some talked about different devices entirely, like spica casts and Rhino braces.
Reading these stories helped Brittany prepare mentally for “the worst” but also added to her worries, as some sources made the experience seem more rigid and severe than what she later found to be true for her own child.
Trusting Your Provider
What calmed her most was her own provider, who took the time to show Brittany and her husband how to get the harness on and off safely and how to adjust it as their daughter grew. They could bathe her, snuggle, and even dress her normally.
Tip Box: Always follow your healthcare provider’s instructions, every child’s hip dysplasia case is a bit different, and what works for one family may not be right for yours.
Sorting Through Information Overload
The internet is a deep well. Brittany realized that when she started comparing every story she read to her own. “It’s easy to start generalizing when you haven’t had your own experience yet,” she says. She encourages parents to gather information, but to keep in mind that only parts of what you read may apply to your case.
Top Advice When Researching Online:
Stick to reputable sources first, look for children’s hospitals, official support orgs, and trusted parent forums.
Treat every parent story as one experience, not a rulebook.
Always check advice with your own medical provider.
Stop reading if you begin to feel overwhelmed, take things one step at a time.
From Ultrasound to Harness: Understanding the Clinical Steps
Ultrasound and Getting the Diagnosis
At her baby’s one-month appointment, the pediatrician still noticed the hip clicking and ordered an ultrasound at the hospital’s radiology department.
The scan was simple: her baby lay calmly while a technician moved her hip gently to capture images. The tech didn’t diagnose anything on the spot. Instead, they sent images back to the pediatrician, who then confirmed hip dysplasia and referred Brittany to a pediatric orthopedic specialist.
The Orthopedic Visit and Harness Fitting
Meeting the specialist, Brittany and her husband listened as they explained angles, numbers, and “coverage” related to the hips. “It didn’t make any sense at first,” Brittany shares, recalling a blur of charts and diagrams. Over several appointments, though, things became clearer. The more she asked, the more confidence she gained.
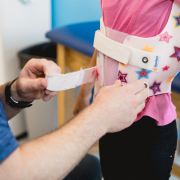
The Pavlik harness fitting involved soft, Velcro straps, sized for her baby. The team marked spots with a permanent marker so they’d know where to position things later. The message Brittany took home: “You got this!”
Honest Emotions During the Process
Brittany admits feeling overwhelmed trying to absorb every detail, partly for herself, but also to answer the questions she knew would come from family and friends. “People kept saying, ‘Oh, but it’ll be okay.’ I needed more than that. I needed to know when and how it was going to be okay.”
Living with the Pavlik Harness: Everyday Parenting and Emotions
Overcoming Initial Worries
Before the harness went on, Brittany’s biggest concerns were both practical and emotional.
First: the look and hassle. “It’s inconvenient and not very cute. People stare or ask questions.”
Second: Would it work? Would they “do everything right” to help their daughter’s hips heal?
She faced a new layer of parenting, explaining a visible brace to others. “It’s different when everyone can see what your child is wearing. You answer a lot of questions.”
Real Talk: Many parents feel sadness, frustration, or worry when their baby needs a medical device. These feelings are normal, acknowledge them, don’t judge yourself.
How the Baby Adjusted
Brittany’s daughter started with the harness at seven weeks old. The first 24 hours, she fussed—her now-spread legs didn’t move like before. Surprisingly, after a day or two, she seemed completely unbothered, stretching with joy when the harness came off but never battling its return.
Some parents Brittany met found their children took longer to adjust, sometimes weeks. Each baby is different, and that’s normal.
Getting Comfortable as a Parent
For Brittany, caring for her baby in the harness took about a week of practice before it felt routine. Diaper changes were awkward at first, no more lifting by the legs. Instead, she rolled her baby or lifted her by the back or hips.
Over days, tasks that felt cumbersome at first became second nature. “Other people would watch and think it looked so complicated, but we got used to it.”
Specialists guided her through adjusting the harness as her baby quickly outgrew the early settings. After a few trips, she felt confident handling tweaks on her own.
Clothing, Cleaning, and Keeping Up: Practical Pavlik Harness Tips
Clothing Choices
The good news: most normal baby clothes fit under the harness. Brittany found that pants or onesies with snaps sometimes needed to be a size up, as the spread legs stretched the fabric more. She usually dressed her daughter underneath the harness, slipping a bigger shirt or dress over the top for outings or special occasions.
While there are specialty pants designed for harnesses, Brittany didn’t find them essential.
Cleaning the Harness
“The harness will get dirty, and that’s okay,” Brittany says plainly. Spit-up, diaper blowouts, and the general mess of baby life all left their mark, especially over ten weeks.
She cleaned it with a damp washcloth and mild laundry soap during the daily hour the harness was off. She avoided the washer and dryer, too risky with all the Velcro and not enough time between wears. She also tried harness covers, which snapped over the straps. They made things cuter and easier to keep clean.
Keeping the Harness Clean: Realistic Expectations
Harness covers and putting a shirt or dress on top helped prevent stains, but Brittany’s biggest change was a mental one. “At the beginning we were so careful, but by the end, we just accepted that it was going to look used.”
Quick Tips for Harness Cleaning and Care:
Clean daily or as needed with a damp cloth and a small amount of gentle soap.
Use harness covers to catch messes and decorate.
Put larger shirts or dresses on top for outings.
Don’t stress about keeping it spotless, some discoloration is inevitable.
Medical Follow-Ups and Adjusting the Plan
Regular Appointments
Every four weeks, Brittany’s family went in for ultrasounds and check-ins with the orthopedic team. Most babies wear the harness for several weeks to a few months; for Brittany’s daughter, it was ten weeks in total.
Each visit meant either the doctor or Brittany herself needed to lengthen the harness straps slightly as her baby grew. Babies grow fast, usually an adjustment about every two weeks. This level of frequent tweaking may not be necessary for other braces, like those used for clubfoot, as growth patterns differ.
When the Harness Isn’t Enough
By the end of ten weeks, one hip had fully healed. The other, though, showed less progress. This sometimes happens and means more treatment is needed, a reminder that these journeys are unique for each child.
Encouragement, Support, and Looking Back
Feeling Normal—And Knowing You’re Not Alone
It’s normal to feel scared, sad, or wonder, “Why me?” if your baby is diagnosed with hip dysplasia. Many families have been where you are, and there is a path through it. Treatments are common and outcomes are overwhelmingly positive.
Advice for New Parents in This Position
Be patient with yourself. Learning a new way of caring for your baby will come with mistakes and awkward moments, but it gets easier every day. The weeks may seem long now, but they’ll feel like a small chapter when you look back.
Brittany says, “It might feel foreign or strange, and you might wonder why this happened to your baby. Just know there are plenty of other parents out there who have gone through it. It’s treatable, and it passes faster than you think. One day, you’ll look back and it’ll just be part of your child’s story.”
“We remember thinking it was so long and hard, but now, did that even happen? It went by so quick. Now it’s just part of her story, and we look back and smile.”
If You’re Facing a Hip Dysplasia Diagnosis
You don’t have to do this alone. Whether you’re searching for other parents’ stories, learning how to adjust a Pavlik harness, or just needing reassurance that your feelings make sense, Brittany’s story proves that support, information, and a little patience go a long way. Treatment feels tough in the moment, but over time it fades into the story of your family’s strength and adaptability.
Disclaimer:
OPSB products should be used under the guidance of a qualified healthcare professional. Individual results may vary. Please consult your pediatrician or orthopedic specialist for professional advice. This article is for informational purposes only and does not constitute medical advice. Always follow your doctor’s recommendations and instructions.
https://family.opsb.com/wp-content/uploads/sites/2/2026/02/thumb-21-scaled.jpg14402560mhoff/wp-content/uploads/sites/2/2026/03/family-resource-hub-logo.pngmhoff2026-03-06 17:54:262026-03-06 17:54:29Brittany Ouimette’s Experience with Baby Hip Dysplasia and the Pavlik Harness
Getting a scoliosis brace can feel like a big change, both for your body and your mindset. These braces help keep your spine healthy and support your treatment, but getting used to wearing one isn’t always easy. Many people deal with sore spots, discomfort, or worry about how the brace will affect daily life.
Adjusting takes patience and a few smart strategies. This guide shares practical tips that can ease the process, boost your comfort, and help you feel more confident from day one.
Understanding Your Scoliosis Brace
Switching to life with a scoliosis brace takes some getting used to, both physically and emotionally. Knowing what your brace does and why it was chosen helps set clear expectations from the start. Each brace is designed for your body and your curve, so recognizing the differences can help you feel more confident as you begin.
Types of Scoliosis Braces
Scoliosis braces come in several shapes, each with a purpose. Your doctor picks a style that matches your age, spinal curve, and activity level. Here’s a look at the most common types you may hear about:
Brace Type
Worn When
Key Features
Who It’s For
Boston Brace 3D®
Day and night
Custom from Scan, hides under clothes, build in correction forces
Most common for children/teens
Wilmington Brace
Day and night
Custom-molded, Velcro fasteners
Children and teens
Charleston Bending Brace
Night only
Flexible, worn lying down, overcorrection
Kids with flexible curves
Providence/Boston Night Brace
Night only
Hypercorrection, Designed for sleeping
Mild to moderate curves
Doctors select a brace based on:
Where your curve is located on your spine.
How much you’re still growing.
Your lifestyle and preferences.
Knowing which brace you have and why it was recommended helps you feel more in control during treatment.
What to Expect When You Start Wearing a Brace
The first time you wear your brace, it might feel stiff or awkward. Most people notice it feels snug around their torso, hips, or shoulders (depending on the type). You may feel warmer than usual or notice new pressure points as your body adjusts.
Common early sensations include:
Some mild discomfort or rubbing.
Tightness while sitting or moving.
The urge to “break in” the brace by removing it more often.
Remember, your skin and muscles will get used to the brace over time. Wearing a thin, moisture-wicking shirt under the brace can help with comfort in the first days.
Common Feelings When Wearing a Brace
Getting a brace can bring up all kinds of feelings. You might feel nervous or even embarrassed at first, especially if you worry about how it will look under your clothes. Some people feel proud—they know they are taking action to support their health. Others feel frustrated by soreness, sweating, or limited movement.
Every feeling is normal. Change always comes with a mix of reactions. What matters is knowing that your brace is only temporary, and it’s helping protect your spine while you grow and your body will adjust to having the brace on over the first few weeks of wear.
The Goals of Bracing
Wearing a scoliosis brace isn’t about changing the way you look or move every day. The main goal is to stop your curve from getting worse as you grow. For many, bracing can keep a mild or moderate curve from needing surgery later and for some it can improve the curve. The brace supports your bones and muscles so you can stay active and focus on doing what you love.
Keeping these goals in mind can help you stay motivated, even on tougher days. Each hour you wear your brace brings you closer to your healthiest future.
Getting Comfortable Physically
Physical comfort is key when you first start wearing a scoliosis brace. Getting used to the brace means thinking about what you wear and how you treat your skin each day. A few simple changes can make a big difference, helping you avoid sore spots and making the brace feel less like a chore. This section will show you how to boost your comfort by making smart choices with clothing and daily routines.
Choosing the Right Clothing
What you wear under and over your brace affects how it feels on your body. The right layers can help you forget you even have it on.
Soft, Seamless Undergarments: Pick underwear, tank tops, or undershirts without thick seams, lace, or scratchy tags. Fabric should be soft and smooth against your skin to prevent rubbing and pressure marks.
Loose-Fitting Outerwear: Go for shirts, hoodies, and pants with a relaxed fit. Stretchy or forgiving waistbands help you feel less pinched during long days.
Avoiding Trouble Spots: Skip clothing with tight belts, fitted waistbands, or bulky seams that can press or bunch up under the brace. Look for dresses, athletic shorts, or sweatpants that glide smoothly over the brace.
Layers Matter: Light layers help keep sweat and heat from getting trapped under the brace. Moisture-wicking shirts made of materials like bamboo, cotton blends, or athletic fabrics keep you cool and dry better than thick cotton alone.
Here are some good fabric choices and tips for daily outfits:
Clothing Item
What to Look For
What to Avoid
Undershirts
Seamless, soft, moisture-wicking
Thick seams, lace, tight fit
Outerwear
Loose, stretchy, lightweight
Bulky seams, fitted waist
Pants/Shorts
Elastic waist, soft fabric
Tight jeans, stiff belts
Dresses/Skirts
Flowy, comfortable, no hard hardware
Zippers, heavy fabrics
Switching up what you wear as the weather changes also helps. In the summer, thin and breathable fabrics help prevent sweat rashes. In cooler months, layers add warmth without crowding the brace.
Preventing and Managing Skin Issues
Skin health can make or break your experience with a scoliosis brace. Soreness, red marks, or itchy patches are common when starting out, but you can keep problems at bay with a little daily care.
Check Your Skin Every Day: Look for small red spots or sore areas when you remove the brace. Early spots often go away overnight, but ongoing pain means you should tell your doctor or orthotist.
Clean Inside the Brace: Wipe the inside of the brace with mild soap and water and dry out completely to prevent dirt build up inside the brace.
Stick to a Gentle Skin Care Routine: Wash with mild, unscented soap and pat dry before putting the brace back on. A clean layer of skin helps prevent irritation and rashes.
Moisturize Smartly: Use a fragrance-free, non-greasy lotion on dry skin, but only after bathing and with enough time for it to fully absorb before putting the brace on. Skip powders and ointments that could rub off on the brace padding.
Beat the Heat: On warm days, choose highly breathable or sweat-wicking undershirts. Carry a backup undershirt if you get sweaty or damp. If the brace feels hot, try brief cool-down breaks if your wear time allows. Avoid keeping the brace in the car during the summer months as it can cause damage to the brace if it overheats.
Small steps can keep your skin healthy:
Wash and dry your skin daily.
Use soft, dry, seamless underclothes.
Moisturize dry or itchy spots before strapping in.
Air out the skin during brace-free times if possible.
Report any lasting redness or sores to your care team.
Think of your skin as the main barrier between you and the brace. A little attention each day builds resilience, keeps friction low, and helps you focus on active, healthy living.
Adjusting Emotions and Building Confidence
Wearing a scoliosis brace can create a lot of mixed emotions. Some days you may feel strong and motivated. Other days, you might feel awkward, anxious, or frustrated. This is normal. Over time, you can shape your emotional response just like you’re shaping your spine. With steady support, honest conversations, and a focus on what makes you unique, you can build real confidence.
Staying Positive and Getting Support
Support makes everything easier, especially when you start something new. You don’t have to go through this alone. Many people want to help, listen, and encourage you as you adjust to life with a brace.
Reach out to these sources for connection and strength:
Family: Family can be a daily source of comfort. Let them know how you’re feeling, both on tough days and on days when things feel easier. If your brace rubs wrong or you feel down, tell them. The people who see you every day can notice changes and help address any problems that come up.
Friends: Good friends care about your well-being. Share what’s helpful and what’s hard for you right now. If someone asks about your brace, try to answer honestly, even if you keep it simple. Remind yourself: real friends support you no matter what.
In-Person Support Groups: Many hospitals and communities offer support groups for kids or teens with scoliosis. Sharing tips, stories, and struggles with people who “get it” can boost your spirits. Sometimes just seeing someone else in a brace can help. Ask your doctor, nurse, or school counselor if there’s a group near you.
Online Communities: Online forums and social media groups connect you with people worldwide who use scoliosis braces. Popular options include the Curvy Girls Scoliosis Support Group, Reddit’s r/Scoliosis, and Facebook groups dedicated to brace wearers. These spaces are good for advice and friendship when you’re looking for understanding.
Here’s a quick table with ideas for finding support:
Support Source
How It Helps
Where to Start
Family
Comfort, help with routines, kindness
Share stories at meals
Friends
Fun, distraction, encouragement
Invite them to learn with you
In-person Support Groups
Peer advice, sense of belonging
Ask your doctor’s office
Online Communities
Tips, emotional support, privacy
Search forums and Facebook
Tips for Talking About Your Brace:
Sometimes, the hardest part is telling others about your brace. Here’s how to make these conversations easier:
Keep it simple: Try, “It’s a brace for my back. It helps my spine stay strong,” if you want a quick answer.
Share what you want: It’s always up to you what details to share. You can say, “I’m still getting used to it, but it’s part of my treatment.”
Answer with confidence: Remember, your brace is a medical tool, just like glasses or braces for teeth. Most people are curious, not judgmental.
Find your style: Express yourself with fun shirts, jewelry, or hairstyles you love. Personal style can help shift focus away from the brace itself—and show everyone you’re still you.
Encourage self-acceptance: Remind yourself every day that a brace won’t change who you are inside. Write notes or reminders you can see, like “Strong and Proud” or “I’m more than my brace.” You deserve to feel proud of your strength.
It can help to connect with others who wear a brace, especially on those rough days. Shared experiences and new friendships make the journey easier. Over time, you’ll discover that your brace doesn’t define you—it supports you. Your confidence will grow as you focus on what you can do, not just what you wear.
Sticking With the Treatment Plan
Wearing a scoliosis brace is a big commitment, but following your treatment plan brings the best results. It’s not just about the hours in the brace. It’s also about regular check-ins, seeing progress, and building habits that support your spine health. Small daily choices and a few smart tricks can help you stick with your schedule and feel proud of what you’re achieving.
Creating a Wear-Time Tracking Habit
Hitting your daily brace goals starts with knowing exactly how long you have it on. Keeping track helps you stay honest, spot small wins, and notice trends. Everyone has their own style, so use the method that’s easiest for you.
Some popular ways to track brace wear time:
Wear-Time Apps: Many braces now come with built-in sensors that sync with mobile apps for easy tracking. If yours doesn’t, try a timer or a simple app like Clockify, Streaks, or Habitica.
Printable Charts: Hang a chart in your room or on the fridge. Color in each hour you wear your brace to see progress at a glance. This creates a visual reward and can spark motivation.
Journals or Notebooks: Write down your daily wear hours, noting how you felt and any issues. This can also help you remember questions for your next appointment.
Reminders and Alarms: Use your phone or a smartwatch to set gentle reminders for when it’s time to put your brace on, or when you can take a break.
Here’s a quick look at the pros of each method:
Tracking Method
Stays Private
Easy to Update
Motivates Progress
Mobile App
Yes
Very easy
Yes, built-in badges
Chart/Visual
No
Easy
Yes: colorful cues
Journal/Notebook
Yes
Easy
Good for reflection
Reminders/Alarms
Yes
Auto-repeat
Keeps you on track
By finding a method you enjoy, you’ll build a steady routine and keep up with your treatment goals.
Using Reminders and Setting Yourself Up for Success
Life gets busy. Even with the best motivation, it’s easy to lose track of time or forget to put on your brace, especially at first. Building reminders into your day helps make brace wear part of your routine instead of a chore.
Here are some simple ways to set reminders:
Set phone alarms that repeat daily at brace “on” and “off” times.
Pair brace time with everyday tasks (put it on after brushing your teeth or before starting homework).
Ask family members to check in or remind you, especially in the beginning.
Put sticky notes in places where you’ll see them—on the bathroom mirror, fridge, or your bedroom door.
Leave your brace in a visible spot as a visual cue.
Making wear time predictable removes stress. When it becomes part of your rhythm, you free up mental space for more enjoyable things.
Attending Follow-Up Appointments
Appointments with your doctor or orthotist are just as important as wearing your brace. These check-ins make sure everything fits right and that your treatment is on the right path.
Key reasons to keep follow-up appointments:
Fit Adjustments: Growth, weight changes, or daily wear can shift how the brace sits. Minor tweaks keep it comfortable and effective.
Progress Checks: X-rays or physical exams help your team see if your curve is staying stable or improving.
Answering Questions: Bring a list of concerns or questions from your brace journal. Your team is there to help.
Spotting Problems Early: If a sore spot or discomfort pops up, early help keeps small issues from getting worse.
Don’t hesitate to speak up about any problems at appointments. Open communication is a sign you’re engaged in your own care.
Celebrating Small Wins and Progress
Adjusting to a brace takes patience, but every day you stick to your plan is a win. Celebrate each milestone, whether it’s a full week of hitting your wear-time goal, surviving a hot summer day, or making it through gym class with confidence.
Meaningful ways to celebrate:
Share your progress with family or close friends when you hit a new goal.
Treat yourself to a favorite snack, playlist, or short movie night for meeting wear-time targets.
Record achievements in your journal—“Wore my brace for 18 hours,” “No red spots today,” or “First time I wore it to a friend’s house.”
Make a “brace milestone” board with stickers, drawings, or notes for each accomplishment.
Small celebrations boost your motivation and remind you how far you’ve come. The journey might feel long, but each step counts.
Conclusion
Getting used to a scoliosis brace brings both physical and emotional changes, but each small step you take makes a difference. Remember the value of comfortable clothing, daily skin care, honest conversations, and steady routines. Support from loved ones and tracking your progress can lighten tough days and celebrate your wins.
Adjusting gets easier with time. Every hour you wear your brace helps your future health and shows real strength. Keep going, trust your process, and be proud of how far you have come.
Disclaimer:
OPSB products should be used under the guidance of a qualified healthcare professional. Individual results may vary. Please consult your pediatrician or orthopedic specialist for professional advice. This article is for informational purposes only and does not constitute medical advice. Always follow your doctor’s recommendations and instructions.
MAM-MM-126
https://family.opsb.com/wp-content/uploads/sites/2/2026/03/1X6A9009-scaled.jpg17072560mhoff/wp-content/uploads/sites/2/2026/03/family-resource-hub-logo.pngmhoff2026-03-06 14:04:392026-03-10 15:07:22Tips for Adjusting to a Scoliosis Brace
Scoliosis Surgery is necessary for some curves that despite non-operative care, continue to progress. The rate of progression is a concern for younger patients. Some curves above 50 degrees, can progress a degree per year. Meaning a 15 year old that presents with a 50 degree curve, if untreated, could be 80 degrees by age 45 – 50. Could be. This is why your physician watches the curve during growth and for a few years after to monitor progression.
Surgery can mean a better quality of life, but it also brings real questions for families. There are benefits, but there are also possible risks to think about. This post will explain what scoliosis surgery involves, what can help, and what to consider before making any decisions. Families can feel more prepared and confident as they learn about the next steps.
What Is Scoliosis Surgery?
Scoliosis surgery is a medical procedure designed to correct progressive curves in the spine. Doctors use surgery when the curve is large or continues to progress, even after other treatments like bracing or physical therapy. The surgical process not only aims to straighten the spine but also helps prevent the curve from continuing to progress. Understanding who needs scoliosis surgery, what kinds of operations are available, and what happens before, during, and after can make a big difference in planning for a child’s care.
Why Scoliosis Surgery Is Done
The main goal of scoliosis surgery is to stop the curve from getting worse and to straighten the spine as much as possible. This often helps improve how the body looks. The surgery also protects the lungs by making sure the spine does not squeeze these organs as the curve grows.
People may need scoliosis surgery if:
The spinal curve is greater than 45 to 50 degrees.
The curve keeps getting bigger, even with a quality brace.
The curve makes everyday life harder, or the person feels uncomfortable about body image.
Not every child or teen with scoliosis will need surgery. Doctors use X-rays and talk with families to help decide if surgery is the right step.
Types of Scoliosis Surgery
There are a few different types of scoliosis surgery, each with its own approach and benefits. The type chosen will depend on the person’s age, how much the spine is curved, and overall health. Your pediatric orthopedic surgeon will guide you and ensure you are making an informed decision.
Here are some common types:
Spinal Fusion: This is the most common type. Surgeons connect two or more bones in the spine with small rods and screws. Over time, these bones fuse together, keeping the spine straight.
Growing Rods: For younger children whose bones are still growing, doctors may use rods that can be lengthened as the child grows. This keeps the curve from getting worse while allowing the spine to keep growing.
Minimally Invasive Surgery: Some newer techniques use smaller cuts and special tools. This can mean a faster recovery time for some patients. Doctors decide if this method is possible based on the curve’s size and shape.
Here is a quick table to compare these procedures:
Procedure
Who It’s For
Key Benefit
Recovery Time
Spinal Fusion
Teens, Adults
Stops further curve
Moderate
Growing Rods
Young Children
Allows for growth
Regular adjustments
Minimally Invasive
Select Cases
Smaller scars, quicker recovery
Usually shorter
What Happens Before, During, and After Surgery
Knowing what to expect can help families feel more at ease as they plan for scoliosis surgery.
Before Surgery:
Doctors do physical exams and take X-rays or other scans.
The team may run blood tests and teach about what to expect in the hospital.
Patients and family meet with the surgeon and nurses to talk through the plan.
During Surgery:
The patient is put under general anesthesia (asleep and pain-free).
The surgeon makes one or more cuts along the spine, depending on the procedure.
Metal rods, screws, or wires are placed to hold the spine in a straighter position.
The bones are fused, or rods are placed for future lengthening.
After Surgery:
Most patients spend several days in the hospital, sometimes in a special recovery unit.
Nurses and physical therapists help with moving, sitting up, and walking.
Pain medicine helps with recovery in the first days.
Patients will learn specific ways to move to protect the healing spine.
The care team is there every step of the way, answering questions and helping families manage each stage. With patience and the right support, many kids and teens return to normal activities in a few months. Each hospital will review their protocol and answer any questions.
When Is Surgery Needed?
Doctors recommend scoliosis surgery when the spinal curve is large, continues to progress, or starts to cause clear problems for health and quality of life. Most decisions come after careful tracking of the curve. Understanding when surgery becomes necessary helps families make choices with confidence and avoid letting the condition limit what a child or teen can do.
Improvement in Spine Curvature
Surgery for scoliosis focuses on straightening the spine as much as possible. For many patients, surgeons can reduce a curve from 50 or 60 degrees down to 20 or even 15 degrees. A straighter spine usually means better balance, a more even shoulder or hip line, and a body shape that feels familiar again.
These changes are more than just cosmetic. A straightened spine can:
Improve posture: Standing up straight feels more natural, and slouching or leaning lessens.
Reduce rib bump or visible shoulder misalignment: Many children and teens feel more comfortable with how they look after surgery.
Think of the spine like the frame of a building. If it’s straight, the rest of the body sits right. When the spinal “frame” is corrected, muscles, joints, and even how clothes fit often improve too.
The Surgical Procedure
When preparing for scoliosis surgery, families often want to understand every step. Surgery is more than just a single event; it’s a process that unfolds in a series of careful and well-coordinated stages. Each part plays a unique role in helping the spine heal and setting up the patient for a stronger future. Below, you’ll find what really happens in the operating room and before and after, so you feel ready and informed.
Overview of Scoliosis Surgery
Scoliosis surgery involves straightening and supporting the spine with implants and sometimes fusing bones together. The goal is to keep the spine steady, prevent it from curving further. Most surgeries take several hours and use general anesthesia to keep the patient fully asleep and pain-free the whole time. The team includes a lead surgeon, anesthesiologist, nurses.
Techniques Used
Surgeons have different ways to fix the curve, and the technique chosen depends on age, spine flexibility, and curve size. Here are the most common methods:
Spinal Fusion: Connects vertebrae with rods and screws so they heal as one solid bone.
Growth Modulation: Uses special devices to guide spine growth in younger patients.
Expandable Rods: For younger children, rods that can be lengthened as the child grows.
The surgical team plans every step using 3D scans and X-rays. This planning keeps the procedure safe and targeted.
Spinal Fusion
Spinal fusion is the most common scoliosis surgery for teens and adults. The surgeon makes an incision along the back to reach the spine. Rods are placed along the curve and attached to the bones with screws or hooks. The surgeon then uses small pieces of bone (taken from the patient or a donor) to help the vertebrae fuse, or grow together. Over the next few months, these bones heal into a single, solid structure.
Key points about spinal fusion:
Stabilizes the curve and stops it from progressing
Aligns the spine to a straighter position
The rods usually stay in place for life; they give support while bones fuse and help the spine hold its new shape. Newer materials, such as titanium, are strong but lightweight.
Growth Modulation
Growth modulation is used for children who are still growing but can’t have a full spinal fusion yet. Here, surgeons attach small devices to one side of the spine to slow growth on that side while letting the other side continue. Over time, this method guides the curve to straighten as the child gets taller. Growth modulation often avoids stiffening the entire spine, which helps preserve movement.
These procedures include:
Vertebral Body Tethering (VBT): A strong cord is attached to the side of the curve. The tightness of the cord controls how the spine straightens as the child grows.
Expandable Rods: Inserted parallel to the spine and lengthened every few months as the child grows, using a simple outpatient procedure or sometimes by remote control.
Benefits include:
Preserved movement, especially in the lower back
More natural growth
Less impact on daily bending and twisting
Pre-Surgery Preparations
Getting ready for scoliosis surgery starts weeks before the actual procedure. Preparation helps the body heal afterwards and lowers the risk of problems. Surgeons and nurses guide families through each step, answering questions and offering clear advice.
Main steps for preparation:
Health Checks: Doctors check the heart, lungs, and blood to be sure the patient is ready. Extra tests, such as chest X-rays or breathing tests, may be done for those with severe curves.
Education: The care team reviews what will happen during and after surgery. Families learn how to help with recovery, manage pain, and spot any warning signs at home.
Medication Review: Certain medicines need to be stopped a week or two before surgery, especially anything that makes bleeding more likely.
Preoperative Appointments: You may meet with a physical therapist, anesthesia provider, and lab staff all in one day.
Nutrition and Wellness: Eating well and boosting physical strength make recovery easier. Sometimes, a nutritionist is part of the team.
Many hospitals offer a tour of the surgical unit and patient rooms to help lower nerves. Preparing both mind and body is key. With support from the care team, families walk into surgery day ready and confident.
Risks and Potential Complications of Surgery
Before deciding on scoliosis surgery, it’s important to look at both the benefits and the possible risks. Every surgery comes with a certain level of risk, and knowing what could happen helps families prepare and make informed choices. Some risks are temporary and appear soon after surgery. Others might show up months or even years later. Here, we break down both the short-term and long-term concerns patients and families should keep in mind. Always consult with your surgeon and medical team about the risks before considering any surgery for your child.
Short-Term Surgical Risks
Complications may occur within the first days to weeks after the operation. The care team watches closely for any signs of trouble so they can act right away if something doesn’t seem right.
Here are some short-term risks to consider and your surgical team will review with you:
Complications During Surgery
Infection
Bleeding
Pain Management
Nerve Injury
Taking steps before and during surgery (like using antibiotics, careful surgical technique, and patient monitoring) helps reduce these risks. If a complication arises, the healthcare team has a plan to respond, so issues can be caught and treated early.
Long-Term Risks and Need for Further Treatment
Some problems do not show up right away but instead cause issues months or even years later. These long-term risks can affect how well the spine works, how comfortable the patient feels, or whether another surgery is ever needed.
Possible long-term concerns include:
Hardware Complications
Infection Around the Hardware
Limited Flexibility
Curve Progression or Loss of Correction
Nerve or Spinal Cord Problems
Need for Revision Surgery
Staying active, going to all check-ups, and following care instructions helps lower the risk of long-term issues. The surgeon will explain what to watch for at home and when to call if something doesn’t feel right.
What to Consider Before Surgery
Choosing scoliosis surgery is a big decision for kids, teens, and families. It is not just about correcting the spine but about how life will look during and after recovery. Before deciding on surgery, families should think about several important factors. Each family is unique, so the right choice depends on a mix of health, goals, and support.
Age and Stage of Growth
Age plays a large role in both the timing and the type of surgery.
Doctors check growth plates with X-rays and use a child’s height history to estimate how much more growing remains.
Younger children may need special rods, called growing rods, if they still have years of growth ahead.
Teens often get spinal fusion since their growth is slowing or done.
Surgeons want to time surgery to protect both growth and the spine’s shape. Waiting too long can let the curve get much worse, but going too soon can create other needs, like future rod adjustments.
Severity of the Spinal Curve
The size and shape of the curve guide every treatment decision. Curves greater than 40 to 50 degrees usually need close watching, since they can keep growing and may lead to bigger problems.
Mild to moderate curves may be managed with physical therapy or braces and do not always require surgery.
Severe or fast-growing curves put the lungs, heart, and nerves at risk and often lead doctors to recommend surgery.
When discussing surgery, families can ask how much the curve has changed and what may happen if they wait. Seeing X-rays over time helps everyone see the bigger picture.
Overall Health and Other Medical Conditions
Health outside the spine matters, too. Some health conditions can affect both surgery and healing.
Heart or lung problems may change what kind of anesthesia or care is safest.
Other illnesses (like diabetes or immune problems) can increase recovery time or risk of infection.
A comprehensive physical exam may be required prior to surgery.
Honest talks about medical history help doctors plan each step. Families should mention allergies, asthma, or any recent illnesses to the care team.
Recovery Time and Daily Life
Scoliosis surgery leads to weeks of healing and gradual return to normal activity. It is smart to picture how this will fit school, sports, family events, and other commitments.
Most patients stay in the hospital for several days after surgery, with a few months before feeling fully back to normal.
Some sports may need to pause longer, especially those that stress the spine (like gymnastics or football).
Kids and teens often need extra support at home and school, including help carrying bags or extra time during class transitions.
Families should talk through time off from school, arranging for tutoring, or support during early recovery. Clear plans reduce stress and make healing smoother.
Lifestyle Goals and Future Activities
Every child or teen has unique dreams and goals. For some, playing sports, dancing, or outdoor activities are top priorities. Others hope for comfort or relief from pain, especially during daily tasks.
Growth-friendly surgeries keep options more open but often need more trips back for rod lengthening.
Surgeons explain what each type of procedure means for flexibility and activity so families can plan for the life they want after healing.
Conversations and Questions With the Medical Team
Don’t go through decision-making alone. Bring questions to every doctor’s visit. Write down concerns as they come up. The care team has helped many families in your shoes and knows what to expect.
Important topics to discuss include:
The surgeon’s experience with your child’s type of curve
Which surgery options make sense and why
Expected recovery milestones and how to manage pain
What to do if problems come up at home
Resources for emotional support and connecting with other families
Doctors, nurses, and therapists can share stories, connect you with resources, and answer “what if” questions to calm nerves. Open conversations build steady trust and help families make choices with confidence.
Quick Checklist for Families
To help keep decisions clear, many families find it useful to use a checklist before giving surgery the green light:
Has the curve been progressing even with bracing or other treatments?
Is the current curve’s rate of progression putting health, breathing, or comfort at risk?
Have all doctors involved (pediatrician, surgeon, specialists) reviewed the care plan?
Do we understand the recovery needs and have support ready at home and school?
Have we asked all our questions about the risks and benefits of surgery?
Are we clear about the type of surgery and how it fits with future goals?
Taking time to weigh each of these points can turn a big, stressful choice into one that feels informed and right for your family. Scoliosis surgery is a partnership between families and a skilled medical team. When everyone understands the plan, the road forward feels easier to travel.
Living After Scoliosis Surgery
Recovering from scoliosis surgery can feel like starting a new chapter. Families often worry about what comes next. The journey doesn’t end after leaving the hospital; it is just the start of building a stronger future. Life after surgery includes recovery at home, checkups, and returning to familiar routines. With patience and support, most children, teens, and adults settle back into daily life and new adventures.
Recovery and Physical Therapy
The first days after surgery usually involve resting at the hospital and learning how to move safely. Hospital staff show families how to help with small tasks. Once home, rest plays a big part in healing for the first few weeks.
Physical therapy starts about two to six weeks after surgery, depending on how the body heals. Therapists teach gentle exercises to keep muscles healthy and improve motion. Early focus is on simple stretches and safe walking. Later, therapy may include:
Strength training for the legs and core muscles
Balance exercises to build confidence
Special moves to return to sports or dance
Therapists often send home printed guides or videos, so patients can practice at their own pace when ready.
Follow-Up Appointments
Regular checkups help catch any problems and track healing. The schedule for these visits might look like this:
About 2 weeks after surgery: The surgeon checks the incision, removes stitches if needed, and answers questions.
Every 4-6 months after: X-rays or scans show how the spine and hardware are settling in place.
6 months and 1 year after: Doctors measure range of motion and strength, then make sure pain is under control.
Families should keep a list of questions or concerns for each visit. These appointments are a chance to mention new aches, trouble moving, or any issues at home.
Returning to School or Work
Many students head back to school about 4-6 weeks after surgery, while adults might plan their return to work with their doctor. The first days can feel tiring, so schools often help with:
Extra time between classes or a lighter backpack
Permission to leave class early to avoid crowded halls
Adjusted gym or sports rules
Adults may start part-time or work from home when possible. Most jobs that involve sitting can resume within a few weeks, but work that involves heavy lifting or lots of bending may need a longer break.
Activities and Lifestyle Changes
Getting active again is important for both mood and health. The timing for returning to favorite activities depends on the type of surgery and how well the bones heal. Check with your surgeon for their recommended protocol. Activities are unique to each person. Most doctors suggest:
Walking every day as the main early exercise
Waiting three months or more before restarting sports with high movement, like basketball or gymnastics
Avoiding contact sports for six months or longer
Skipping activities that stress or twist the spine until the doctor says it is safe
Swimming, biking, and light chores around the house are usually safe within a few months. In time, many people return to the same hobbies or sports they enjoyed before surgery, just with a little more care at first.
Possible Need for Ongoing Care
Life after scoliosis surgery sometimes includes extra support. Some patients need ongoing physical therapy or special equipment for comfort. Regular checkups remain important, especially during the first year.
A few signs that may need more medical attention include:
New or severe pain that doesn’t get better
Losing feeling or strength in the legs
Redness, swelling, or leaking fluid from the incision site
The doctor will explain what’s normal and what should prompt a call or visit. Most issues are minor and improve with the right care.
For those who had rods placed at a young age, follow-up surgeries to lengthen or adjust hardware may be needed. The medical team will explain the timing and steps involved if this applies.
Building Confidence and Independence
It is common to feel nervous or unsure during recovery. Small wins help rebuild confidence, like sitting up alone, walking the hall, or going outside for the first time. Family, friends, and school staff play a big part in cheering on progress and providing practical help.
Celebrating each milestone—no matter how small—teaches the importance of patience and strength. By staying positive and following care instructions, most people find that life after scoliosis surgery means more freedom, less pain, and a wider world of possibility.
Scoliosis Surgery Before and After
Scoliosis surgery brings change that many families hope for and often worry about at the same time. Understanding what happens before and after surgery helps set realistic expectations and supports better preparation. By looking at both the physical and emotional sides, families can picture the journey more clearly.
What to Expect Before Surgery
Preparing for scoliosis surgery involves more than just medical steps. It is a time of learning, planning, and building support.
Appointments and Tests: Doctors use X-rays, blood work, and checkups to plan the surgery. These visits help spot hidden health issues and answer last-minute questions.
Home Planning: Many families prepare the home with supplies like shower chairs, extra pillows, and easy meals.
School and Work Prep: Teachers and employers need to know about the time off. Kids may set up remote learning or extra help as they recover.
Emotional Support: Talking through fears eases anxiety for both patients and families. Nurses or social workers often suggest relaxation tips or connect parents with others who have gone through the same experience.
Being organized and open about needs often leads to fewer surprises on surgery day.
Immediate Changes After Surgery
The first days and weeks after surgery look different for every patient, but most can expect these key changes:
Physical Feeling: Soreness is common, especially around the incision site. The back may feel stiff, but pain medicine helps.
Activity: Movement starts slowly. At first, patients may need help sitting up or walking. Therapists teach safe ways to roll, get in and out of bed, and stand up.
Visible Results: The spine appears straighter right away. Shoulders, hips, and waist often look more even.
Emotional Impact: Relief mixes with nerves as patients notice the difference in their bodies. Some feel pride, while others need time to adjust.
Family support and a team of doctors, nurses, and therapists make each milestone easier to reach.
Long-Term Results and Improvements
As healing continues, most people see big changes in both health and confidence. Over time, the body and mind adjust to life after scoliosis surgery.
Benefits often reported include:
Lasting Pain Relief: Many patients say back pain gets much better or disappears months after surgery.
Better Posture: Standing taller and straighter becomes easier.
Stronger Self-Esteem: Feeling comfortable in their own skin and seeing a balanced reflection in the mirror boosts mood and confidence.
More Activity Freedom: Sports, dance, and other hobbies often come back into reach as strength builds.
Some patients need more time or extra care, especially if hardware has to be adjusted later. Most, though, return to school, work, and favorite activities within months.
Patient Stories and Testimonials
Hearing from real people helps turn facts into hope. Here are a few shared experiences from those who went through scoliosis surgery:
Sarah, age 15: “Before my surgery, I couldn’t stand as long as my friends and felt shy about my back in gym class. Six months after surgery, I was back playing soccer. My back feels strong, and I love how my clothes fit now.”
Jordan, age 12: “The hardest part was being in the hospital for a week, but everyone supported me. My back used to hurt all the time, and now I can finally walk to school without pain.”
Elena, parent: “Our biggest worry was recovery. The team worked with us, and by three months, my daughter was dancing again. She even says she feels taller!”
These stories remind us that while recovery takes time and patience, the rewards often reach beyond the physical. Families find new strength and children gain the chance to enjoy more of childhood.
Comparing Before and After Results
To offer a clear snapshot, here is a simple table showing the changes many patients notice:
What Changes?
Before Surgery
After Surgery
Spine Shape
Curved, uneven shoulders/hips
Straighter, more balanced
Daily Activities
Limited by pain/stiffness
Easier movement, less pain
Physical Appearance
Visible curve, uneven back
Smoother back, better posture
Energy Levels
Fatigue with activity
More stamina and comfort
Confidence/Self-Image
Worry about looks/teasing
Higher confidence, proud
Not every outcome looks the same, but most people find real improvement in how they look, feel, and move.
Little steps add up, and each positive shift during recovery proves just how strong kids, teens, and families can be. Scoliosis surgery often marks a true turning point—a real chance for a better, more active life.
Conclusion
Scoliosis surgery offers the chance for a straighter spine and stops curve progression. It can make daily life easier and help many kids and teens feel more like themselves both inside and out. At the same time, surgery comes with risks like infection, hardware problems, and changes in how the back moves. These are low risks that your surgeon will discuss with you.
The best decisions come from honest talks with doctors about all treatment options. Taking time to understand both the benefits and risks helps families move forward with confidence. Remember, you are not alone on this journey. Support, facts, and trust can make a big difference at every step. Thank you for reading, and please share your thoughts or your story if you wish, your experience matters to others facing the same path.
Disclaimer:
OPSB products should be used under the guidance of a qualified healthcare professional. Individual results may vary. Please consult your pediatrician or orthopedic specialist for professional advice. This article is for informational purposes only and does not constitute medical advice. Always follow your doctor’s recommendations and instructions.
MAM-MM-123
https://family.opsb.com/wp-content/uploads/sites/2/2026/03/12.png13501080mhoff/wp-content/uploads/sites/2/2026/03/family-resource-hub-logo.pngmhoff2026-03-05 23:31:252026-03-27 17:16:09Scoliosis Surgery: Benefits, Risks, and What Families Need to Know
Hearing the word “clubfoot” from your child’s doctor can feel overwhelming, but you’re not alone. Clubfoot is a foot condition present at birth. It causes the foot to turn inward or downward, and it affects about 1 in every 1,000 babies. With the right care, most children treated early grow up to walk and play just like other kids.
Spotting clubfoot early helps your child get the care they need. In this post, you’ll find clear signs to watch for, learn how doctors confirm clubfoot, and see what happens during that first appointment. Knowing what to expect can ease worries and help you feel ready for what comes next.
What Is Clubfoot?
Clubfoot is a medical term for a foot that is twisted out of shape or position. It was not caused by anything the mother is not simply because the foot was squished. At birth, a baby with clubfoot has a foot that turns sharply inward or even points down. Even though it looks uncomfortable, most babies with clubfoot do not feel pain because they have never walked on it. Clubfoot is one of the most common foot problems seen in newborns and can affect one or both feet.
Clubfoot Basics
Clubfoot can be easy to spot. The main thing you notice is the foot’s unusual shape. The foot may seem like it is twisted so the bottom faces sideways or up, instead of downward. Often, the calf muscles on the affected leg are smaller compared to the other side. Parents should know that clubfoot is a physical condition; it is not a sign of any problem with intelligence or mood.
There are a few key points about clubfoot:
Present at birth: Most cases are found right after a baby is born, though doctors sometimes see them during pregnancy on ultrasound.
More common in boys: Boys are twice as likely as girls to have clubfoot.
Can run in families: Sometimes, more than one person in a family has clubfoot.
Types of Clubfoot
Doctors use the word “clubfoot” to describe several related shapes that feet can take. Clubfoot usually falls into two types:
Isolated (idiopathic) clubfoot: This is the most common form, where the foot alone is affected, and the child is otherwise healthy.
Atypical clubfoot: A less common and more severe form of clubfoot, where the foot is stiffer and more difficult to correct, often needing extra care during treatment.
Syndromic clubfoot: Here, the clubfoot happens along with other health problems or genetic conditions.
Knowing the difference helps doctors guide treatment right from the start.
What Causes Clubfoot?
Doctors do not know exactly why clubfoot develops, but they believe both genetics and environment matter. If someone in the family has clubfoot, chances go up.
Several factors linked to clubfoot include:
Family history (others in the family had it)
Babies with certain genetic conditions
Most of the time, though, clubfoot happens with no known cause. It is nobody’s fault.
How Idiopathic Clubfoot Looks
Spotting idiopathic clubfoot is pretty clear when you know the signs. Here’s what parents and doctors notice most:
The foot curves inward, downward, or both
The heel points upward while the toes turn down
The foot may look shorter or smaller than normal
The calf muscles can appear thinner or underdeveloped
This table shows some main features and how they appear in clubfoot:
Feature
How It Appears
Foot Direction
Inward and/or downward twist
Heel Position
Upward or tilted
Arch Shape
High arch, or even no arch
Calf Size
Smaller on the affected side
It is important to remember that clubfoot itself can look dramatic, but children with this condition often go on to live active lives once treated.
Common Symptoms of Idiopathic Clubfoot in Newborns
When a baby is born with clubfoot, the signs usually stand out during the first checkup. Parents often see the shape and direction of the foot is not like other babies. Understanding these symptoms helps families spot clubfoot early, which is key for starting care. Here are the most common symptoms you might notice from day one.
Unusual Foot Shape
Clubfoot is known for its unusual foot shape. The foot may turn sharply inward, downward, or both. Sometimes, the foot curves so much that the bottom faces sideways or even up. This twist is firm and does not move back to a normal position when you try to gently straighten it.
The front of the foot often turns in toward the other leg.
The heel points up instead of down.
The foot may seem shorter or smaller than the other foot.
Rigid Position
Babies with clubfoot often have a foot that feels tight or stiff. You cannot easily move or stretch the foot into a normal position with your hands. Even when you try, the foot snaps back to its twisted shape. This tightness is because the tendons and muscles on one side of the foot are shorter and tighter.
Calf Muscle Difference
Another clear sign of clubfoot is that the calf muscle on the affected leg is thinner. You might see one calf looks slimmer or less filled out. This is not painful for the baby, but it shows that the leg muscles did not grow the same way during pregnancy.
Shorter Leg or Foot
Parents or doctors sometimes see a mild difference in leg length. The affected leg or foot can be a bit shorter. This happens because clubfoot limits how the bones and muscles grow. This does not need treatment and most of the time, this difference is small and only noticed during a close check.
Foot Skin Creases
There may be extra skin folds or deep creases on the bottom, the side of the foot, and/or over the heel. These lines appear because the skin folds over itself as the foot turns in. These creases often stay until the foot is treated.
Clubfoot Symptom Checklist
Quickly spotting the common symptoms helps start care right away. Here’s a simple checklist parents and doctors often use:
Inward and/or downward pointed foot
Foot appears short or small
Tightness or stiffness of the foot
Smaller calf muscle on one leg
Extra creases on the bottom, side of the foot, and/or back of the heel
Symptom Summary Table
This table helps you see the key clubfoot symptoms at a glance:
Symptom
What to Look For
Inward/Downward Foot
Foot curves in or points down
Rigid Position
Stiff, hard to straighten
Thin Calf Muscle
Slimmer calf on affected side
Shorter Foot/Leg
Foot or leg looks slightly shorter
Deep Skin Creases
Extra folds or lines on the foot
Knowing these symptoms gives parents and caregivers confidence to act fast and ask questions if they see any of these signs in a newborn’s feet. Trust your instincts and mention anything that does not look right during those first doctor visits.
How Clubfoot Is Diagnosed
Getting a clear diagnosis of clubfoot helps your child get the right care quickly. Doctors use a hands-on exam, careful questions, and sometimes special tests to confirm clubfoot. This process can start right after birth or, in some cases, even before your baby is born. Knowing what happens during diagnosis helps you feel more prepared for your first visit.
Physical Examination
Most of the time, doctors diagnose clubfoot by looking at and moving your baby’s feet. This exam is simple but important. The doctor looks at the shape and stiffness of the foot, how far it turns inward, and checks the skin and muscles.
During the exam, you may notice the doctor:
Pressing gently on the foot and ankle
Bending the foot to see if it moves easily or stays stiff
Comparing both feet and legs, even if only one looks affected
Looking for skin creases, foot size, and calf muscle difference
Doctors also ask about family history and how your pregnancy went. This helps them see if other health problems could affect treatment.
Prenatal Ultrasound
Sometimes, clubfoot is seen before birth during a routine pregnancy ultrasound. If your doctor saw something on an ultrasound picture, they might have mentioned it during your pregnancy.
Key things about prenatal ultrasound:
It may spot clubfoot as early as the second trimester.
The baby’s foot may appear turned in the images.
Ultrasound helps families plan for care ahead of time.
Not every ultrasound finds clubfoot. Some babies are only diagnosed during the first exam after birth, so parents should not worry if it was not mentioned earlier.
Imaging and Extra Tests
In most cases, doctors do not need more than a physical exam to confirm clubfoot. But sometimes, if they have questions or want more details, they use imaging tests.
X-rays: Can show foot bones and how much they are out of place. Rarely needed for basic cases, but helpful for complex clubfoot or older children.
Other tests: Blood tests or scans may be used if the doctor thinks another health issue is linked to clubfoot. These are not routine.
A table below shows the common tools used in clubfoot diagnosis:
Tool or Test
Used For
Common?
Physical Exam
Main diagnosis method
Always
Prenatal Ultrasound
Early detection before birth
Sometimes
X-ray
Details on bone position
Rarely
Other Scans
Check for related conditions
Rarely
Diagnosis Checklist: What Parents Can Expect
Most families want to know what will happen when the doctor checks for clubfoot. Here’s a short list of common steps:
Doctor reviews birth and family history
Careful exam of your baby’s feet and legs
Gentle stretching to test movement
Looking for typical clubfoot signs (shape, size, muscle)
This checkup is usually quick, gentle, and does not hurt your baby. The doctor will share what they see, explain the next steps, and answer your questions. Knowing what the diagnosis involves helps you feel more confident and less anxious about your child’s care.
What To Expect At Your First Appointment
The first appointment can feel like a big day for parents and their child. Walking into the clinic, you might have a mix of worries and hope. Knowing what will happen during this first visit helps you prepare and stay calm. The care team is there to answer your questions and guide you every step of the way.
Meeting the Care Team
You will likely meet several people who work together for your child’s care. This team often includes:
A pediatric orthopedic doctor who treats bone and muscle issues
Nurses or physician assistants who help with exams and treatment
Sometimes a physical therapist who can explain how muscles and movement will improve
They will greet you, ask your baby’s name, and make sure you feel welcome. The team wants you to know you are not alone and they have helped many families through this before.
A Careful Examination
Next, the doctor will examine your baby’s feet and legs. This part of the appointment is gentle but thorough. The doctor may do the following:
Watch how your baby moves the feet and toes
Gently press, stretch, and move the foot to test its range of motion
Check the shape of the foot, ankle, and calf
Compare both legs, even if only one is affected
If you have seen any new changes or signs at home, share them. The doctor will also ask about your pregnancy, any family history of clubfoot, and how your baby is doing overall.
Talking Through Symptoms and Findings
Once the exam is done, the doctor explains what they see. They will use simple words and avoid medical jargon. You should expect to hear:
What clubfoot is and how it affects your child
Which type your baby has (if it’s isolated or part of a syndrome)
How stiff or flexible the foot is
Doctors understand these words can sound new. Do not be afraid to ask for plain explanations, or repeat what you hear to be sure you understand.
Reviewing the Diagnosis
The doctor will talk about the diagnosis clearly and address your concerns. If there is any doubt, or if extra testing is needed (like an X-ray), the doctor will explain why. Often, diagnosis is based mainly on what they see and feel during the exam.
Sometimes you may hear the words “mild,” “typical,” or “complex” to describe the clubfoot. The doctor may jot down notes or use drawings to help you see what’s going on inside your child’s foot.
Plan for Next Steps
By the end of your first visit, the team will outline what happens next. Most doctors use a step-by-step approach so you know what to expect. You might be told about:
Beginning gentle stretching and casting treatment right away
How many visits are needed for treatment
What you need to watch for at home
When you will see the team again
Many parents leave with printed handouts, web links, or phone numbers for more questions. You will not leave empty-handed.
Helpful Things to Bring
To make the most of your child’s first appointment, certain items or information can help:
Any records from your pregnancy or early ultrasounds
A list of your questions or concerns
Something to comfort your baby, like a blanket or pacifier
A notebook or phone for taking notes
Another adult as a second set of ears to listen to the doctor while you are caring for your baby.
Here is a quick checklist for parents getting ready for the first clubfoot visit:
Bring your baby’s health records or ultrasound reports
Write down questions you want to ask
Have a comfort item handy for your baby
Plan to arrive a bit early in case there is paperwork
Preparing ahead takes the stress out of a new experience. Doctors and nurses know this is a lot to take in and will give you clear answers, so you leave the appointment knowing what comes next for your child’s clubfoot care.
Treatment Options Following Diagnosis
Once the doctor confirms a clubfoot diagnosis, the next step is to start treatment as soon as possible. Early action gives your child the best chance for strong, flexible feet and a normal life. Clubfoot treatments have improved greatly, with most children growing up to walk, run, and play just like their friends. Understanding what comes next will help you feel prepared and hopeful.
The Ponseti Method
The Ponseti method is the most common and recommended treatment for clubfoot. Doctors across the world trust this gentle approach because it works well and uses careful hands instead of surgery for better outcomes.
Here is what the Ponseti method includes:
Gentle stretching and casting: The doctor will move your baby’s foot a little closer to the right position and place it in a cast to hold it there. This cast usually stays on for 5 to 7 days.
Weekly cast changes: Each week, your child gets a new cast. The foot moves closer to a natural shape with each one.
Over several weeks: Most treatments use five to eight casts. The number depends on how stiff the foot is and how much it needs to move.
After the final cast, most babies need a small procedure called a tenotomy, where the doctor uses a tiny cut to release a tight tendon at the heel. This simple step helps the foot move up and down better. The doctor usually does this with local numbing medicine, sometimes light sedation, and it heals quickly.
Bracing Phase
Once the foot is in a better position, it is important to keep it from turning back. That is where bracing comes in. Babies wear a special brace called a “boots-and-bar” (BnB), your clinician may refer to it as a Foot Ankle Brace (FAB), for several months all day, then only at night for a few years. This keeps the foot straight as your child grows.
Some key points about bracing:
Early stage: Worn most 23 hours a day for the first 3 months after casting.
Later stage: Worn at night and naps for a period of years, sometimes until age 4 or 5.
Wearing the brace is not painful, but your child may need time to adjust. Parents often find that sticking to the bracing plan is one of the most important parts of long-term success.
Physical Therapy and Home Stretching
Some doctors will show you gentle stretching exercises to do at home, especially if the foot is very stiff or if treatment starts a little later than usual. Physical therapy may help improve strength and keep the foot flexible. Parents take an active role by helping with these stretches each day.
Surgery
Most children with clubfoot do not need major surgery. However, if the foot does not straighten fully with casting and bracing, doctors may discuss surgical options. Surgery can help release or lengthen tight tendons and joints. The goal is to make the foot as straight and flexible as possible for walking and playing.
Surgery is less common now than it was years ago, thanks to better results with the Ponseti method. If surgery comes up, your care team will explain every step and answer your questions.
Clubfoot Treatment Table
This table gives a quick look at common clubfoot treatments and what each involves:
Treatment Step
What Happens
How Long
Ponseti Casting
Gentle stretching, weekly casts
5-8 weeks
Tenotomy
Small heel tendon release (simple procedure)
Once, after last cast
Bracing (Boots-Bar)
Special shoes and bar to hold foot straight
3 months full-time, then nightly for several years
Physical Therapy
Home stretches and exercises
Varies, some cases only
Surgery
Correction of tight parts (rare)
One-time, if needed
What Parents Can Expect During Treatment
Treatment for clubfoot is a team effort. Doctors, clinicians, and parents work together to guide your child week by week. Every visit brings progress, and parents play a big role in bracing and exercises at home.
Support is always available. Your care team knows this time can feel new and stressful, but they have seen many families walk a similar path. Asking questions, sharing concerns, and learning how to care for your child’s feet helps make each step easier. Every week of treatment brings your child closer to healthy, happy steps in the future.
Conclusion
Clubfoot may feel scary at first, but it is treatable and most kids go on to walk, run, and play just like anyone else. Early diagnosis, caring medical professionals, and the support of family make a strong difference in each child’s progress. Acting early can mean easier treatment and fewer worries over time.
Parents play a key role by asking questions, sharing concerns, and making sure their child gets the right care. If you notice anything unusual with your baby’s feet, trust your instincts and reach out to your doctor. You are not alone on this journey.
Disclaimer:
OPSB products should be used under the guidance of a qualified healthcare professional. Individual results may vary. Please consult your pediatrician or orthopedic specialist for professional advice. This article is for informational purposes only and does not constitute medical advice. Always follow your doctor’s recommendations and instructions.
IAM-MM-048
https://family.opsb.com/wp-content/uploads/sites/2/2026/02/Picture4.png219263mhoff/wp-content/uploads/sites/2/2026/03/family-resource-hub-logo.pngmhoff2026-02-24 23:50:472026-02-25 20:23:21Clubfoot Symptoms and Diagnosis: What Parents Can Expect at the First Visit
Worried about a foot that looks turned in at birth? Clubfoot means a baby’s foot points inward and downward from birth, and it is common and treatable. It is not your fault, and with early care most children walk, run, and play without limits.
Clubfoot is often found during a routine prenatal ultrasound, usually around the second trimester. If it is not seen before birth, your pediatrician or a pediatric orthopedist can diagnose it at the newborn exam. Sometimes only one foot is affected, sometimes both.
Early diagnosis leads to better outcomes, especially with the Ponseti method. This gentle approach uses a series of casts, a small outpatient procedure on the Achilles tendon in many cases, and bracing to guide the foot into a healthy position. Starting treatment in the first weeks sets kids up for strong, flexible feet.
This guide explains when clubfoot is usually diagnosed, how doctors confirm it, and what parents can expect next. You will learn who is involved, what tests are used, and the first steps after diagnosis. The goal is to ease worry with clear, practical facts.
If you are searching for clubfoot diagnosis for parents, you are in the right place. You will get plain answers you can trust, along with tips to prepare for appointments. Keep reading to feel ready, confident, and supported from day one.
When Can Clubfoot Be Diagnosed During Pregnancy?
Some cases are first seen on the mid-pregnancy ultrasound, usually around 18 to 22 weeks. Sonographers look at both feet during the anatomy scan and can spot a foot that points inward and downward. Detection rates are about 60 percent, which means some cases are missed until birth or flagged but later turn out normal. Early knowledge from early detection can help you plan care, but it is important to remember that if your child is diagnosed before or after birth, the time of diagnosis does not impact your child’s treatment or outcome.
The Role of Ultrasounds in Early Detection
During the standard anatomy scan, the sonographer reviews the baby head to toe. For the feet, they assess:
Foot shape and position: Is the sole facing inward and downward relative to the leg?
Alignment: Does the foot line up with the tibia and fibula?
Movement: Does the foot move freely or stay fixed in one direction?
If a view is unclear, your provider may schedule a follow-up scan in a week or two. Fetal position, low amniotic fluid, a wriggly baby, or later gestational age can hide the feet. This is common. Ultrasound is non-invasive, safe, and routine.
Helpful questions to ask during or after the scan:
Can you check the baby’s feet in a few different views?
Do the feet move normally today?
If the view is limited, when should we repeat the scan?
If clubfoot is suspected, can you note if one or both feet are affected?
False positives can occur, especially if the foot is pressed against the uterus. Your provider will look for consistent signs before making a likely diagnosis.
Other Prenatal Tests for Confirmation
If the initial scan suggests clubfoot and images are limited, your provider may consider:
3D ultrasound: Offers clearer foot contours. Helpful for counseling, not always required.
Fetal MRI: Rarely needed. Used when the view is very limited or other concerns exist.
Amniocentesis: Considered if there is a family history or other anomalies on ultrasound. It checks for genetic links. It carries a small miscarriage risk, so it is optional and not routine.
Most families do not need advanced testing. Ask about the pros and cons, what each result would change, and whether a pediatric orthopedist visit during pregnancy would help you prepare.
How Clubfoot Is Diagnosed After Birth
Clubfoot diagnosis at birth usually happens in the delivery room or nursery. Doctors look at the shape and flexibility of each foot, then decide if a specialist should see your baby. The process is quick, hands-on, and gentle. If clubfoot is suspected, you will get a referral to a pediatric orthopedist so treatment can start early.
The Newborn Physical Examination Process
Right after birth, your baby gets a routine head-to-toe exam. For the feet, the doctor will:
Gently move the foot in different directions to check flexibility.
Look for alignment: the foot pointing down and in, with the sole facing up.
Compare both feet and legs, then note any stiffness, skin creases, or asymmetry.
This bedside check is painless and takes just a few minutes. If the foot moves easily into a normal position, it may be positional and not true clubfoot. If it stays stiff or springs back, clubfoot is more likely.
Specialists often use the Pirani score, a simple 0 to 6 scale that grades six signs of severity. Higher scores mean a stiffer foot and help guide how many casts might be needed. Ask your provider to share the score in plain terms so you know what to expect.
Helpful steps for parents:
Mention any family history of clubfoot or foot issues.
Take clear photos of the feet in a relaxed position for your records.
If you feel unsure about the plan, ask for a second opinion from a pediatric orthopedist. That is common and welcome.
Advanced Imaging and Tests Post-Birth
Most babies do not need imaging right away. The exam alone is enough to start treatment. When needed, your team may use:
X-rays after a few weeks or months to confirm bone position once the tiny bones harden.
Ultrasound in very young infants to look at cartilage structures and/or soft tissues, like tendons and ligaments.
These tests confirm the diagnosis and help tailor the care plan, but they rarely delay casting. Your provider will explain each step and keep it simple. The goal is clear: start gentle correction early so your child has a strong, flexible foot.
Signs to Watch For and Next Steps After Diagnosis
Once clubfoot is on your radar, small details matter. You will not catch every sign at once, and that is okay. Look during diaper changes, bath time, and when your baby relaxes. What if your baby has mild symptoms? Pay attention anyway, then share what you see with your doctor.
Common Symptoms Parents Might Notice
Some signs are easy to spot. Others are subtle and appear during daily care.
Foot twisted inward and downward: The sole may face inward, and the toes point down.
Stiff foot: The foot does not flatten when you change a diaper or press gently.
Deep skin creases: Extra creases on the inside or back of the ankle.
Tight Achilles tendon: The heel does not touch the surface easily, and the foot resists lifting up.
Smaller calf on the affected side: The lower leg looks slimmer, and the foot may look shorter.
Limited movement: The foot springs back when you try to move it into a neutral position.
How is this different from temporary positioning issues? Positional feet feel soft, move into a normal position, and often improve in a few days. True clubfoot stays stiff and does not correct with gentle stretching.
Helpful tip: take clear photos or short videos in the same positions each week. Add notes about stiffness, skin marks from the brace or cast, or feeding and sleep changes. These details help your doctor fine-tune care.
What Happens Next: From Diagnosis to Treatment
After diagnosis, you will get a referral to a pediatric orthopedist. Most teams start the Ponseti method in the first weeks.
Serial casting: Weekly casts guide the foot into better alignment. Expect about 4 to 8 casts.
Achilles tenotomy: A quick outpatient procedure in many cases to release tightness of the Achilles tendon that allows the final correction of the downward appearance.
Bracing phase: A foot abduction brace holds the correction. Full time at first, then nap and night wear for several years.
Your role matters. Check toes for color and warmth after each cast, keep skin clean and dry, and report redness or swelling right away. Attend each follow-up. Small concerns today prevent bigger issues later.
Helpful resources: the Ponseti International website, your hospital’s orthopedic clinic, and parent support groups. Hearing from other families brings calm and practical tips.
You are not alone. With early care and steady follow-through, most kids walk, run, and play without limits.
Conclusion
Early answers calm fear. Most families first hear about clubfoot on the mid-pregnancy ultrasound, then confirm details after birth with a hands-on exam. From there, the path is clear. A trained pediatric orthopedist starts gentle serial casting, often follows with a small Achilles release, then protects the correction with bracing. Starting early, showing up for every visit, and keeping skin and toes checked lead to strong, flexible feet.
Use this guide to clubfoot diagnosis for new parents to plan next steps with confidence. Bring photos, ask about severity scores, and agree on a start date for casting. If imaging is suggested, learn what it adds and whether it changes the plan. Partner with your pediatrician and orthopedist, and keep notes between visits. Small details you share help the team tailor care.
Clubfoot is treatable, and informed parents lead to happy outcomes. Your child can walk, run, and play without limits. Thank you for reading and caring so deeply for your baby. If this guide helped, share your experience or questions in the comments to support the next family. For more parent-friendly insights on diagnosis, treatment, and daily care, follow along and stay connected.
Disclaimer:
OPSB products should be used under the guidance of a qualified healthcare professional. Individual results may vary. Please consult your pediatrician or orthopedic specialist for professional advice. This article is for informational purposes only and does not constitute medical advice. Always follow your doctor’s recommendations and instructions.
IAM-MM-047
https://family.opsb.com/wp-content/uploads/sites/2/2026/02/Screenshot-2025-10-16-142626.png881586mhoff/wp-content/uploads/sites/2/2026/03/family-resource-hub-logo.pngmhoff2026-02-24 23:34:472026-02-25 20:16:22A Parents Guide to Clubfoot Diagnosis: When and How
Naomi’s story shows the real experiences families face after a clubfoot diagnosis. What begins as uncertainty can quickly turn into hope and accomplishment, especially with the right care and support. If you’re a parent walking a similar path, or if you’re just seeking a story of determination, Naomi’s journey offers practical insight and encouragement for anyone dealing with clubfoot treatment.
Understanding Naomi’s Clubfoot Diagnosis and Early Concerns
When Naomi’s family learned about her clubfoot diagnosis, the initial reaction was filled with worry. Doctors often warn parents about possible mobility challenges. In Naomi’s case, they were told she might not be able to walk at all. That’s a heavy thing for any parent to hear. The uncertainty felt by Naomi’s mom, Lauren, is common, especially when facing a diagnosis that’s described as “tricky” or hard to predict.
Despite these early concerns, Naomi’s story took a hopeful turn. From the start, she seemed determined to prove expectations wrong. The idea that a child with clubfoot might never walk can feel overwhelming, but as Naomi’s journey reveals, these predictions are not set in stone. “Beating all the odds” became Naomi’s theme, as her family watched her make progress every step of the way.
One important lesson they learned was the value of taking things slow. When faced with a new diagnosis, it’s easy to feel pressure to figure everything out at once. Frustration, fear, and even guilt can creep in. But pushing yourself can lead to stress that doesn’t help. As Lauren shared, focusing on each day’s small steps can make the process feel lighter.
Emotional tips for parents facing a clubfoot diagnosis:
Stay calm and positive, even when the path feels difficult.
Focus on gradual progress, not perfection or rushing.
Seek support from medical specialists and families who’ve gone through similar experiences.
Early diagnosis and the right mindset matter. By breaking things down into simple, manageable tasks, parents can help their children—and themselves—move through the journey with less anxiety.
The Treatment Journey: From Casting to Bracing
Initial Treatment: Casting Phase
After Naomi’s clubfoot was diagnosed, her treatment started with casting. Serial casting is a well-known way to begin addressing clubfoot. It involves gently moving the foot into a better position and holding it there with a cast. This process is repeated over several weeks, slowly bringing the foot closer to a typical alignment.
In Naomi’s case, the casting phase lasted for several weeks. The timeline was clear and steady—casting first, then four weeks later she would move into wearing boots. This step-by-step plan set the stage for her progress.
For many families, this first phase is both hopeful and stressful. Seeing your child in casts can be stressful, but every week brings improvements, and those changes add up fast.
Transition to Boots (Bracing)
Four weeks after starting with casts, Naomi’s treatment shifted to boots and bar (BnB), sometimes known as bracing. Lauren mentioned working closely with OPSB (formerly Boston O&P) during this stage.
This bracing phase of treatment helps maintain the progress made during casting and is vital for long-term success. Once Naomi started using the boots, Lauren described the transition as “smooth sailing”.
That’s a powerful phrase for any parent who’s been through weeks of worry and adjustment. Smooth sailing means the routine became more predictable, and Naomi continued to improve.
Daily life with boots n bar brings its own set of habits. Consistency matters for the best results. Parents need to make sure boots n bar are worn as prescribed and watch for any signs of discomfort. Encouragement is key, as kids may not always love their braces at first.
Checklist for parents starting boot treatment:
Wear boots n bar as prescribed by your clinical team.
Monitor your child’s skin and comfort, especially in the first days.
Provide gentle encouragement for movement and play.
Keep routines consistent, making boots n bar use part of daily life.
While every child’s journey is unique, these steps can make boots n bar treatment smoother and more comfortable for both parent and child.
Naomi’s Progress: Beating the Odds and Mobility Achievements
Despite early concerns that Naomi might struggle to walk, she surprised everyone with her progress. Lauren pointed out that movement became the easy part for Naomi. She moved quickly and kept up with her peers, showing that the limitations once feared didn’t hold her back.
Now the focus has shifted to helping Naomi “do it on her own”—encouraging independence in walking and moving without constant assistance. This moment is huge for families dealing with clubfoot. The goal isn’t just for kids to walk, but to do so confidently in their own time.
Specialist support played a major part in Naomi’s journey. Teams like the Ksenia Major and other clinicians at OPSB, worked closely with Lauren to make sure each stage moved forward without trouble. Having this network matters, especially when each diagnosis brings its own challenges.
Lauren reminds us that progress looks different for every child. Some families see big leaps, while others make gradual strides. There’s no single timeline that fits all, and comparing your child’s path to another can add unnecessary pressure.
Motivational reminders for parents:
Celebrate small wins, no matter how minor they may seem.
Remember that every child moves at their own pace.
Avoid comparing your journey to someone else’s—focus on your own milestones instead.
Watching Naomi work so hard and eventually move so freely shows what’s possible with patience, support, and the right mindset.
Advice for Parents: Taking One Day at a Time
One of the strongest messages from Naomi’s story is the importance of patience and perspective. Clubfoot treatment is a process, not a sprint. Trying to “fix” everything at once can lead to stress and even sickness from worry.
Lauren encourages parents to “take it one day at a time.” This isn’t just a slogan; it’s practical advice. Managing the mental and emotional side of treatment is just as important as handling the physical aspects. Anxiety can weigh down parents, affecting the whole family.
Finding calm in the middle of uncertainty can feel hard, but it helps in the long run. Building a network of support—whether that’s family, friends, or a local support group—gives you a place to share worries and pick up new strategies. Taking breaks, even for a few minutes, can help reset your outlook.
Encouragement points to keep in mind:
Focus on today’s progress, not all the things that might happen later.
Lean on your family, friends, or others with similar experiences.
Steer clear of overthinking or letting fear about the future take over.
Every parent wants the best for their child. Staying present and calm helps you support your child’s journey in the most meaningful ways.
Final Thoughts on Naomi’s Journey and Support Systems
Naomi’s progress shows what’s possible when determination, expert care, and family love come together. It’s easy to get caught up in fear or uncertainty, but taking time to appreciate each step makes the journey more hopeful.
Families facing clubfoot treatment aren’t alone. Working closely with specialists, listening to your child, and celebrating each milestone can make all the difference. Naomi’s experience proves that beating the odds is not just possible—it can be a shared victory for the whole family.
Disclaimer:
OPSB products and products distributed by OrthoPediatrics Corp. should be used under the guidance of qualified healthcare professional. Individual results may vary. Please consult your pediatrician or orthopedic specialist for professional advice, including intended use, warnings, precautions, side effects and contraindications. This video is for informational purposes only and does not constitute medical advice. Always follow your doctor’s recommendations and instructions.
https://family.opsb.com/wp-content/uploads/sites/2/2026/02/thumb-6-scaled.jpg13502560mhoff/wp-content/uploads/sites/2/2026/03/family-resource-hub-logo.pngmhoff2026-02-23 21:28:102026-03-27 16:35:46Naomi’s Clubfoot Journey: Overcoming Challenges and Celebrating Progress
Every family’s path is different, especially when a child is born with medical challenges. But some stories stand out for the love, teamwork, and hope at their core. Debbie’s journey with spina bifida, her transformation after a major surgery, and her family’s experience with pediatric prosthetic experts at OPSB combine to offer guidance and hope for other families on a similar path.
Debbie’s Early Challenges with Spina Bifida
Debbie’s story began with her arrival into the world, bringing with it both joy and sudden, unexpected challenges. Debbie was born with spina bifida meningocele, a form of spina bifida where the spinal cord lining pushes out but is covered by skin. For her family, the first look at her legs was hard. She had a severe contracture in one leg—her foot bent up tight, pressing against her bottom at a 90-degree angle.
Her mom determined to give Debbie every chance, started the long process of . For two years, doctors and therapists tried to stretch and reshape her leg using a series of casts and braces. They saw some progress, with the angle improving to about 45 degrees, but time and time again, the tightness returned. Each time the casts came off, her leg would curl back.
This time was tough for both Debbie and her mom. Watching your child struggle, especially when therapy, orthopedic treatments, and bracing brings only a little relief, brings its own kind of heartache. Still, her family pushed on, always hoping for a breakthrough.
A Life-Changing Decision
After two years, Debbie’s mom stood at a crossroad. Would another year bring more progress, or would they need to try something new? Together with her doctors and the OPSB team, they made the hard decision: at age two, Debbie would have a knee disarticulation surgery. This meant removing her leg at the knee joint, but without cutting the bone. The hope was that, with a prosthetic limb, Debbie could finally find freedom and movement.
Decisions like these aren’t easy. The thought of amputation is frightening for any parent. But Debbie, and her family leaned into her trusted relationship with the OPSB team to answer questions about questions about life with a prosthesis, so they felt prepared, educated, and ready for this big change.
Life After Knee Disarticulation and Prosthetic Use
The impact of this decision was clear as Debbie recovered and began using her prosthesis. Shortly after surgery, her life looked very different. No longer held back by her contractures, Debbie accomplished something that once seemed out of reach: she took her first independent steps.
Seeing Debbie walk on her own for the first time was a turning point for her family. Her mom remembers the thrill clearly, saying, “That first day she took those steps, it was just amazing. So I knew I made the right choice at that point.”
Today, Debbie is a joyful child who plays, explores, and rarely slows down. With her new leg, she fits right in with her friends. She doesn’t let her prosthesis hold her back and rarely even thinks about it.
Trusted Support: The Role of the Pediatric Certified Prosthetist Orthotist
From the very start, Debbie and her family worked closely with Lauren, a pediatric Certified Prosthetist Orthotist (CPO) at OP Specialty Bracing. Lauren first met Debbie when she needed an Ankle Foot Orthosis (AFO) as an infant, and a KAFO (knee ankle foot orthosis) for her contractures. Over the years, Lauren became more than just a healthcare provider. She listened, offered ideas, and became a partner in Debbie’s progress.
Debbie’s mom shares, “We click, we just click. I don’t know how else to explain it. I feel comfortable and I feel like I can express my concerns… She really listens and goes above and beyond.” This trust made a difference every step of the way, especially when it came time to make life-changing decisions.
Today, clinic visits are a highlight for Debbie—the team has turned what could be a stressful experience into something positive. “She’s not scared to go. She loves coming here; it’s like a fun day trip for her,” her mom says.
The Collaborative Care Team and Support System
What makes Debbie’s story even stronger is the collaborative environment at OPSB and their connections with CHOP (Children’s Hospital of Philadelphia). Care at this clinic means more than just fitting a device It involves teamwork among doctors, therapists, prosthetists, orthopedic surgeons, rehab specialists, and, importantly, parents.
Having this network made a real difference. When Debbie’s family faced the decision about amputation, they could ask questions and talk with everyone involved. Krista, Debbi’s mom, was a key team member in advocating for her daughter. She worked closely with the CHOP and OPSB specialists to gather input from every corner, ensuring no voice was left out.
How Communication Builds Better Care
Open and regular communication made all the difference. Debbie’s mom could share daily observations about what was working and what wasn’t. This allowed the care team to brainstorm solutions and fine-tune Debbie’s braces and prostheses.
Key communication points included:
Families sharing daily challenges and successes
Team members brainstorming possible solutions
Coordination among doctors, therapists, and prosthetists
Making sure parents steer decisions about their child’s care
Lauren emphasizes, “Parents know best.” Healthcare providers don’t make decisions for families. Instead, they give all the details, options, and support—so the family can choose what’s right for their child.
Debbie’s mom says this teamwork made her feel safe and confident. She never felt alone or unheard. “It’s like she knows what I’m thinking, with the braces and prostheses, she goes above and beyond… I know we’re in the right spot for her. I feel it in my gut.”
Advice and Insights for Other Parents
Walking this path means facing tough choices. Debbie’s story is a reminder for other parents to stay informed, ask questions, and trust their instincts.
Here’s some practical advice for any parent navigating medical decisions for their child:
Ask many questions. Don’t hesitate to seek details about your child’s diagnosis and all possible treatments.
Request clear explanations. Don’t settle for jargon—ask until you understand.
Expect real listening. Your concerns and ideas should be welcomed by the care team.
Gather input from everyone. Don’t just rely on one opinion—pull together insights from all the specialists involved.
The biggest message is to trust your gut and keep searching until you feel comfortable. Debbie’s mom stresses the value of finding a provider who feels like family: “She goes above and beyond… It’s just amazing and I’m so thankful that, first shot, we got you… I know we’re in the right spot for her.”
Choosing a prosthetist who listens and adapts makes the experience better for everyone. You should feel safe expressing anything on your mind.
The collective effort at OPSB doesn’t just support the child’s physical progress, but also builds confidence and relief for parents.
Final Thoughts on Debbie’s Journey and Words of Encouragement
Debbie’s family faced big hurdles: a diagnosis that shaped her first years, a contracture that restricted her movement, years of therapy, and then the big decision to try amputation. But with each challenge, they found a turning point—thanks in large part to teamwork among specialists, their own resolve, and the caring professionals at OPSB.
Today, Debbie is walking, running, and enjoying life as she should. Her independence and happiness are proof that, even when choices seem overwhelming, there’s hope for a better tomorrow.
For families just beginning their own journey, be encouraged: you are your child’s best advocate. The right team will listen, share ideas openly, and stand alongside you. Choose experts who treat you as partners—not just patients.
If you’re looking for knowledgeable, compassionate care, consider reaching out to OPSB clinics for resources and support tailored for families facing similar challenges. Your child’s story can have a happy chapter, just like Debbie’s.
Disclaimer:
OPSB products and products distributed by OrthoPediatrics Corp. should be used under the guidance of qualified healthcare professional. Individual results may vary. Please consult your pediatrician or orthopedic specialist for professional advice, including intended use, warnings, precautions, side effects and contraindications. This video is for informational purposes only and does not constitute medical advice. Always follow your doctor’s recommendations and instructions.
https://family.opsb.com/wp-content/uploads/sites/2/2026/02/Thumbnails-for-tutorial_00052.jpg10801920mhoff/wp-content/uploads/sites/2/2026/03/family-resource-hub-logo.pngmhoff2026-02-23 18:18:152026-03-27 16:38:23Debbie’s Prosthetic Journey: A Spina Bifida Success Story With OPSB
When you first hear that your child has an orthopedic condition like clubfoot, the world can feel like it flips upside down. Shock, fear, and uncertainty fill your mind. What comes next? Where do you turn for the right help? In this post, we share real experiences, practical advice, and helpful tips from Jacob Kodner, a parent who’s walked this road. You’ll find guidance for those first steps, building a support network, sifting through information without losing yourself, and making sure you have a plan that helps, not overwhelms, your family.
Understanding the Diagnosis: The First Steps
Hearing your child’s diagnosis can trigger a flood of questions. Many parents act quickly, looking for answers wherever they can find them. For Jacob and his wife, it was no different. Like a lot of parents, they went straight to Google right after learning their baby would be born with clubfoot.
Those first moments are filled with a need to know more; anything that will help calm those racing thoughts. Parents often start by looking for basic information to understand what’s ahead:
What does the diagnosis mean?
Finding answers early doesn’t just fill your head with facts, it also helps lower anxiety. As Jacob shared, “It was about getting a full picture of what clubfoot was and what our start with treatment would look like.”
But not all sources are the same. In those first days and weeks, parents should keep in mind that doctors and medical professionals are key partners. Use their guidance to shape your online research, so you aren’t drawn down the wrong path.
Connecting with Community: The Power of Support Networks
Very soon after starting their research, Jacob and his wife found a huge support system on social media, especially in Facebook groups. These communities connected them to other parents dealing with clubfoot. Within these groups, members freely shared their journeys, treatment choices, and what daily life looked like after a diagnosis.
You can expect to find all sorts of support in these spaces:
Parental advice on daily care
Jacob noted, “The Facebook groups helped us get a full picture of what clubfoot was and what we would be starting, from treatment to long-term care.” While parents were careful not to give direct medical instructions, their shared stories offered insight and comfort.
Of course, not every story or piece of advice will match your journey. Not all experiences are the same outcomes and differ based on many factors, including the type of treatment chosen or how severe the condition is.
When Support Feels Overwhelming
Sometimes the sheer volume of information and the range of struggles shared in these groups can feel intense, sometimes even scary. Jacob admits there were nights when he or his wife had to call a stop to their scrolling. The endless posts and “what-ifs” can paint pictures of everything that could go wrong, increasing anxiety, especially if your child’s treatment hasn’t even started yet.
As Maureen shared, this is a common experience. When you don’t yet know the severity of your child’s diagnosis or what your specific plan will look like, it’s easy to overthink and absorb the fears of others. Recognizing when this happens, and knowing how to pull back, is essential.
Managing Information Overload: Strategies to Stay Balanced
Jacob and his wife realized that while learning more empowered them, too much information at once became overwhelming. They found themselves deep in social media “rabbit holes,” sometimes lying awake long after bedtime, worries running wild.
Jacob described how they managed this:
“Luckily, we were really good about taking that information and pumping the brakes… maybe there was one night we’re lying in bed and she finds herself down that rabbit hole, and then I’d say ‘Okay, that’s enough for tonight,’ and vice versa.”
Setting clear boundaries became a tool to keep sanity and support each other. Here’s what worked for them:
Limit research time to certain hours
Finding that balance between feeling informed and keeping peace of mind is tricky. Jacob and his wife wanted to learn everything because they didn’t want to miss a detail. But reading about worst-case outcomes, especially before knowing what their own child would face, led to stress they didn’t need.
Most importantly, they learned that many stories online outline scenarios that may not apply to every family. Parents need to remember that while community advice is useful, your child’s experience will be unique.
Practical Advice for Finding Trusted Resources
Jacob’s story shows that finding the best resources means blending professional advice with community support, while always cross-checking what you discover. Here are Jacob’s top tips for other parents just starting their resource search:
1. Start with Your Child’s Doctor
Jacob strongly recommends speaking first with the doctor who gave the diagnosis. Doctors sometimes can recommend local specialists or provide informational materials. In Jacob’s case, his wife’s OB was new to the area and couldn’t immediately refer them to a pediatric orthopedic surgeon. When that happens, parents may need to look further.
2. Use Social Media and Online Platforms Wisely
Jacob and his wife turned to Instagram, Facebook, and Google. Online groups and pages can help answer urgent questions and provide emotional backup, but not all advice is equal. Compare what you find with what your doctor says before deciding on next steps.
3. Arrange Early Meetings with Specialists
Once the family identified a pediatric orthopedic surgeon, the doctor agreed to meet with them before their son was born. That face-to-face meeting lifted a huge weight from their shoulders. It allowed them to plan and feel informed, even if their son’s actual arrival didn’t go as planned.
4. Be Ready to Adjust Plans
Life surprised them: their son arrived early, and while they were out of state. The carefully laid plans were delayed, but because they had researched and prepared ahead, they felt equipped to deal with those changes.
Suggested Steps for Parents
Talk to your diagnosing doctor first.
Join trusted social media groups and read with a filter, not fear.
Follow orthopedic specialists or respected organizations for accurate updates.
Arrange a consultation with a pediatric orthopedic surgeon as early as possible.
Create a flexible game plan—know that not everything goes as scheduled.
Finding information before the baby’s birth helped Jacob and his wife to feel prepared, but they also understood that nothing replaces professional advice. When in doubt, loop in your care team.
Tips for Parents: Balancing Knowledge and Emotional Well-being
How do you protect your mental and emotional health while gathering everything your child needs? Here are a few tips inspired by Jacob’s journey and echoed by many parents:
Recognize information overload: When research starts to make you anxious or steals your sleep, that’s a signal to pause.
Lean on your partner or trusted friend: Set boundaries together. When one gets overwhelmed, the other can step in to call a timeout.
Remember: Your child is unique, their treatment will be unique, and your journey will be unique.
As Jacob said, “You just have to keep your finger on the pulse… be familiar and educate yourself with what can happen, but set up safeguards so you don’t go too far.”
Conclusion
No parent is ever truly prepared for a medical diagnosis, but you don’t have to face it alone. Start with your doctor, then connect with others who understand your feelings and needs. Stay curious but also kind to yourself. Find support in people and groups who lift you up and advice that equips you, not advice that scares you.
Balance is possible, even in stressful moments, you can find peace if you take one step at a time, trust your instincts, and remember that your efforts and love make all the difference.
Disclaimer:
OPSB products and products distributed by OrthoPediatrics Corp. should be used under the guidance of qualified healthcare professional. Individual results may vary. Please consult your pediatrician or orthopedic specialist for professional advice, including intended use, warnings, precautions, side effects and contraindications. This video is for informational purposes only and does not constitute medical advice. Always follow your doctor’s recommendations and instructions.
MAM-MM-111
https://family.opsb.com/wp-content/uploads/sites/2/2026/02/How-to-Find-Resources_00032.png10801920mhoff/wp-content/uploads/sites/2/2026/03/family-resource-hub-logo.pngmhoff2026-02-23 17:18:482026-03-27 16:41:59How to Find Resources After Your Child’s Diagnosis