OPSB Family Resource Hub
  • About
  • For Providers
  • Product Resources
  • Blogs
  • Find a Clinic
Search Search
  • Scoliosis
  • Clubfoot
  • Lower Limb
  • Hip Dysplasia
  • Plagiocephaly
  • Femur Fracture
  • Prosthetics & Limb Difference
  • Surgical Resources
  • Menu Menu

From Scoliosis Patient to Pediatric Orthotist: Sophia’s Story

Sophia still remembers the day her scoliosis journey began because it wasn’t in a doctor’s office, but at school.

It was a routine grade-school scoliosis screening with the school nurse. When she returned to class, she realized she was the only student holding a letter recommending a follow-up visit with her pediatrician. At the time, she didn’t fully understand what it meant. She just knew something was different.

Her pediatrician confirmed the nurse’s observations and referred her to Texas Scottish Rite Hospital. Even then, the diagnosis hadn’t fully sunk in. It wasn’t until she met with her orthotist for her evaluation that reality hit—she was going to wear a brace.

Looking back now, Sophia remembers feeling confused more than anything else. She didn’t yet understand scoliosis, bracing, or how much this experience would shape her future.

Learning to Live (and Sleep) in a Brace

Sophia was prescribed a nighttime scoliosis brace, meaning she only wore her brace while sleeping at home. While any type of scoliosis bracing can be challenging, nighttime wear allowed her to attend school and participate in extracurricular activities without her brace during the day which made a big emotional difference as a teen.

Once she adjusted to sleeping in her brace, it became routine. Eventually it even felt strange not to sleep in it.

She also learned early on that scoliosis treatment isn’t one-size-fits-all. Many factors determine whether a patient wears a brace full time or only at night, and for the right presentation, nighttime bracing can reduce the emotional burden that sometimes comes with daytime wear.

The Power of a Support System

Sophia credits her success in bracing to the people around her.

Her first line of support was her multidisciplinary care team, her pediatrician, orthopedist, radiologist, and orthotist who were all working together. To Sophia, great clinical care wasn’t about a single provider; it was about collaboration.

Her family played an equally critical role. They helped ensure she met her wear time, donned her brace correctly, and never missed an appointment.

And then there was her best friend who was diagnosed with scoliosis shortly after Sophia and prescribed a full-time brace. Having someone her own age who truly understood made all the difference. They joked that when they wore their braces, they had “abs of plastic.” That shared humor and relatability helped normalize what could have felt isolating.

A Career Sparked by Care

Although Sophia’s story begins with scoliosis, her path into orthotics wasn’t immediate. She always knew she wanted to work with people and with her hands, and she explored several career paths before discovering orthotics and prosthetics.

One person made a lasting impression: her own orthotist, Cara. She took the time to explain every step, set clear expectations, and ensure Sophia felt comfortable both physically and emotionally. That care planted a seed.

Sophia remembers thinking, I want to pass forward the care that was given to me.

The moment everything clicked came during her first day shadowing at an O&P clinic as an undergraduate student. She observed a bilateral AFO fitting for a toddler with delayed motor milestones. By the end of the appointment, the child stood independently and even attempted a step. The parents were overjoyed.

That was it. Sophia knew: this was the work she was meant to do.

Choosing Pediatrics and Coming Full Circle

During O&P school, Sophia knew pediatrics was where she belonged. When she visited Boston O&P, now OP Specialty Bracing, she knew it was where she wanted to complete her residency.

Her New England residency included rotations across multiple Boston Children’s Hospital locations, exposing her to a wide range of diagnoses and pediatric specialties. She learned from dedicated clinicians and, after certification, stayed on as part of the team.

Sophia enjoys orthotics and prosthetics serve patients of all ages, diagnoses, and goals. Whether a child needs a scoliosis brace, AFOs, or a cranial helmet, the purpose is always the same: improving quality of life for that child.

Orthotics, she says, is the perfect blend of healthcare, art, and engineering and she feels honored to be part of the profession.

Caring for Kids with Lived Experience

Today, Sophia brings both clinical expertise and personal understanding to every patient interaction.

As a former scoliosis patient, the phrase “treat others as you would want to be treated” carries real meaning. She strives to provide the highest level of care not just because she’s been there but because every child deserves it.

When working with teens who may be struggling with bracing, Sophia focuses on listening and education. She helps families feel informed and supported throughout treatment. Often, it’s the parents who express the most gratitude when Sophia chooses to share her own story who are reassured by hearing from someone who truly understands the journey.

A Story of Care, Passed Forward

Sophia’s story is a reminder that pediatric orthotic care is about more than devices and diagnoses. It’s about empathy, trust, teamwork, and meeting kids where they are.

What began as a confusing school screening became a calling; one that now allows Sophia to support families walking the same path she once did herself.

Disclaimer:

OPSB products and products distributed by OrthoPediatrics Corp. and its subsidiaries should be used under the guidance of a qualified healthcare professional. Please consult your pediatrician or orthopedic specialist for professional advice. This content is for informational purposes only and does not constitute medical advice. Always follow your doctor’s recommendations and instructions.

MAM-MM-166

https://family.opsb.com/wp-content/uploads/sites/2/2026/04/Sophia-Valls-Headshot.png 982 1057 mhoff /wp-content/uploads/sites/2/2026/03/family-resource-hub-logo.png mhoff2026-04-13 22:05:052026-04-13 22:06:58From Scoliosis Patient to Pediatric Orthotist: Sophia’s Story

Halo Gravity Traction Explained: A Parent’s Guide

Hearing that your child needs halo gravity traction can stop you in your tracks. The name sounds intense, and the equipment can look scary at first. Most parents have the same questions right away: Why does my child need this, what will it feel like, and how do we get through the hospital stay?

Halo gravity traction is a way for a spine team to slowly and gently improve a severe spinal curve. It’s most often used for kids and teens with scoliosis or kyphosis, especially when the curve is large or stiff. It can also help in some complex spine conditions where breathing or balance is affected.

This guide explains what halo gravity traction is, what daily life looks like in the hospital, what side effects to watch for, and what to ask your child’s care team so you can feel steady and prepared.

What halo gravity traction is and what it helps your child’s care team do

Halo gravity traction is a treatment that uses a halo, a ring, attached to the skull with small pins. Those pins sit in the outer layer of the skull bone. The halo then connects to a traction system that creates a gentle upward pull. That pull can come from a pulley and weights, or a traction frame, depending on the hospital and your child’s mobility plan.

It may help to picture it like slowly straightening a bent young tree with soft ties instead of forcing it upright all at once. The goal is steady change over time, not a big correction in a single day.

The main purpose is to gradually stretch the spine and the soft tissues around it, including muscles and ligaments. This can:

  • Improve alignment and posture over time
  • Reduce how stiff the curve is
  • Help the spine team plan a safer next step, often surgery
  • In some cases, improve alignment enough to delay or change the timing of surgery

Doctors most often recommend halo gravity traction for severe scoliosis or kyphosis, very stiff curves that don’t move much on bending X-rays, spine deformities that may affect breathing, or complex conditions where a careful, staged approach is safest.

Why doctors may recommend it before spinal fusion or other surgery

For some kids, the biggest risk in spine surgery is not the rods or the length of the operation. It’s the stress that a sudden correction can place on the spinal cord, nerves, and lungs.

Halo gravity traction can lower that stress by doing part of the correction slowly, before the operating room. As the curve eases little by little, the surgeon may not need to apply as much force during surgery. That matters because less force can mean a lower chance of nerve irritation or injury.

Traction may also help with balance and positioning. A spine that is less twisted and less stiff can be easier to align during fusion or other procedures. Some kids also breathe a bit easier as the chest and spine position improves, though results vary and depend on the child’s condition.

A key point for parents: traction is not about rushing to create a perfect spine. It’s about making the next step safer and more controlled.

Who is a good candidate

A spine team decides on halo gravity traction based on imaging, physical exam, and your child’s overall health. It tends to be most helpful when a child has a very large curve, a rigid curve with poor flexibility, or signs that the curve is affecting breathing or stamina.

If traction is recommended, it’s because the team believes the benefits outweigh the risks for your child’s exact situation. Don’t be afraid to ask what other options were considered, and why traction fits your child best.

What the hospital experience looks like from day one to going home

In most cases, halo gravity traction usually means an inpatient hospital stay. Many families find that the first few days feel like the steepest part of the learning curve. After that, the routine becomes more predictable.

While each hospital does it a bit differently, the timeline often looks like this:

Your child may have pre-hospital testing, such as X-rays and other imaging, lab work, and sometimes breathing tests if lung function is a concern. The halo ring is then placed, often in the operating room with anesthesia or heavy sedation. After placement, traction starts at a low weight. The team slowly increases weight over time, often daily, while watching comfort, nerve function, and pin sites.

Traction often lasts weeks, but the exact length varies. Some kids use traction mainly in bed with a frame. Others can get up, walk, and do therapy while still in traction, using a rolling traction walker or a wheelchair plan.

In the room, you’ll likely see ropes, pulleys, and weight plates (or a built-in traction setup), plus safety features to keep the system stable. It can look like a lot, but nurses and therapists will teach you what each part does, which parts you can adjust, as well as what you should never adjust on your own.

Halo placement day, what happens, and how the pins are cared for

On halo placement day, your child will usually go to the operating room. The surgeon places the halo ring and inserts several small pins. Parents often worry about the word “pins,” but they are designed for traction, and the team checks them carefully.

After placement, it’s normal for your child to feel sore. Some kids describe a tight feeling, a headache, or pressure at first. The team will treat pain early, then adjust as your child settles in.

Pin site care is a big part of preventing infection. Nurses typically clean around each pin site and check the skin often. Your job is not to guess the “right” technique. Your job is to watch and speak up if something looks off, and to ask the team to show you what normal healing looks like.

Ask your care team what signs matter most at your hospital. In general, warning signs may include redness that spreads, swelling, warmth, drainage, a bad smell, fever, or pain that’s getting worse instead of better.

Daily life in traction: school, sleep, showers, and staying active

Once the system is set up and your child’s weight increases slowly, daily life becomes a mix of therapy, rest, and finding ways to stay connected to normal routines.

Mobility depends on the traction type and your child’s condition. Some kids can stand and walk while in traction, usually with a special walker or frame. Others need a wheelchair for longer trips in the hospital. Physical therapy often focuses on safe movement, leg strength, and endurance. Occupational therapy may help with daily tasks like getting dressed or adjusting to new limits.

Sleep can be tricky at first. The position may feel unfamiliar, and the halo ring can make turning harder. Utilizing extra pillows, careful support under the knees, and a calm bedtime routine can help. The nurses can also suggest safe positions based on your child’s setup.

Bathing and hair washing often need adaptations. Some hospitals use no-rinse shampoo caps, basin washes, or assisted shower plans. Bathroom needs are planned around safety and the traction system. The staff has done this many times, and it’s okay to ask for privacy and a step-by-step explanation.

School doesn’t have to stop. Many children’s hospitals have hospital teachers or school services. Child life specialists can also help your child cope, stay busy, and feel more in control.

Safety, comfort, and side effects: what parents should watch for

Halo gravity traction is closely monitored. The team doesn’t just add weight and walk away. They check comfort, strength, sensation, and skin. Your child will also have regular check-ins with the surgeon and therapists, and may have repeat imaging to track progress.

Still, side effects can happen. Most are common and manageable. Some need quick attention. Parents do best when they treat changes like useful information, not a reason to panic.

Pain control usually uses a mix of approaches. That may include scheduled pain medicine early on, then as-needed medicine later, plus ice packs, gentle stretching, and therapy. Emotional comfort matters too. Kids can feel trapped, bored, or embarrassed. A steady routine, honest answers, and small choices (what to watch, who to call, when to rest) can reduce stress.

Common issues like headaches, neck pain, nausea, and muscle soreness

In the first days, headaches are common. The halo changes how forces move through the head and neck, and the pins can create pressure. Neck and shoulder soreness can also happen as muscles adapt to a new alignment.

Some kids get nausea, especially if in pain or if they feel anxious. Muscle soreness can show up in the back, hips, or legs because traction slowly changes posture.

Most of the time, the care team responds by adjusting the traction plan, treating symptoms, and pacing activity. Sometimes a small change, like slowing a weight increase or changing a pillow setup, makes a big difference.

How to advocate for your child and prepare your family for the next step

When your child is in traction, you’re part of the care team. You’ll notice patterns in pain, mood, sleep, and appetite. You’ll also be the one translating hospital life into something your child can handle.

Advocacy can be calm and practical. Keep a short list of questions on your phone. Write down the names of key team members. If something doesn’t make sense, ask for plain language. If two people give different answers, ask them to confirm the plan together.

It also helps to talk early about what happens after traction. For many kids, the next step is spine surgery, often spinal fusion. For others, the plan may include bracing or a different staged approach. Rehab and follow-up are part of the path either way.

Questions to ask at the bedside, and how progress is measured week to week

A few focused questions can clear up a lot of worry:

  • What is the target traction weight for my child, and how do you decide increases?
  • How often will you take X-rays, and what change are you hoping to see?
  • What are the main goals for traction, before the next step?
  • How do you check nerve function each day, and what changes should I report?
  • What therapy plan will my child follow, and what milestones matter?
  • How long do you expect traction to last, and what might extend it or shorten it?
  • What would make you change course, pause increases, or adjust the plan?

Progress is often tracked with repeat X-rays, height changes, posture and balance, comfort level, and in some cases breathing measures. Some days look quiet, but small gains add up over weeks.

Packing list and comfort ideas that actually help in the hospital

Packing for traction is less about “cute hospital outfits” and more about comfort and access. Clothing should be easy to put on without pulling over the head.

A practical packing list:

  • Button-up shirts or zip hoodies (clothes can’t go over the head)
  • Soft, loose pants or shorts with easy waistbands
  • Slip-on shoes with grip soles
  • Baby wipes and gentle face wash
  • Dry shampoo or no-rinse hair products (ask what’s allowed)
  • Long charging cords and a power bank
  • Headphones, a tablet, books, or a handheld game
  • A small blanket or familiar pillow from home (if permitted)
  • A notebook for questions, symptoms, and daily updates

Family logistics matter too. Ask about hospital school services, visiting rules, meal support, and parking passes. If you have other kids at home, line up a plan early for routines, rides, and check-ins. The steadier home feels, the safer your child will feel in the hospital.

Conclusion

Halo gravity traction is a slow, controlled way to help straighten a severe spinal curve and prepare the body for the safest next step. It looks like a lot at first, but it’s closely monitored, adjusted carefully, and designed to protect your child’s nerves and comfort. Most kids adapt over time, especially when pain is treated early and routines stay steady.

Your role matters. Watch for changes, ask clear questions, and keep the care team in the loop. If you’re unsure about anything, your child’s spine team is the best source of guidance for your child’s diagnosis, hospital setup, and halo gravity traction plan.

Disclaimer:

OPSB products should be used under the guidance of a qualified healthcare professional. Individual results may vary. Please consult your pediatrician or orthopedic specialist for professional advice. This article is for informational purposes only and does not constitute medical advice. Always follow your doctor’s recommendations and instructions.

MAM-MM-169

https://family.opsb.com/wp-content/uploads/sites/2/2026/04/Screenshot-2026-04-07-132912.png 672 524 mhoff /wp-content/uploads/sites/2/2026/03/family-resource-hub-logo.png mhoff2026-04-09 18:19:502026-04-09 22:06:56Halo Gravity Traction Explained: A Parent’s Guide

Common Halo Gravity Traction Terminology Explained for Families

Halo gravity traction (HGT) is a treatment that gently uses a halo (a ring attached to the skull with small pins) and a traction system (ropes, pulleys, weights, or springs) to help gradually stretch and straighten the spine over a period of time. It’s often used before spine surgery so the correction can happen in safer, smaller steps.

Families may hear about HGT when a child has severe scoliosis, kyphosis, or another spinal deformity that needs careful planning before surgery.

This guide is a simple glossary with real-life context. It’s not medical advice. It’s here to explain the terms families commonly hear from doctors, nurses, therapists, and care coordinators, especially during rounds, therapy sessions, and discharge planning.

Start here: the core parts of halo gravity traction and what they do

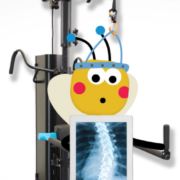
Halo gravity traction sounds high-tech, but the main idea is simple: steady, gentle pull helps the spine and soft tissues adjust. The equipment can look intimidating at first, yet most pieces have a straightforward purpose.

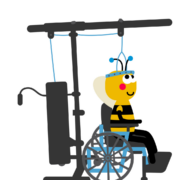
You’ll usually see a ring around the child’s head, with a connection to a rope-and-pulley system. Weights or springs may attach to the line, or the setup may connect to a frame, walker, or wheelchair.

The terms below are the ones families may hear in the first few days. Once these make sense, the rest of the HGT vocabulary gets easier.

Halo ring, pins, and pin sites (the headpiece and the skin care words)

Halo ring means the ring that sits around the head. It creates a stable place to attach traction safely.

Pins are the small posts that connect the halo ring to the skull. Families often worry these pins are placed deep, however the skull has two layers and the pins only go through the first, outer, layer. They are designed to be secure without getting near the brain. The care team picks pin spots carefully and checks them often.

Pin sites are the small areas of skin where each pin meets the head. You’ll hear about pin care, which refers to daily cleaning of the pin sites to lower infection risk and keep the skin calm.

You might also hear retightening or torque. This means the team is checking the pin tightness with a special tool so the halo stays stable. It’s not something families should do at the bedside.

If staff mentions pain, swelling, or loosening, helpful questions include:

  • “Which pin site is the concern, and what changed today?”
  • “Is this normal irritation or an infection concern?”
  • “What should I watch for overnight?”
  • “Can you show me what ‘too loose’ would look like?”
Traction setup terms: ropes, pulleys, weights, and the traction line

Traction means a pulling force used to align bones and joints. In HGT, the pull is gentle and steady.

Gravity traction means the pull comes from weights and gravity, not a motor. That’s why the setup may look like a rope running over pulleys (devices that guide the rope smoothly).

The rope system or traction line is the rope that connects the halo to the weights or frame. Staff will often check that the line moves freely and stays centered.

Weights are exactly what they sound like. They create the amount of pull. Families may hear weight amount (how many pounds are used) and weight increase (adding weight over time).

You may also hear titration, which means adjusting something slowly in small steps. In HGT, titration often means adding traction weight gradually so the body has time to adapt. Quick jumps can cause pain, headaches, or nerve symptoms, so slow changes are usually safer.

The head of bed position can matter because angles change how gravity acts on the line. That’s why staff may adjust the bed and then re-check the traction line.

Words you will hear about safety, comfort, and daily care

Day-to-day HGT care is a mix of safety checks, comfort support, and small increases in activity. Each plan is personal. Two kids can have the same diagnosis and still have different rules based on age, strength, skin needs, and how their nerves respond.

You may hear language like “today we’re focusing on…”. That can mean a new weight goal, more walking, extra rest, or extra skin checks. It often means the team is trying to keep progress steady without pushing too fast.

This section explains common terms that shape what your child can do today, and how staff will help.

Positioning and movement: head of bed, log rolling, and activity level

Head of bed (HOB) is how raised the bed is. A nurse might say, “HOB at 30 degrees,” to describe the angle. It can affect comfort, breathing, and traction pull.

Positioning means how your child is placed in bed or in a chair. Staff aims for good alignment, meaning the head, shoulders, hips, and legs line up in a balanced way.

Midline means centered. If the head drifts to one side, staff may gently re-center it so traction stays even.

Log roll is a way to turn the body like a single unit, shoulders and hips moving together. This helps avoid twisting the spine and neck. It can look stiff at first, but it’s a common safety move.

Transfers are moves from bed to chair, chair to toilet, or bed to standing.

Ambulation means walking, usually with help at first.

You’ll also hear activity level and as tolerated. “As tolerated” means the child can do the activity as long as symptoms stay acceptable, like manageable pain, no dizziness, and no new numbness. Over time, the team often increases activity in steps, like sitting longer, standing more often, and walking farther with therapy.

Comfort and skin protection: pain scale, muscle spasms, and pressure injury prevention

A pain score is the number your child gives for pain, often 0 to 10, or a face scale for younger kids. It helps staff track patterns, not judge toughness.

Scheduled meds are given at set times to prevent pain from building.

PRN meds are “as needed” meds for pain, nausea, itching, or spasms.

Breakthrough pain is pain that pushes through even when scheduled meds are on board, a sign the plan may need adjusting.

Muscle spasm means a muscle tightens suddenly and won’t relax. Spasms can happen as the body adjusts to traction.

Nerve pain can feel like burning, zapping, or tingling.

Itching can come from healing skin, sweating under padding, or medication side effects.

You may hear sedation if a child is very anxious, can’t tolerate a procedure, or needs help staying still for imaging. If sedation is discussed, it’s okay to ask what will be used, how breathing is watched, and how long grogginess may last.

Skin care is a big deal in traction because pressure stays in the same spots. A pressure injury is skin damage from pressure and friction, often over bony areas like hips, tailbone, heels, shoulders, and sometimes the back of the head. Staff may talk about a turning schedule, extra padding, and routine skin checks. These aren’t “extra tasks,” they’re prevention, like brushing teeth to avoid cavities.

Clinical and imaging terms that can sound scary but have a simple meaning

Hospitals use short clinical words because they’re precise and quick to say.

Most of these terms are about tracking progress and catching problems early. Staff repeats the same checks because small changes matter, especially when traction weight increases.

If you ever feel lost, asking “What does that mean in plain language?” is a normal request. It also helps to ask what changes would be urgent versus expected.

Monitoring and exams: neuro checks, sensation, strength, and reflexes

A neuro check (short for neurologic check) is a quick test of how the brain, spinal cord, and nerves are working. Nurses might do these often, even overnight.

A neurologic exam can be a longer version done by a doctor or advanced practice provider. It often includes asking your child to move arms and legs, push and pull against hands, and answer questions.

Sensation means feeling. Staff may lightly touch the skin and ask if it feels the same on both sides. Tingling can feel like pins and needles. Numbness means reduced or missing feeling. Weakness means less strength than normal, like trouble lifting a foot or gripping.

Reflexes are automatic responses, like a knee jerk. Reflexes help the team understand how nerves are signaling.

You’ll hear baseline a lot. Baseline means “what’s normal for your child.” If your child already has weakness or numbness, the team wants to know the baseline so they can spot new changes.

If anything changes suddenly, tell the nurse right away. New numbness, new weakness, or new trouble walking can be urgent, even if it seems small.

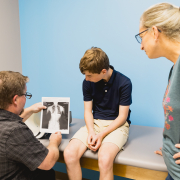
X rays and measurements: Cobb angle, alignment, and curve correction

An X-ray is a picture of bones. A scoliosis series is a set of spine X-rays taken in specific views so the team can measure the curve the same way each time.

Cobb angle is the main measurement used to describe the size of a scoliosis curve. Think of it like measuring the tilt of two books on a shelf to describe how big the bend is. The number helps the team compare before traction, during traction, and before surgery.

Kyphosis means a forward rounding curve, often in the upper back. Lordosis means an inward curve, often in the low back. Both are normal in small amounts. Problems happen when the curve is too large, too small, or unbalanced.

Coronal balance describes side-to-side balance when looking at the body from the front. Sagittal balance describes front-to-back balance when looking from the side. Alignment is the broader term for how the head, spine, and pelvis line up.

Correction means how much the curve and balance improve with traction or surgery. The goal is often a safer operation and a spine that sits and stands in a more stable way, not a “perfect” spine on paper.

Planning ahead: timelines, goals, and the words used for next steps

Once the traction routine settles, conversations often shift to “What are we working toward?” Families may hear a mix of rehab-style language (goals and milestones) and surgery planning language (pre-op and fusion).

It can help to keep two tracks in mind. One track is day-to-day function, like comfort, walking, and skin health. The other track is long-term planning, like surgery timing and what support will be needed afterward.

Hospitals often hold team check-ins, sometimes called care conferences or family meetings, to make sure everyone is aligned.

Progress language: goals, milestones, tolerance, and plateau

Therapy goals are targets set by physical therapy (PT) and occupational therapy (OT). They might focus on walking safely, getting in and out of bed, or building endurance.

Milestones are key steps along the way, like sitting up for meals, walking to the hallway, or showering with help. These milestones may look different for each child.

Tolerance means how well your child handles an activity or a weight change. Good tolerance can mean pain stays controlled, no new nerve symptoms show up, and fatigue is manageable.

You may hear “progressing” when things are moving forward, and “regressing” if a child temporarily shows neurological signs or has more pain. Regression usually isn’t permanent. Sometimes it happens after a tough day, a weight increase, poor sleep, or illness.

A plateau means progress has slowed. It doesn’t mean failure. It can mean the body needs more time at the current level before the next step.

A trial is a short test, like trying a new chair, walking device, or a short session at a new weight amount to see how the child responds.

Next step terms: pre-op, fusion, instrumentation, and postoperative recovery words

Pre-op means before surgery. Clearance means other teams (like anesthesia, cardiology, or pulmonology) have checked that it’s safe to proceed.

A surgical plan is the outline of what the surgeon expects to do, including which parts of the spine will be treated.

Spinal fusion is a surgery that joins spinal bones so they heal into a single solid section. This is done to stop a severe curve from worsening and to improve balance.

Instrumentation refers to the hardware used to hold the spine in position while fusion heals, often rods and screws. Levels means which spine segments are included. Families might hear “upper levels” or “lower levels,” or a range of vertebrae.

After surgery, you may hear ICU (intensive care unit) versus floor (regular hospital unit). ICU usually means closer monitoring for a short time. The floor is for continued recovery once things are stable.

Precautions are the safety rules after surgery, such as limits on bending, lifting, or twisting, and guidance on how to move safely during healing.

Conclusion: how to use this terminology without feeling overwhelmed

New words come fast when your child is in halo gravity traction. With time, they’ll start to feel familiar, like learning the names of tools in a kitchen.

  • Keep a running list of questions in your phone or notebook.
  • Ask staff to spell new terms, then write them down.
  • Repeat back what you heard, “So the plan is the same weight today, with more walking, right?”
  • If the plan or terms change quickly, request a short family meeting.
  • Ask what symptoms are expected versus urgent for your child’s case.
  • Call the nurse right away for new numbness, severe headache, breathing trouble, or new pin-site drainage.

Feeling overloaded doesn’t mean you’re doing anything wrong. Asking clear questions is part of good care, and the team expects families to speak up.

Disclaimer:

OPSB products should be used under the guidance of a qualified healthcare professional. Individual results may vary. Please consult your pediatrician or orthopedic specialist for professional advice. This article is for informational purposes only and does not constitute medical advice. Always follow your doctor’s recommendations and instructions.

MAM-MM-170

https://family.opsb.com/wp-content/uploads/sites/2/2026/04/Maureen-Blog-Images-2.png 1350 1080 mhoff /wp-content/uploads/sites/2/2026/03/family-resource-hub-logo.png mhoff2026-04-09 18:15:492026-04-09 22:07:52Common Halo Gravity Traction Terminology Explained for Families

A Parent’s Guide to Scoliosis Braces for Kids and Teens

Hearing the word scoliosis at a checkup can make your stomach drop. Many parents picture scary back problems or painful treatments, and kids often worry they did something wrong.

In most cases, scoliosis simply means that the spine curves instead of being straight. For many children and teens, doctors watch the curve. For some, they recommend a back brace to help guide the spine while it is still growing.

There are several types of scoliosis braces. They look different, feel different, and fit into daily life in different ways. This can be confusing when you are trying to make good choices for your child.

This article explains the main types of scoliosis braces, how they work, why doctors choose one brace over another, and what life in a brace is really like. It is for education only and does not replace medical advice from your child’s care team.


Scoliosis Bracing Basics: What Parents Need To Know First

The main goal of bracing is simple: stop the curve from getting worse while your child is still growing.

Most braces focus on progressing the curve and some braces can improve the curve, approximately 25%, but the primary goal of any brace is allowing your child to grow up with a healthy, strong back and avoid surgery whenever possible.

Simple scoliosis terms to know

These are words you may hear at visits, explained in plain language:

  • Curve: The sideways bend in the spine that shows on an X-ray. Some curves are small and mile, others are larger and more serious.
  • Cobb angle: a number, measured in degrees, that shows how much rotation there is in the curve. A higher number means more rotation.
  • Growth plates: Areas at the ends of bones that are still open while a child is growing. If growth plates are open, your child has more growing to do, and the curve has more time to change.

Not every child with scoliosis needs a brace. Doctors look at:

  • Age and how much growing is left
  • Size of the curve (Cobb angle)
  • How fast the curve has changed over time
  • Curve pattern on the X-ray

Children with small curves may only need regular checkups. Those with large curves or curves that continue to progress on their own may require bracing or in some cases surgery.

How a scoliosis brace helps the spine grow straighter

A good way to picture a brace is to think of a gentle, steady hand guiding a young tree. The tree wants to bend, but the support keeps it straighter as it grows taller.

A scoliosis brace works in a similar way:

  • It wraps around the body to support the spine.
  • It uses gentle pressure on certain spots to push the curve in a better direction.
  • It holds the spine in a straighter position while bones grow.

Most braces do not fully straighten the spine. Instead, they:

  • Reduce how much the curve grows.
  • Lower the chance that the curve reaches a size where surgery is needed.
  • Support the body so kids can stay active and strong.

Success often depends on brace hours which vary depending on the brace type (Full time vs. Nighttime). If the doctor recommends wearing a full-time brace, 18 hours a day, wearing it only 8 hours rarely gives the same results. Bracing is time dependent and every hour counts.

When doctors recommend a scoliosis brace (and when they do not)

Most doctors think about bracing when:

  • The curve is usually in the 20 to 45 degree range.
  • The child or teen is still growing.
  • The curve has a real risk of getting worse as they grow.

A brace may not be recommended when:

  • The curve is small, for example under 20 degrees, and has stayed stable on X-rays.
  • The child is almost done growing, so the curve is not likely to change much.
  • The curve is very large, often around 50 degrees or more, and surgery is more likely than bracing to help long term.

There are always exceptions. This is why your child’s doctor looks at the full picture, not just a single number.

Key brace terms families will hear in the clinic

You may hear words that sound official or confusing at first. Here are a few common ones:

  • Full time brace: A brace worn many hours a day, often 16 to 23 hours. Kids may take it off for showers, sports, or special events.
  • Nighttime brace: A brace worn mostly or only during sleep. These use stronger correction for fewer hours.
  • Thoracolumbosacral orthosis (TLSO): A long word that simply means a brace for the upper body, lower back, and sometimes the hips. The Boston Brace 3D® and Nightshift are types of TLSO braces.
  • Custom molded: A brace that is made for your child’s body using a scan, a mold, or detailed measurements. It is not a generic size from a shelf.

These terms will come up again as we look at each brace type.


Explaining Common Types of Scoliosis Braces for Children and Teens

Most families hear about a few main brace types during scoliosis care. The most common are:

  • Boston Brace 3D® type TLSO brace
  • Nighttime braces, such as Nightshift, Providence or Charleston
  • Older braces, such as the Milwaukee brace or the original Boston Brace
  • Soft or flexible braces that are often found online

Each one has its own look, feel, and place in treatment.

Boston Brace 3D® (TLSO): The most common daytime scoliosis brace

The Boston Brace is one of the most widely used scoliosis braces for kids and teens.

What it looks like

  • Plastic shell that wraps around the torso, from under the arms and chest down to the hips.
  • Open in the front or back with Velcro straps.
  • Usually worn under clothes, over a tight shirt.
  • Custom made to match your child’s shape.

Most Boston 3D® braces are TLSO braces, so they are trimmed under the chest and lower back. The brace has correction built into the brace and the orthotist (brace specialist) builds specific pads inside to push the curve in the right direction. These pads are adjustable to optimize the fit and function as you grow.

How it is worn

  • Often prescribed for 16 to 23 hours per day.
  • Taken off for showering and for sports or activities.
  • Worn over a snug cotton shirt to protect the skin.

At first, kids may notice:

  • Itchiness or sweating.
  • Red spots where the pads press.
  • Stiffness when they first put it on.

Most of this improves as the body adjusts and the brace is fine tuned.

Benefits for families

  • Strong research support for controlling many types of curves.
  • Widely used, so many clinics have experience with fitting and adjusting it.
  • Can be trimmed, reshaped, and adjusted as your child grows.

Common challenges

  • Comfort, especially during hot weather.
  • Sleep in the first few weeks.
  • Body image worries, since kids may feel “different” from friends.

With time, many kids say the brace becomes part of their routine, like glasses or braces on teeth. Regular follow up visits help keep the fit comfortable and effective.

Nighttime braces (Nightshift, Providence, Charleston): For sleeping only

Nighttime braces, such as the Nightshift, Providence or Charleston brace, aim to correct the curve while your child sleeps.

How they feel and look

  • Plastic, like a Boston Brace 3D®, but shaped for hyper-correction.
  • Worn only at night or when lying down, usually 8 to 10 hours in bed.

Because they push harder on the curve, most kids could not walk around comfortably in a nighttime brace all day. That is why they are designed for lying down.

Main benefit

  • No daytime wear, which means:
    • Less impact on school and social life.
    • No brace under clothes during the day.
    • Fewer concerns during sports and physical activities.
    • If a kid refuses to daytime wear, than a nighttime only design is an alternative in some instances.

Main limits

  • Nighttime braces are not right for every curve.
  • They tend to work best for certain curve sizes and patterns, often in the lower or middle part of the spine.
  • Some curves, especially very stiff or larger curves, may need a full time TLSO instead.

Doctors choose nighttime braces after they review X-rays, growth status, and family routines. For some kids, a nighttime brace is a good match. For others, the curve needs more support across the whole day.

Soft scoliosis braces and new brace designs parents might see online

Search “scoliosis brace” online and you will see many soft or flexible braces. These often look more like vests or wraps instead of hard shells.

Possible benefits:

  • More comfortable for some kids.
  • Allow more movement.
  • Less bulky under clothing.

However, research on soft braces is mixed. Some studies suggest they help certain kids, while others show they may not control curves as well as rigid braces like the Boston Brace 3D®.

Other points to keep in mind:

  • Some soft braces are not accepted by all scoliosis experts.
  • Insurance may not cover them.
  • Claims online can be overstated, and pictures can be misleading.

If you are curious about a brace you see online, take the information to your child’s scoliosis doctor. Ask if it is safe, supported by evidence, and right for your child’s curve.

Custom made vs off the shelf braces: Why fit and follow up matter

Most scoliosis braces for kids are custom made. This means:

  • The orthotist uses a body scan, plaster mold, or detailed measurements.
  • The brace is shaped to match your child’s body and specific curve.
  • Pads and trim lines are placed exactly where they are needed.

A good fit is critical for:

  • Comfort and skin health.
  • Correct pressure on the curve.
  • Willingness to wear the brace for many hours each day.

As your child grows, the brace will need adjustments. The clinic may:

  • Trim plastic around the arms or hips.
  • Add or move pads.
  • Replace straps.

Parents should speak up if:

  • Your child has pain that does not ease after the first week or two.
  • Skin breaks down or sores appear.
  • There is numbness, tingling, or trouble breathing.
  • The brace becomes hard to close due to growth.

Follow up visits are part of normal brace care, not a sign of failure.


Choosing the Right Scoliosis Brace for Your Child

Only your child’s doctor and orthotist can choose the exact brace type, but you deserve to understand why a certain brace is suggested. The “right” brace is usually the one that:

  • Matches your child’s curve and growth stage.
  • Has a good chance of controlling the curve.
  • Fits your child’s daily life well enough that they will wear it.
  • The brace your clinical team is most familiar and had the best outcomes with.

Questions to ask your scoliosis doctor about brace options

Bringing a list of questions can help you leave the visit feeling calmer and clearer. Here are useful questions:

  • Why are you recommending this type of brace for my child?
  • How many hours per day should they wear it?
  • How long will brace treatment likely last?
  • How will you measure if the brace is working?
  • What happens if my child struggles to wear it for the full hours?
  • Are nighttime brace options in our case, or is a full time brace better?
  • Can my child still play their favorite sports?
  • How often will we need follow up visits and new X-rays?
  • Who do we contact if the brace hurts or causes skin issues?
  • What are your bracing outcomes?

You can also ask about school, sleep, and clothes. No question is silly when you are caring for your child’s spine.

Balancing curve control with your child’s comfort and lifestyle

Doctors sometimes talk about “brace dose”, meaning how many hours per day the brace is worn. In general, more hours give better curve control, up to a point.

But kids are not robots. Comfort, mood, and social life matter too.

Some general patterns:

  • A very active athlete may do well with a plan that allows brace breaks for practice, while still reaching the target hours each day.
  • A child with sleep problems may find a full time daytime brace easier than a tight nighttime brace.
  • A teen who feels very self-conscious at school may prefer a nighttime brace, if it is safe for their curve pattern.

Try to involve your child in these talks. Ask:

  • “What do you think about wearing a brace?
  • “Do you have any worries about wearing a brace?”
  • “What do you want your doctor to know about your day?”
  • “What did you hear the Dr. say about wanting you to wear a brace?”

When kids feel some control and respect, they are more likely to stick with the plan.

Insurance, cost, and getting support when a scoliosis brace is expensive

Scoliosis braces can be expensive and will require follow visits to the doctor and orthotist. Many families feel stress around cost, especially knowing that kids grow and may need more than one brace over several years.

Some general points:

  • Many insurance plans cover a brace when it is medically needed.
  • Clinics often handle prior authorization, but it can take time.
  • Co-pays or deductibles may still be required.

If cost is a barrier, talk openly with the clinic staff. Ask about:

  • Payment plans that spread the cost over time.
  • Hospital financial assistance programs.
  • Charities or local groups that help children with medical equipment.
  • Community foundations that support families in need.

You are not asking for a favor. You are advocating for your child’s health.


Helping Your Child Live Well With a Scoliosis Brace

Daily life in a brace can feel like a big change at first. With some adjustments, most kids learn to:

  • Wear the brace enough hours.
  • Stay active and involved.
  • Build confidence and pride in their effort.
  • Encourage independence as kids learn to put on and take off their brace and learn to manage their daily brace routine.

Your support and attitude make a big difference.

Making the brace more comfortable: Skin care, clothing, and fit checks

Small comfort tweaks can turn a tough day into a better one.

Helpful tips:

  • Use a snug, seamless cotton shirt under the brace. This protects skin and absorbs sweat.
  • Avoid thick seams, buttons, or zippers under the brace.
  • Show your child how to check their skin when the brace comes off. Mild pink spots that fade within 20 to 30 minutes are usually normal; dark red areas, or broken skin are not.
  • Wash the inside of the brace with mild soap and water, then dry well.
  • Schedule follow up visits for any pressure areas that do not improve.

Some kids feel more comfortable sleeping: there is no one right answer. Try sleeping as before when first breaking in the brace. If still feeling uncomfortable, you can try-

  • On their back with a thin pillow under the knees.
  • On their side with a pillow between the knees.
  • With a slightly firmer mattress for more support.

Some soreness in the first weeks is common. Sharp pain, tingling, or sores are not. Call the orthotist or doctor if that happens.

Staying active and playing sports while wearing a scoliosis brace

Many kids in braces keep playing sports and moving their bodies. In fact, strong muscles help support the spine.

General ideas:

  • Most doctors allow kids to take the brace off for intense sports, as long as they still reach the daily hour goal.
  • For light activity, such as walking or simple stretching, some kids keep the brace on.
  • Physical therapy or scoliosis specific exercises may be part of the plan to build core strength, balance, and posture.

Ask your child’s doctor:

  • Which sports are okay with or without the brace.
  • How to time brace breaks around practices or games.
  • Whether a written note for coaches or gym teachers would help.

Movement is good for the body and mind. Kids should not feel that scoliosis means they must sit on the sidelines.

Supporting your child’s feelings and confidence during brace treatment

The emotional side of bracing matters as much as the physical side.

Kids may worry about:

  • How clothes will fit.
  • What friends will say at school.
  • Feeling “different” or “broken.”

Parents can help by:

  • Praising effort, not perfection. For example, “I see how hard you are trying to wear your brace. I am proud of you.”
  • Listening when they vent. “It’s okay to hate the brace sometimes. I get why you feel that way.”
  • Helping them find clothes they like over the brace, such as looser shirts or layered outfits.
  • Role playing short replies to questions at school, like “It is my back brace, it helps my spine stay strong.”

You can also look for:

  • Local support groups for families with scoliosis.
  • Online communities where teens share tips and stories.
  • Programs where older teens with scoliosis encourage younger kids.

Remind your child that the brace is something they wear, not who they are.

Tracking progress and knowing when brace treatment might end

Kids often ask, “How long do I have to wear this?” Having a rough plan can help.

Doctors track progress by:

  • Regular checkups, usually every few months.
  • X-rays, sometimes with and without the brace, to see how the curve looks.
  • Watching growth signs, such as height changes and maturity.

Parents and kids can:

  • Keep a simple brace wear log to track hours each day.
  • Use a timer or phone reminder to stay on schedule.
  • Use built-in wear time sensors if the brace has them and the team uses that data.

Brace treatment usually continues until your child is mostly done growing and the curve looks stable. At that point, the doctor may suggest:

  • Wearing the brace fewer hours per day.
  • Slowly weaning off the brace over several months.
  • Stopping the brace and shifting to periodic checkups.

Reaching the end of brace treatment is a big milestone, and kids often feel proud of what they did to protect their spine.


Conclusion

Scoliosis bracing can feel scary at first, but it is a powerful tool to slow or stop curve progression while kids are still growing. There are several types of braces, from daytime TLSO designs like the Boston Brace 3D®, to nighttime options like Nightshift, Providence or Charleston, to older or special use braces such as the Milwaukee brace.

The best brace is the one that fits your child’s curve, matches their growth stage, and fits into daily life well enough that they will wear it. Your role is to ask questions, partner with the care team, and support your child both physically and emotionally.

With clear information, honest conversations, and steady encouragement, families can handle scoliosis bracing. Your child can stay active, chase goals, and build confidence, all while taking thoughtful care of their spine and their future.

Disclaimer:

OPSB products should be used under the guidance of a qualified healthcare professional. Individual results may vary. Please consult your pediatrician or orthopedic specialist for professional advice. This article is for informational purposes only and does not constitute medical advice. Always follow your doctor’s recommendations and instructions.

MAM-MM-121

https://family.opsb.com/wp-content/uploads/sites/2/2026/03/1X6A9022-scaled.jpg 1707 2560 mhoff /wp-content/uploads/sites/2/2026/03/family-resource-hub-logo.png mhoff2026-03-06 16:25:282026-03-27 16:33:29A Parent’s Guide to Scoliosis Braces for Kids and Teens

A Patient & Parent Guide: How Scoliosis Is Diagnosed

Scoliosis is a sideways curve and twist of the spine that often shows up in kids and teens. It can be mild or more pronounced, and it sometimes runs in families. About 2 to 3 percent of kids have it, which means it is common and manageable.

So how is scoliosis diagnosed? Doctors start with a history and physical exam, then look for signs like uneven shoulders or a rib hump when bending forward. If scoliosis is suspected, they confirm it with X‑rays to measure the curve, called the Cobb angle.

Catching it early matters. The sooner scoliosis is found, the more options there are to guide growth, protect lung and spine health, and avoid larger curves. For many kids, that means watchful checkups. For others, it might mean bracing, physical therapy, or in some cases surgery.

This guide walks you through what to watch for at home and during school screenings, what happens at the doctor’s office, and which tests give clear answers. You will learn what the results mean, how curves are measured, and what happens next by age and growth stage. The goal is to help you feel informed, calm, and ready for the next step.

If you are a parent or a young patient, you are not alone. With clear information and steady support, you can make confident choices and keep daily life on track.

Spotting Early Signs of Scoliosis: What Parents and Kids Should Know

Small changes in posture can be the first clue. You do not need special tools, just a careful eye. The goal is not to diagnose at home. It is to notice patterns early and get the right check-up if needed.

Physical Changes to Watch During Everyday Activities

Look for simple, repeatable signs while your child gets dressed, stands, or plays. A few minutes each month can reveal helpful trends.

  • Uneven shoulders: One sits higher than the other.
  • Shoulder blade sticks out: One shoulder blade looks more prominent.
  • Uneven hips or waist: One hip is higher, or the waist looks tilted.
  • Clothes hang unevenly: Shirt hems tilt, pant legs seem different lengths, straps slip off one shoulder.
  • Leaning to one side: While standing relaxed or carrying a backpack.
  • Rib or back bump: A small ridge on one side of the back- noticed more when a child bends over to pick something up from the floor.
  • Back pain after sports: Soreness that repeats on one side, especially after running or gymnastics. Mild aches are common, but watch for a pattern.

Try a quick home posture check. Have your child stand tall, feet shoulder width apart. Look from behind at shoulder height, shoulder blades, and hips. Then try the forward bend test. Ask them to bend forward at the waist, hands palm to palm, and look for a rib hump or uneven back surface. This is a screening tip, not a diagnosis. This screening is completed at most well child check up’s by your child’s pediatrician. If your pediatrician does not perform this screening, it doesn’t hurt to gently remind them that you would like to have your child’s spine checked.

Track what you see over time. A simple plan helps:

  1. Take a photo from behind once a month, same spot and lighting.
  2. Compare photos for changes, not single-day differences.

If signs keep showing up, or the curve seems to grow, call your doctor. Many kids have natural posture shifts that even out. Not all curves are scoliosis. Trust your notes and photos, then get a professional opinion.

When Growth Spurts Might Reveal Scoliosis

Puberty is a common time for curves to appear or get stronger. Rapid growth can make a small curve more visible. This often happens between ages 10 and 15, when bones grow fast and muscles try to keep up.

Growth spurts can uncover posture changes you did not notice before. You might see a shoulder rise in a few months or shirts fit differently at the waist. That shift can be your cue to check posture more often.

Use school and sports physicals to your advantage. Ask for a quick back check at each visit. If your school offers screenings, say yes. Regular measurements during these years create a helpful record.

Keep this in mind:

  • Most cases are mild: Many kids never need treatment.
  • Watching is a plan: Doctors often use scheduled check-ups to see if a curve stays stable.
  • Early action helps: If a curve grows, bracing or exercises may guide growth during the fast years.

Stay calm, stay observant, and keep notes. If something feels off or changes quickly, schedule a visit. Early awareness leads to clear answers and simple next steps.

The First Steps in Scoliosis Screening: From Home to Doctor’s Office

Early screening starts simple. A quick look at posture at home, a school check, and a short visit with your pediatrician can spot a curve while it is small. Most screenings start around age 10, when growth speeds up. That timing gives the best chance to guide the spine as your child grows.

Get ready by keeping basic notes. Jot down any back pain, changes in posture, or uneven clothing fit. Bring photos from your home check if you have them. Mention family history of scoliosis or back surgery. These small steps help the visit feel calm and clear.

School and Routine Health Screenings Explained

Schools and pediatric clinics use the same simple tools to find possible curves. The process is quick, private, and does not hurt.

Here is what usually happens during a screening:

  1. The child stands tall, feet shoulder width apart, arms at the sides.
  2. The screener looks at shoulder height, shoulder blades, and the waist.
  3. The child does the forward bend test. They bend forward at the waist, arms with palm to palm, and keep knees straight. The back forms a gentle curve.
  4. The screener looks across the ribs and lower back for a rib hump or uneven surface. One side may look higher if a curve is present.
  5. In some settings, a small level-like tool measures trunk rotation.
  6. The child stands up again. The screener may check hip height, leg length, and how the spine lines up with the head.

Key points to remember:

  • Fast and non-invasive: Most checks take under two minutes.
  • Clothing: Wear a T-shirt or sports bra that allows a clear view of the back.
  • Frequency: Many programs screen yearly from ages 9 to 14, since these are peak growth years.
  • What if flagged: A positive screen is not a diagnosis. It is a sign to see your doctor for a full exam and possibly an X-ray.

Your pediatrician may repeat the same steps during annual visits. They also ask about growth spurts, sports, pain, weakness, or numbness. A brief neuro check, like reflexes and walking on heels and toes, helps rule out nerve issues. If the exam suggests scoliosis, the next step is spinal X-rays to measure the Cobb angle.

Talking to Your Doctor: Questions to Ask Early On

Go in with a short list. Clear questions help you understand the plan and reduce stress.

Try these:

  • What did the screening show, and what does it mean today?
  • Do we need an X-ray now, or should we recheck in a few months?
  • If we get X-rays, how is the Cobb angle measured?
  • How often should we follow up during growth spurts?
  • What signs at home should prompt an earlier visit?
  • Are sports or backpacks okay right now?
  • If a curve is mild, what is our watch-and-wait plan?
  • If a curve is growing, when do bracing or exercises make sense?
  • Who do you refer to if we need a specialist?

Share what you see at home:

  • Family history of scoliosis or back surgery
  • Any back pain, fatigue, or shortness of breath with activity
  • Changes in clothing fit, shoulder height, or waist shape
  • Photos taken a month apart that show a pattern

Ask your doctor to explain results in plain language. It is fair to request a summary you can repeat to your child. Leave with next steps written down, including when to return and what to watch for.

Key Diagnostic Tests for Confirming Scoliosis

Once a curve is suspected, testing gives clear answers. Doctors combine a hands-on exam with imaging to confirm scoliosis, gauge curve size, and plan next steps. Most visits are quick and painless. You can expect simple movements, a few minutes of standing for pictures, and clear numbers that guide the plan.

During the physical exam, the clinician checks:

  • Posture from behind and the side, looking at shoulder and hip levels.
  • The forward bend test to see rib or low back rotation.
  • Flexibility with gentle side bending and twisting.
  • A brief nerve check, like reflexes, strength, and walking on heels and toes.

These steps show how the spine moves, how the ribs rotate, and whether nerves are involved. Imaging then confirms the curve and measures it.

The Role of X-Rays in Measuring Spine Curves

X-rays are the standard test for confirming scoliosis. Standing X-rays show the spine’s shape from the front and the side. The side view helps the doctor see the natural curves, like the chest curve and low-back curve, and how they interact with the sideways curve.

The key number from X-rays is the Cobb angle. It is a simple way to measure curve size:

  1. The doctor draws a line across the top of the highest tilted vertebra in the curve.
  2. Another line is drawn across the bottom of the lowest tilted vertebra.
  3. The angle where those lines would meet is the Cobb angle, measured in degrees.

How to read that number at a glance:

  • Mild: under 20 degrees
  • Moderate: about 25 to 40 degrees
  • More severe: above 40 to 45 degrees in the upper back

What you can expect:

  • You will stand still for a few minutes while the images are taken.
  • You may take a deep breath and relax your arms at your sides.
  • It does not hurt. No shots, no contrast, no special prep.
  • Modern systems use low radiation, and clinics aim the beam from back to front to reduce exposure.

Why X-rays matter:

  • They confirm scoliosis and provide a baseline number.
  • They show if the curve is balanced over the pelvis.
  • They guide care. Mild curves often need watching. Moderate curves in a growing child may benefit from bracing or targeted exercises. Larger curves or curves that keep growing may need a surgical opinion.

Tip: Ask for the Cobb angle and whether the curve changed since the last image. Keep those numbers in your records.

Advanced Tests for Complicated Cases

Most patients do not need advanced imaging at the start. When symptoms or findings raise extra questions, your doctor may order one of the following to get a full picture:

  • MRI: Used if nerve symptoms appear, such as weakness, numbness, unusual pain, or changes in bowel or bladder control. Also considered for very early-onset scoliosis or curves that look unusual. MRI shows the spinal cord and soft tissues in detail.
  • CT scan: Reserved for complex cases, such as planning surgery, assessing congenital bone shapes, or when prior imaging is unclear. CT shows bone detail better than MRI.

These tests help rule out other problems, like tethered cord or congenital bone differences. They are rarely needed for a straightforward first diagnosis of idiopathic scoliosis. If your doctor recommends one, the goal is clarity, not alarm, so the care plan fits the full picture.

What Happens After Diagnosis: Next Steps and Support

A confirmed scoliosis diagnosis gives you facts to work with. You will get numbers, a plan, and a timeline. The goal is simple, guide growth, protect function, and keep life moving. Your doctor will explain curve size, growth left, and the best next step for you or your child.

Interpreting Your Results and Treatment Options

Start with the Cobb angle and growth status. These two details shape the plan. Ask for the angle in degrees, where the curve sits, and how much growth remains.

Here is a quick way to match results with common next steps:

Cobb angleGrowth statusTypical plan
Under 20°Growing or near doneObservation with scheduled checks, consider exercises/ part time bracing
20–25°Actively growingCloser monitoring, consider exercises/ bracing
25–40°Actively growingBracing plus exercise to slow progression/ improve the curve
Over 40–45° (thoracic)Growing or doneBracing, Surgical consult, especially if progressing

What that means in practice:

  • Observation: Best for mild curves. You will have checkups every 4 to 6 months during growth. X-rays are spaced to limit radiation, often once or twice a year unless changes appear. Daily life stays normal.
  • Bracing: Used during growth to hold a curve in the safer range. Most braces are worn part-time or full-time based on the curve and age. A good brace fit, steady wear, and simple core exercises improve results.
  • Surgery: Considered for larger curves or curves that keep growing despite bracing. The aim is to stop the curve from worsening and protect lung and spine health. Many teens return to sports and normal routines after recovery.

Growth matters. Plans are tailored based on markers like the Risser score, recent height changes, and for girls, timing of first period. A small curve in a teen with little growth left is often watched. That same curve in a fast-growing 11-year-old needs closer follow-up.

Progression is not always bad, and it is not always fast. Two examples can help:

  • A 12-year-old with an 18° curve stays between 16° and 20° over two years. No brace, just steady checks, soccer on weekends, and no limits.
  • A 13-year-old with a 28° curve starts bracing during a growth spurt. The curve holds near 30° through peak growth, then stabilizes after growth slows. The brace comes off, and the teen keeps an active routine.

Make the most of each visit by asking clear questions:

  • What is the Cobb angle today, and has it changed?
  • How much growth is left, and how does that affect risk?
  • How often should we return, and when is the next X-ray?
  • If bracing is recommended, how many hours a day and for how long?
  • Which exercises are worth our time, and who teaches them?
  • When should we consider a surgical opinion?

It is also fair to ask for a second opinion. Many families do this for peace of mind, especially near a decision point like starting a brace or discussing surgery.

Most kids and teens with scoliosis lead active, healthy lives. They play sports, learn instruments, and do normal school days. The plan may change with growth, but support stays steady.

For trustworthy information and support:

  • Scoliosis Research Society (SRS): professional guidelines and patient education
  • National Scoliosis Foundation: community and practical tips
  • POSNA (Pediatric Orthopaedic Society of North America): parent-friendly overviews
  • International Society on Scoliosis Orthopedic and Rehabilitation Treatment (SOSORT)

Keep your records, show up for follow-ups, and ask questions. With a clear plan and the right support, you can move forward with confidence.

Conclusion

Early eyes on posture, steady screenings, and clear tests make a strong plan. Notice small changes at home, then use school checks and pediatric visits. If a curve is suspected, X-rays confirm the Cobb angle and guide next steps. Most kids stay active with watching, bracing, or targeted exercises, and many never need surgery.

Keep records, ask for plain-language results, and lean on trusted groups like SOSORT, SRS and the National Scoliosis Foundation. Share what you see with your care team, and get a second opinion if you need it. Small, consistent steps build confidence and protect long-term health.

If you are seeing changes, schedule an appointment with your doctor. Have you walked this path already? Share your story to help another family feel less alone. With early diagnosis, scoliosis is very manageable.

Disclaimer:

OPSB products should be used under the guidance of a qualified healthcare professional. Individual results may vary. Please consult your pediatrician or orthopedic specialist for professional advice. This article is for informational purposes only and does not constitute medical advice. Always follow your doctor’s recommendations and instructions.

MAM-MM-122

https://family.opsb.com/wp-content/uploads/sites/2/2026/03/1X6A1144-scaled.jpg 1707 2560 mhoff /wp-content/uploads/sites/2/2026/03/family-resource-hub-logo.png mhoff2026-03-06 16:20:192026-03-10 15:06:08A Patient & Parent Guide: How Scoliosis Is Diagnosed

Understanding the Benefits of Scoliosis Braces for Kids and Teens

Scoliosis means the spine curves in ways it shouldn’t. Most often, this appears in kids and teens during their growth years.

When a growing spine starts to shift, parents and kids want options. Scoliosis braces are one of the most common ways to slow down or stop the curve from getting worse. People often wonder how these braces actually help and what real changes they bring to everyday life. This post covers the true benefits of scoliosis braces, what kids and families can expect, and how these devices make a difference.

What Is Scoliosis and Who Needs a Brace?

Scoliosis is more common than you may think. Picture the spine as a straight stack of blocks, but with scoliosis, the stack starts to bend and twist. Some curves are small and easy to miss, while others can change the shape of a kid’s back or shoulders. Knowing the basics helps families stay ahead and get help early.

Common Causes and Who Gets Scoliosis

Most scoliosis in kids and teens will increase during growth spurts. The most common type of scoliosis is called idiopathic scoliosis, which means the cause is unknown. Even so, a few things can make someone more likely to get it:

  • Family history (scoliosis often runs in families)

Girls 10 years old and older- are more likely than boys to have scoliosis. Boys from birth to age 3 are more likely to have scoliosis, and boys and girls between ages 4-9 are equal. Early detection matters, since a spine growing fast can change even quicker.

Signs of Scoliosis in Kids and Teens

Most kids with mild scoliosis don’t feel pain. Parents usually notice small, uneven changes, like:

  • Shoulders or hips looking uneven
  • Clothes that don’t fit straight
  • A rib sticking out more on one side when bending forward

Because the early signs are subtle, many schools and doctors check for scoliosis at routine visits.

When Do Doctors Recommend a Scoliosis Brace?

Doctors start thinking about braces when the curve measures between 20 and 45 degrees and the child is still growing. A brace can improve the curve, but the main goal is to keep the curve from getting worse. The decision depends on:

  • The size of the curve
  • How much the child has left to grow
  • How quickly the curve has changed

A brace works best for kids who are still growing because that is when the curve can get worse.

Why Early Detection Is Key

Catching scoliosis early gives families more choices. If a curve is small, doctors can just watch it. If the curve is bigger or growing fast, starting a brace early can prevent bigger problems later. Think of it like straightening a young tree—it’s much easier than trying to bend an older one. Early action means more hope for avoiding surgery and keeping the spine as healthy as possible.

How Scoliosis Braces Work

When a doctor recommends a scoliosis brace, many families feel unsure about what lies ahead. Scoliosis braces may look simple, but the way they work is both gentle and smart. These devices guide the spine, encourage better alignment, and help slow down the curve while kids and teens are still growing. Most braces are designed to be worn under clothing, quietly doing their job throughout the day or night. Let’s dig deeper into how different braces work, how they fit, and what kids can expect during treatment.

Main Types of Scoliosis Braces

Different braces work for different kinds of scoliosis and body shapes. Below are the most common types and how they each manage the curve.

Boston Brace 3D®

The Boston Brace 3D® is the most widely used type. It wraps around the torso, from just below the chest down to the hips. This brace is made from lightweight plastic, it’s made from a scan or cast of the body and can be lined for comfort. Small pads inside the brace press gently against spots where the spine curves the most.

  • How it works: The Boston Brace 3D® uses gentle, steady pressure to hold the spine as straight as possible. It has areas of relief or space that allows the corrected spine to move into and to not impede breathing.
  • When it’s worn: Most kids wear this brace for 16 to 23 hours a day, taking it off for bathing or certain activities. The more it is worn, the more effective the brace is.
  • What to expect: At first, wearing the brace can feel odd or tight. Clothes may fit differently. Over time, most kids adjust and find ways to stay active and comfortable.

Wilmington Brace

The Wilmington brace is made from a single piece of plastic that opens in the front with Velcro straps for easy removal.

  • How it works: This brace fits very close to the body, almost like a shell. Because it’s molded just for each person, it gives the right pressure at key spots to steer growth as the spine gets longer.
  • When it’s worn: Kids usually wear the Wilmington brace about 18 to 23 hours daily.
  • What to expect: The smooth outer shell fits well under clothes.

Nighttime Braces

Not all braces need to be worn all day. Nighttime options, like the Boston Night Shift, Providence or Charleston bending brace, are worn only while sleeping.

  • How they work: These braces gently bend or twist the spine to a corrected position. Since sleep is calmer than daytime activity, the brace can place stronger, focused pressure on the curve without making daily life harder.
  • When they’re worn: Only during sleep (about 8 to 10 hours each night).
  • What to expect: Nighttime braces can feel snug initially because they place the body in a gently corrected position. Most children adapt quickly, as the brace is worn only while they sleep and doesn’t interfere with daytime activities.

Quick Comparison Table: Scoliosis Brace Types

Here’s a simple comparison to help make sense of the main types:

Brace TypeHow It’s WornWhen It’s WornKey Features
BostonAround torso (under arms to hips)16–23 hours/dayMost common; adjustable pads
WilmingtonCustom full torso (front-opening)18–23 hours/dayMolded fit; smooth surface
Nighttime (Providence/Charleston)Only at night8–10 hours/nightOver corrective; sleep-only

Fitting and Wearing Scoliosis Braces

Getting a scoliosis brace always starts with a fitting by an orthotist, a specialist trained to custom-build braces. They take careful measurements, a scan of your body that helps create a shape to match the body, and build in the right support.

Braces fit snugly, but they should not pinch or hurt. The exact fit can change as a child grows, so regular check-ins allow for adjustments.

Most braces are barely visible under everyday clothes. Some kids choose undershirts made from soft cotton to protect their skin and make the brace more comfortable.

What to Expect During Treatment

Wearing a scoliosis brace takes patience. At first, it can feel strange or even a little uncomfortable, especially when sitting or moving in new ways. Many kids notice changes in how their clothes fit or how they move during sports.

Here are a few things most families experience:

  • Getting used to the brace: The body needs time to adjust. Mild soreness early on is normal.
  • Daily routines: With practice, kids learn how to put the brace on and off by themselves quickly.
  • Check-ups: Doctors and orthotists schedule regular visits to track growth and make sure the brace is working as planned.
  • Sticking with it: Most importantly, wearing the brace as prescribed gives the best chance to stop the curve from getting worse.

With support from parents, doctors, and friends, most kids find they can keep up with school, play, and everyday life while wearing a brace.

Key Benefits of Using a Scoliosis Brace

A scoliosis brace does more than just provide outside support. It acts as a partner in care for kids and teens, guiding the spine as it grows and giving families hope to avoid more invasive treatments. Beyond the physical effects, braces bring real emotional and social benefits for young people facing scoliosis. Let’s break down what these benefits look like in daily life.

Physical Benefits: Preventing Further Spine Curvature

The biggest physical benefit of a scoliosis brace is its power to slow or stop a curve from growing, and sometimes improve the curve. When the spine is changing quickly during growth spurts, even a small curve can get worse with time. Bracing works by holding the spine in a straighter position, making it much less likely for the curve to increase.

Medical guidelines, such as those from the Scoliosis Research Society, state that bracing can prevent curve progression in up to 85% of kids with moderate scoliosis. Studies show that if a brace is worn as recommended, most children avoid spine surgery later on. The brace acts like a steady hand, gently nudging the spine to grow straight. Here are the top physical benefits:

  • Slows, stops or improves curvature: A well-fitted brace can keep the spine from getting more curved, stopping the problem before it leads to more serious issues.
  • Reduces the need for surgery: Many children who wear their brace as directed never have to face surgery, which comes with risks and longer recovery.
  • Supports better posture: The brace encourages standing and sitting taller. This can help kids move better and sometimes breathe easier.
  • Encourages a more active daily life: With a brace, many kids can still play sports, exercise, and join in most normal activities.

A quick look at what braces can change, based on research:

BenefitHow Braces HelpTypical Success Rate
Slow/stop progressionHolds spine in straighter position70-85%
Avoid surgeryKeeps curve under 45-50 degrees (surgical threshold)Most with moderate curves
Improve postureEncourages upright spine alignmentSignificant
Help daily functionAllows for regular movement and playHigh

Braces work best when worn the right number of hours every day. Consistency is the key to results.

Emotional and Social Benefits

Living with scoliosis at a young age comes with emotional ups and downs. Some kids worry about feeling different, being stared at, or missing out on what’s important to them. A brace can actually make things better by giving back a sense of control.

Many children say that wearing a brace helps them feel stronger because it means they are actively managing their health. Rather than just waiting for things to change or get worse, they are doing something to help themselves. This boost in control can lead to better self-esteem and more confidence in daily life.

Key emotional and social benefits include:

  • Greater confidence: Kids learn they can handle challenges and take charge of their treatment. This confidence often spills over into friendships, sports, and school.
  • More normal activities: Most kids find that after they adjust to their brace, they can stay involved in the activities they enjoy, from dance to soccer to hanging out with friends.
  • Sense of belonging: Knowing they are not alone helps. Many find support in scoliosis groups or through connecting with others facing the same thing.

Support from family, friends, and medical experts is huge. Parents who encourage and listen, teachers who make small classroom adjustments, and doctors who explain the process in positive ways all help boost the child’s mood and self-image. Simple actions can make a big difference, such as:

  • Helping choose clothes that fit comfortably over the brace
  • Talking openly about feelings and fears
  • Celebrating milestones like check-ups or brace-free hours

A scoliosis brace is more than a medical device. For many kids and teens, it becomes a sign of their strength, growth, and spirit. With the right support, most adjust well and keep moving forward in every part of life.

Practical Tips for Living with a Scoliosis Brace

Daily life with a scoliosis brace takes patience and a bit of creativity, but it doesn’t have to slow you down. Kids, teens, and families often worry about comfort, clothing, and staying involved in normal activities. With the right steps, the brace can fit into your routine without taking over. Here are tried-and-true strategies for wearing a brace comfortably, looking after it, choosing clothes, and keeping up with favorite activities.

Getting Comfortable with the Brace

The first few days and weeks may feel awkward, but comfort improves with some adjustments and the right habits. Ease the transition and make daily life smoother with these practical ideas:

  • Wear a wrinkle/rib free, snug undershirt: Soft cotton or moisture-wicking shirts help prevent rubbing and skin irritation. Look for tagless styles to avoid itching.
  • Check fit and padding regularly: Skin can get sore where the brace presses. Let your orthotist know if you find red spots or sore areas that don’t fade after removing the brace. Small tweaks or extra padding often solve the problem.
  • Break it in slowly: Doctors/orthotist may recommend wearing the brace for short periods, then adding more hours each day until you reach the recommended wear time.
  • Stay cool: Braces can feel warm, especially in summer. Carry an extra T-shirt to change if your shirt gets sweaty during the day.
  • Ask about flex time: Some kids need to remove the brace for sports or certain events. Check with your doctor about approved times to be brace-free.

Caring for the Scoliosis Brace

Keeping the brace clean and in good shape will help with comfort and skin health. Families can set up easy routines:

  • Wipe the inside daily: Use a damp cloth with mild soap or a baby wipe. Dry the brace well before wearing it again.
  • Keep it dry: Moisture trapped between the skin and brace can cause rashes. Change sweaty shirts often, especially in warm weather or after sports.
  • Inspect for changes: Watch for damage or worn straps. Report any trouble to your orthotist so repairs can be made right away.
  • Schedule regular check-ups: The brace may need adjustments as your body changes. Don’t skip follow-up visits.

A simple cleaning routine and quick daily checks save time and prevent bigger problems.

Clothing Tips for Comfort and Style

Worried about how a brace will look under your clothes? With a few wardrobe tricks, most kids find options that look and feel good.

  • Layer up: Tee shirts, camisoles, tank tops, or thin long-sleeve shirts under the brace help reduce skin irritation and create a smoother look.
  • Choose looser styles: Flowy shirts, hoodies, and sweaters work well to cover the brace.
  • Try stretchy waistbands: Yoga pants, leggings, or sweatpants make dressing easier and avoid pressure from stiff jean waistbands.
  • Mind the length: Longer shirts help if you feel self-conscious about the brace edges showing.
  • Shop together: Choosing your own clothes gives you more control and confidence.

Clothes can still showcase your style even with a brace underneath. Mix and match until you find what works.

Staying Active in Sports and Daily Life

A brace shouldn’t stop you from joining in. Most kids keep up with sports, gym class, and hobbies (with a few thoughtful changes):

  • Check activity guidelines: Some sports (like swimming, gymnastics, or martial arts) are recommended to be brace-free, if your doctor agrees. For others, you can wear the brace most of the time, then take it off briefly for specific activities as advised.
  • Time activities: Plan your brace-free time around important practices or games if your doctor says it’s safe.
  • Protect the brace: For contact sports, its recommended you remove your brace, but check with your physician/orthotist.
  • Find movement you enjoy: Walking, cycling, or dancing can help stretch and strengthen your back even with a brace on.
  • Let coaches and teachers know: It helps if adults at school or sports know you have a brace. Most are willing to help with minor adjustments, like changes to team uniforms or more time to change for gym class.

Staying active matters for the body and the mind. With planning and teamwork, most kids keep doing the things they love.

Building a Routine That Works

You don’t have to figure out brace life alone. Families can make things easier with a regular routine and open communication.

  1. Set reminders: Use alarms or calendars for putting on, taking off, and cleaning the brace.
  2. Celebrate progress: Mark milestones on the calendar, like reaching a full day of wear or a painless week.
  3. Share feelings: Talk openly about what’s hard, and ask for help when needed.

Over time, these habits build confidence and make the brace feel like just one more part of the day—not a barrier. Small wins add up, and support from others helps everyone adjust.

Conclusion

Scoliosis braces offer real hope for kids and teens by slowing and sometimes improving curves, reducing the chance of surgery, and supporting active lives. Early action, routine checkups, and open conversations at home and school help kids feel confident through treatment. When families, doctors, and teachers work together, children get the support they need every step of the way.

A well-fitted brace is more than just a medical tool. It can give children strength, comfort, and a sense of control. Every small win adds up, making it possible to face scoliosis with courage.

Disclaimer:

OPSB products should be used under the guidance of a qualified healthcare professional. Individual results may vary. Please consult your pediatrician or orthopedic specialist for professional advice. This article is for informational purposes only and does not constitute medical advice. Always follow your doctor’s recommendations and instructions.

MAM-MM-125

https://family.opsb.com/wp-content/uploads/sites/2/2026/03/1X6A0718-scaled.jpg 1707 2560 mhoff /wp-content/uploads/sites/2/2026/03/family-resource-hub-logo.png mhoff2026-03-06 16:16:332026-03-10 15:06:45Understanding the Benefits of Scoliosis Braces for Kids and Teens

Self Care Tips for Kids and Teens With Scoliosis Bracing

Wearing a scoliosis brace can bring change to a young person’s daily routine. But like any change, getting into a new routine takes time. The right self-care tips can make bracing more bearable, help manage their emotions, and boost confidence. This guide offers practical ways for young people and families to handle the challenges and thrive while living with a brace.

Physical Self-Care Strategies for Wearing a Scoliosis Brace

Wearing a brace every day takes time to become part of the daily routine. Many kids and teens deal with skin changes, sore muscles, and less freedom to move the way they want. Good physical self-care can help you avoid most issues and stay as comfortable as possible. Here are some ways you can take great care of your body while wearing your brace.

Skin Care and Hygiene Tips

Keeping your skin healthy under a scoliosis brace starts with a strong daily routine. The skin underneath a brace can get sweaty, sore, and even itchy, which makes care important.

  • Wash your skin every day. Use lukewarm water and a gentle, unscented soap. This helps keep sweat and bacteria from building up.
  • Dry your skin fully before putting the brace back on. Trapped moisture can cause red spots or rashes.
  • Check your skin for changes. Look for red patches that do not go away after 20 mins. These could mean the brace needs an adjustment.
  • Wear a tight, breathable shirt (like a cotton tee or seamless tank) under the brace. Avoid thick seams or tags that can rub your skin.
  • Change the undershirt if you get sweaty to keep skin dry and cool.

A simple table below can help you remember these steps:

Skin Care StepWhy It Helps
Daily washingRemoves sweat and bacteria
Using mild soapPrevents irritation
Drying before braceStops rashes and discomfort
Soft, fitted shirtReduces rubbing and friction
Regular skin checksSpots trouble early

Listen to your body. If skin issues stick around, talk with your doctor or orthotist as soon as possible.

Managing Skin Discomfort

Bracing brings changes to how your body feels, especially when you’re getting used to it. There are ways to help your body adjust without missing out on things you love.

  • Ease in gradually. Follow the provided break in wear schedule to allow your body to adapt to the brace. If your doctor says it’s okay, build up brace wear time a little each day when you first start.
  • Keep skin dry. Wet, sweaty skin is more likely to be sore.

See your healthcare provider if you have pain that won’t go away, numbness, or deep red spots that don’t fade within 30 minutes after taking off your brace.

Safe and Fun Ways to Stay Active

Exercise keeps muscles strong and flexible, which is good for anyone wearing a brace. You don’t need to skip activity, but picking the right movements makes a big difference.

Talk with your healthcare provider (physician/orthotist) about continuing in your sport/dance/theater/recreational activities.  Keep active. Some activities require the brace not be worn – this will be your time out of brace.

Here are some kid- and teen-friendly activities that work well with bracing:

  • Swimming: The water takes pressure off your joints and helps your whole body move. Try gentle laps or water games.
  • Stretching routines: Daily stretches improve flexibility, ease stiffnes.
  • Walking: Going for walks (with or without your brace, as advised by your doctor) is gentle but keeps you moving.
  • Yoga for kids/teens: Look for simple yoga videos made for scoliosis or beginners. Many basic poses are safe but always double-check with your specialist.

Try different activities to see what fits your needs and feels fun. Stay safe, follow guidance from your doctor, orthotist, or therapist, and remember: movement is part of caring for both body and mind.

Boosting Emotional Well-Being While Wearing a Brace

Living with a scoliosis brace affects more than just your body, it can stir up lots of feelings each day. Feeling different, worrying about what others might think, or managing frustration and stress are all normal. Emotional health is just as important as physical comfort, and there are simple tools and ideas that can make a big difference. Taking care of your mind can help you stay strong, positive, and connected to what matters most.

Building Confidence With Your Brace

Adjusting to a brace often means learning to see yourself in a new way. Confidence doesn’t happen overnight, but you can grow it, step by step.

  • Reframe your thoughts: Instead of seeing the brace only as a challenge, remind yourself that it’s a tool helping you get stronger. Every time you wear it, you show courage.
  • Own your story: It’s okay to feel awkward at first. Sharing your story—maybe with close friends or through art, journaling, or social media—can help you take pride in what you’re facing.
  • Set small wins: Celebrate each success, like wearing the brace for a full day or finding a comfortable shirt. Little victories add up.
  • Find your style: Make your brace your own! Use colored straps, covers, or stickers (with your orthotist’s okay) to show off your personality.
  • Remember, everyone has something: Most people deal with something unique, even if it’s not visible. Your brace is just one part of your story.

Building confidence takes practice. Start with one tip, keep going, and you’ll find your own strength shining through.

Coping With Teasing and Social Situations

Social moments can feel tricky when your brace is noticeable. Worries about teasing or awkward questions are common for kids and teens, but you can handle them with simple strategies.

  • Plan your answer: Practice a calm, short way to explain your brace if someone asks. For example: “It helps my back stay healthy” or “I’ve got scoliosis and this keeps my spine straight.”
  • Stay calm: If teasing happens, take a deep breath. Try not to react right away. Save your energy for people who treat you well.
  • Find your supporters: Stick close to friends who treat you with kindness. Trusted adults—like parents, teachers, or counselors—can also help if teasing or bullying gets serious.
  • Let adults know: If bullying continues, tell a teacher or school counselor right away. You don’t have to handle it alone.
  • Join a group: Connecting with others who wear braces (online or in person) can help you feel less alone and offer space to share tips.

You deserve kindness and respect. Speak up when you need help, seek out supportive friends, and remind yourself that bravery looks different for everyone.

Practicing Mindfulness and Relaxation

Big feelings can build up when you’re adjusting to your brace. Mindfulness and relaxation can help settle tough emotions and give you fresh energy for each day.

Here are a few easy exercises to try anytime:

  • Belly Breathing: Sit or lie down comfortably. Place your hands on your belly. Breathe in slowly through your nose, feel your belly rise, then breathe out through your mouth. Try for 5 slow breaths.
  • Muscle Relaxation: Squeeze one body part at a time—for example, your hands or shoulders—hold for a count of five, then let go. Notice the difference as each part relaxes.
  • Body Scan: Starting at your toes, slowly notice each part of your body, moving up to the top of your head. Imagine sending warmth or calm to any spots that feel tense.
  • Mindful Moments: Focus on something you enjoy, like listening to music or drawing, and pay close attention to how it feels or sounds. Let your mind rest on that peaceful moment.

Practicing these exercises once or twice a day helps train your mind to handle stress and find calm even when things get tough. Keep trying, you may discover your own favorite ways to relax and recharge.

Involving Family, Friends, and School in Self-Care

Finding support from people around you is key to thriving while wearing a scoliosis brace. Friends, family members, and teachers all play an important role in helping kids and teens feel understood and cared for. Building your own support team takes honesty and a little creativity. Reaching out can make daily life easier, both at home and at school.

Talking to Family and Asking for Help

Open conversation is the foundation of strong support at home. Sharing your day-to-day feelings and needs can lighten the load and help everyone in your family understand how to help.

It’s normal to need extra comfort or a helping hand with things like putting on your brace, carrying a heavy backpack, or dealing with tough moments. Telling your family how you feel, instead of keeping it inside, builds trust and brings you closer together.

Here are practical ways to start talking and get support:

  • Share how you feel, honestly. If you’re sore, frustrated, or just need to talk, let your family know. Say something like, “Wearing my brace is making me tired today. Can we talk about it?”
  • Ask for specific help. Be clear about what you need. You might say, “Could you help me adjust my brace?” or “Can someone drive me to my appointment?”
  • Let others know how they can cheer you up. Sometimes, you just want to be distracted. Suggest playing a favorite game, watching a fun movie, or having your favorite meal together.
  • Set aside check-in times. A regular family chat, even ten minutes at dinner, gives everyone a chance to listen and support you.

Being open about your needs turns your family into a team, working together to make each day better.

Navigating School With a Scoliosis Brace

School brings its own challenges when wearing a brace. Talking to teachers, administration, the school nurse, and/or counselors and asking for fair adjustments helps you succeed and feel more comfortable in class.

Most teachers want to help, but they may not know exactly what you need unless you tell them. Don’t be shy about speaking up for yourself. You have a right to feel safe and included at school.

Consider these steps for a smoother school day:

  • Meet with your teachers early. Explain why you wear a brace and what kinds of tasks might be harder, sitting at certain desks, or joining P.E.
  • Request simple accommodations. Ask for extra time to dress for PE, a comfortable seat. If you need privacy to adjust your brace, talk to the nurse or counselor.
  • Mark calendar reminders for brace care. Set a quiet alarm on your phone to check or adjust your brace throughout the day, if needed.
  • Reach out for support. Trusted friends, a school nurse, or a guidance counselor can all help if you’re feeling overwhelmed or face teasing.

Bringing others into your self-care routine, both at home and at school, helps you feel less alone. A network of caring people can make your journey with a scoliosis brace easier, kinder, and more positive.

Fun and Creative Ways to Personalize Your Brace

Personalizing a scoliosis brace turns something medical into something meaningful and even fun. When your brace feels like it reflects who you are, wearing it each day can get a little easier. There are many ways to add color, style, and smiles to your brace. Kids and teens have found that owning their look boosts confidence and makes the process feel less clinical, sometimes, it can even feel like adding their own “armor” for the day. Celebrate your creativity by making your brace truly yours.

Decorating and Customizing Your Brace: Safe, Brace-Friendly Ideas

Take pride in your brace by trying out some safe decorating tips. Always check with your doctor or orthotist before making big changes, but many small touches are both brace-safe and simple. Here are some popular ways to decorate:

  • Removable stickers or decals: Pick your favorite themes, from animals to superheroes to sports. Make sure stickers are easy to remove and not too thick, so they don’t stop the brace from fitting right.
  • Fabric brace covers: These are sleeves made just for scoliosis braces. They slip on easily, come in bright colors and patterns, and feel soft against your skin. Some kids even have a few covers to match to their outfit or mood each day.
  • Washi tape or medical tape: Use on the hard plastic (not on foam padding) for a pop of color. Try stripes, zigzags, or layer different tapes for a unique look. Replace weekly so tape stays clean and doesn’t peel.
  • Safe paint or vinyl wraps: Some clinics offer custom brace painting, or you can use vinyl wraps designed for plastic. Always choose non-toxic, brace-safe products. If you plan to paint, let your orthotist apply a sealant for easy cleaning.
  • Pins, patches, or charms: Soft, sew-on patches can go on brace covers. Clip-on charms can attach to straps or cover edges (just avoid anything bulky that could catch on clothing).
  • Glow-in-the-dark decorations: Some kids love adding a little glow, especially if they wear their brace at night.

Personalizing isn’t just about looks. It’s a way to make the brace part of your world, not just something you carry along. Here’s a quick table with things you can safely use and things to skip:

Safe to UseBest to Avoid
Removable stickers/decalsSuper glue or permanent adhesive
Fabric brace covers/sleevesMetal studs or sharp pins
Medical or washi tapeAnything thick that changes fit
Colored straps (with approval)Paints with strong smells or toxins
Clip-on, soft charmsHeavy or bulky items

Get creative and show off your interests, favorite colors, or even supportive messages. Decorating your brace can spark conversation and help friends understand your journey, too.

If you enjoy drawing, ask for a blank brace cover you can decorate with fabric markers. Or make a design wall in your room with old cover pieces. The options are endless. Expressing yourself makes the brace less of a stranger and more like a teammate in your daily life.

Conclusion

Taking care of your body and mind is possible while wearing a scoliosis brace. Small steps—like practicing good skin care, staying active, and seeking support from others—add up to big improvements in comfort and confidence. Personalizing your brace can even bring a bit of fun to the process.

With the right tools, a strong routine, and the help of family and friends, kids and teens can handle the daily challenges of bracing and grow stronger through the experience. Every act of self-care is a sign of courage and progress.

Disclaimer:

OPSB products should be used under the guidance of a qualified healthcare professional. Individual results may vary. Please consult your pediatrician or orthopedic specialist for professional advice. This article is for informational purposes only and does not constitute medical advice. Always follow your doctor’s recommendations and instructions.

https://family.opsb.com/wp-content/uploads/sites/2/2026/03/1X6A0936-scaled.jpg 1707 2560 mhoff /wp-content/uploads/sites/2/2026/03/family-resource-hub-logo.png mhoff2026-03-06 16:09:182026-03-06 18:44:55Self Care Tips for Kids and Teens With Scoliosis Bracing

Tips for Adjusting to a Scoliosis Brace

Getting a scoliosis brace can feel like a big change, both for your body and your mindset. These braces help keep your spine healthy and support your treatment, but getting used to wearing one isn’t always easy. Many people deal with sore spots, discomfort, or worry about how the brace will affect daily life.

Adjusting takes patience and a few smart strategies. This guide shares practical tips that can ease the process, boost your comfort, and help you feel more confident from day one.

Understanding Your Scoliosis Brace

Switching to life with a scoliosis brace takes some getting used to, both physically and emotionally. Knowing what your brace does and why it was chosen helps set clear expectations from the start. Each brace is designed for your body and your curve, so recognizing the differences can help you feel more confident as you begin.

Types of Scoliosis Braces

Scoliosis braces come in several shapes, each with a purpose. Your doctor picks a style that matches your age, spinal curve, and activity level. Here’s a look at the most common types you may hear about:

Brace TypeWorn WhenKey FeaturesWho It’s For
Boston Brace 3D®Day and nightCustom from Scan, hides under clothes, build in correction forcesMost common for children/teens
Wilmington BraceDay and nightCustom-molded, Velcro fastenersChildren and teens
Charleston Bending BraceNight onlyFlexible, worn lying down, overcorrectionKids with flexible curves
Providence/Boston Night BraceNight onlyHypercorrection, Designed for sleepingMild to moderate curves
    

Doctors select a brace based on:

  • Where your curve is located on your spine.
  • How much you’re still growing.
  • Your lifestyle and preferences.

Knowing which brace you have and why it was recommended helps you feel more in control during treatment.

What to Expect When You Start Wearing a Brace

The first time you wear your brace, it might feel stiff or awkward. Most people notice it feels snug around their torso, hips, or shoulders (depending on the type). You may feel warmer than usual or notice new pressure points as your body adjusts.

Common early sensations include:

  • Some mild discomfort or rubbing.
  • Tightness while sitting or moving.
  • The urge to “break in” the brace by removing it more often.

Remember, your skin and muscles will get used to the brace over time. Wearing a thin, moisture-wicking shirt under the brace can help with comfort in the first days.

Common Feelings When Wearing a Brace

Getting a brace can bring up all kinds of feelings. You might feel nervous or even embarrassed at first, especially if you worry about how it will look under your clothes. Some people feel proud—they know they are taking action to support their health. Others feel frustrated by soreness, sweating, or limited movement.

Every feeling is normal. Change always comes with a mix of reactions. What matters is knowing that your brace is only temporary, and it’s helping protect your spine while you grow and your body will adjust to having the brace on over the first few weeks of wear.

The Goals of Bracing

Wearing a scoliosis brace isn’t about changing the way you look or move every day. The main goal is to stop your curve from getting worse as you grow. For many, bracing can keep a mild or moderate curve from needing surgery later and for some it can improve the curve. The brace supports your bones and muscles so you can stay active and focus on doing what you love.

Keeping these goals in mind can help you stay motivated, even on tougher days. Each hour you wear your brace brings you closer to your healthiest future.

Getting Comfortable Physically

Physical comfort is key when you first start wearing a scoliosis brace. Getting used to the brace means thinking about what you wear and how you treat your skin each day. A few simple changes can make a big difference, helping you avoid sore spots and making the brace feel less like a chore. This section will show you how to boost your comfort by making smart choices with clothing and daily routines.

Choosing the Right Clothing

What you wear under and over your brace affects how it feels on your body. The right layers can help you forget you even have it on.

  • Soft, Seamless Undergarments: Pick underwear, tank tops, or undershirts without thick seams, lace, or scratchy tags. Fabric should be soft and smooth against your skin to prevent rubbing and pressure marks.
  • Loose-Fitting Outerwear: Go for shirts, hoodies, and pants with a relaxed fit. Stretchy or forgiving waistbands help you feel less pinched during long days.
  • Avoiding Trouble Spots: Skip clothing with tight belts, fitted waistbands, or bulky seams that can press or bunch up under the brace. Look for dresses, athletic shorts, or sweatpants that glide smoothly over the brace.
  • Layers Matter: Light layers help keep sweat and heat from getting trapped under the brace. Moisture-wicking shirts made of materials like bamboo, cotton blends, or athletic fabrics keep you cool and dry better than thick cotton alone.

Here are some good fabric choices and tips for daily outfits:

Clothing ItemWhat to Look ForWhat to Avoid
UndershirtsSeamless, soft, moisture-wickingThick seams, lace, tight fit
OuterwearLoose, stretchy, lightweightBulky seams, fitted waist
Pants/ShortsElastic waist, soft fabricTight jeans, stiff belts
Dresses/SkirtsFlowy, comfortable, no hard hardwareZippers, heavy fabrics

Switching up what you wear as the weather changes also helps. In the summer, thin and breathable fabrics help prevent sweat rashes. In cooler months, layers add warmth without crowding the brace.

Preventing and Managing Skin Issues

Skin health can make or break your experience with a scoliosis brace. Soreness, red marks, or itchy patches are common when starting out, but you can keep problems at bay with a little daily care.

  • Check Your Skin Every Day: Look for small red spots or sore areas when you remove the brace. Early spots often go away overnight, but ongoing pain means you should tell your doctor or orthotist.
  • Clean Inside the Brace: Wipe the inside of the brace with mild soap and water and dry out completely to prevent dirt build up inside the brace.
  • Stick to a Gentle Skin Care Routine: Wash with mild, unscented soap and pat dry before putting the brace back on. A clean layer of skin helps prevent irritation and rashes.
  • Moisturize Smartly: Use a fragrance-free, non-greasy lotion on dry skin, but only after bathing and with enough time for it to fully absorb before putting the brace on. Skip powders and ointments that could rub off on the brace padding.
  • Beat the Heat: On warm days, choose highly breathable or sweat-wicking undershirts. Carry a backup undershirt if you get sweaty or damp. If the brace feels hot, try brief cool-down breaks if your wear time allows. Avoid keeping the brace in the car during the summer months as it can cause damage to the brace if it overheats.

Small steps can keep your skin healthy:

  1. Wash and dry your skin daily.
  2. Use soft, dry, seamless underclothes.
  3. Moisturize dry or itchy spots before strapping in.
  4. Air out the skin during brace-free times if possible.
  5. Report any lasting redness or sores to your care team.

Think of your skin as the main barrier between you and the brace. A little attention each day builds resilience, keeps friction low, and helps you focus on active, healthy living.

Adjusting Emotions and Building Confidence

Wearing a scoliosis brace can create a lot of mixed emotions. Some days you may feel strong and motivated. Other days, you might feel awkward, anxious, or frustrated. This is normal. Over time, you can shape your emotional response just like you’re shaping your spine. With steady support, honest conversations, and a focus on what makes you unique, you can build real confidence.

Staying Positive and Getting Support

Support makes everything easier, especially when you start something new. You don’t have to go through this alone. Many people want to help, listen, and encourage you as you adjust to life with a brace.

Reach out to these sources for connection and strength:

  • Family: Family can be a daily source of comfort. Let them know how you’re feeling, both on tough days and on days when things feel easier. If your brace rubs wrong or you feel down, tell them. The people who see you every day can notice changes and help address any problems that come up.
  • Friends: Good friends care about your well-being. Share what’s helpful and what’s hard for you right now. If someone asks about your brace, try to answer honestly, even if you keep it simple. Remind yourself: real friends support you no matter what.
  • In-Person Support Groups: Many hospitals and communities offer support groups for kids or teens with scoliosis. Sharing tips, stories, and struggles with people who “get it” can boost your spirits. Sometimes just seeing someone else in a brace can help. Ask your doctor, nurse, or school counselor if there’s a group near you.
  • Online Communities: Online forums and social media groups connect you with people worldwide who use scoliosis braces. Popular options include the Curvy Girls Scoliosis Support Group, Reddit’s r/Scoliosis, and Facebook groups dedicated to brace wearers. These spaces are good for advice and friendship when you’re looking for understanding.

Here’s a quick table with ideas for finding support:

Support SourceHow It HelpsWhere to Start
FamilyComfort, help with routines, kindnessShare stories at meals
FriendsFun, distraction, encouragementInvite them to learn with you
In-person Support GroupsPeer advice, sense of belongingAsk your doctor’s office
Online CommunitiesTips, emotional support, privacySearch forums and Facebook

Tips for Talking About Your Brace:

Sometimes, the hardest part is telling others about your brace. Here’s how to make these conversations easier:

  • Keep it simple: Try, “It’s a brace for my back. It helps my spine stay strong,” if you want a quick answer.
  • Share what you want: It’s always up to you what details to share. You can say, “I’m still getting used to it, but it’s part of my treatment.”
  • Answer with confidence: Remember, your brace is a medical tool, just like glasses or braces for teeth. Most people are curious, not judgmental.
  • Find your style: Express yourself with fun shirts, jewelry, or hairstyles you love. Personal style can help shift focus away from the brace itself—and show everyone you’re still you.
  • Encourage self-acceptance: Remind yourself every day that a brace won’t change who you are inside. Write notes or reminders you can see, like “Strong and Proud” or “I’m more than my brace.” You deserve to feel proud of your strength.

It can help to connect with others who wear a brace, especially on those rough days. Shared experiences and new friendships make the journey easier. Over time, you’ll discover that your brace doesn’t define you—it supports you. Your confidence will grow as you focus on what you can do, not just what you wear.

Sticking With the Treatment Plan

Wearing a scoliosis brace is a big commitment, but following your treatment plan brings the best results. It’s not just about the hours in the brace. It’s also about regular check-ins, seeing progress, and building habits that support your spine health. Small daily choices and a few smart tricks can help you stick with your schedule and feel proud of what you’re achieving.

Creating a Wear-Time Tracking Habit

Hitting your daily brace goals starts with knowing exactly how long you have it on. Keeping track helps you stay honest, spot small wins, and notice trends. Everyone has their own style, so use the method that’s easiest for you.

Some popular ways to track brace wear time:

  • Wear-Time Apps: Many braces now come with built-in sensors that sync with mobile apps for easy tracking. If yours doesn’t, try a timer or a simple app like Clockify, Streaks, or Habitica.
  • Printable Charts: Hang a chart in your room or on the fridge. Color in each hour you wear your brace to see progress at a glance. This creates a visual reward and can spark motivation.
  • Journals or Notebooks: Write down your daily wear hours, noting how you felt and any issues. This can also help you remember questions for your next appointment.
  • Reminders and Alarms: Use your phone or a smartwatch to set gentle reminders for when it’s time to put your brace on, or when you can take a break.

Here’s a quick look at the pros of each method:

Tracking MethodStays PrivateEasy to UpdateMotivates Progress
Mobile AppYesVery easyYes, built-in badges
Chart/VisualNoEasyYes: colorful cues
Journal/NotebookYesEasyGood for reflection
Reminders/AlarmsYesAuto-repeatKeeps you on track

By finding a method you enjoy, you’ll build a steady routine and keep up with your treatment goals.

Using Reminders and Setting Yourself Up for Success

Life gets busy. Even with the best motivation, it’s easy to lose track of time or forget to put on your brace, especially at first. Building reminders into your day helps make brace wear part of your routine instead of a chore.

Here are some simple ways to set reminders:

  • Set phone alarms that repeat daily at brace “on” and “off” times.
  • Pair brace time with everyday tasks (put it on after brushing your teeth or before starting homework).
  • Ask family members to check in or remind you, especially in the beginning.
  • Put sticky notes in places where you’ll see them—on the bathroom mirror, fridge, or your bedroom door.
  • Leave your brace in a visible spot as a visual cue.

Making wear time predictable removes stress. When it becomes part of your rhythm, you free up mental space for more enjoyable things.

Attending Follow-Up Appointments

Appointments with your doctor or orthotist are just as important as wearing your brace. These check-ins make sure everything fits right and that your treatment is on the right path.

Key reasons to keep follow-up appointments:

  • Fit Adjustments: Growth, weight changes, or daily wear can shift how the brace sits. Minor tweaks keep it comfortable and effective.
  • Progress Checks: X-rays or physical exams help your team see if your curve is staying stable or improving.
  • Answering Questions: Bring a list of concerns or questions from your brace journal. Your team is there to help.
  • Spotting Problems Early: If a sore spot or discomfort pops up, early help keeps small issues from getting worse.

Don’t hesitate to speak up about any problems at appointments. Open communication is a sign you’re engaged in your own care.

Celebrating Small Wins and Progress

Adjusting to a brace takes patience, but every day you stick to your plan is a win. Celebrate each milestone, whether it’s a full week of hitting your wear-time goal, surviving a hot summer day, or making it through gym class with confidence.

Meaningful ways to celebrate:

  • Share your progress with family or close friends when you hit a new goal.
  • Treat yourself to a favorite snack, playlist, or short movie night for meeting wear-time targets.
  • Record achievements in your journal—“Wore my brace for 18 hours,” “No red spots today,” or “First time I wore it to a friend’s house.”
  • Make a “brace milestone” board with stickers, drawings, or notes for each accomplishment.

Small celebrations boost your motivation and remind you how far you’ve come. The journey might feel long, but each step counts.

Conclusion

Getting used to a scoliosis brace brings both physical and emotional changes, but each small step you take makes a difference. Remember the value of comfortable clothing, daily skin care, honest conversations, and steady routines. Support from loved ones and tracking your progress can lighten tough days and celebrate your wins.

Adjusting gets easier with time. Every hour you wear your brace helps your future health and shows real strength. Keep going, trust your process, and be proud of how far you have come.

Disclaimer:

OPSB products should be used under the guidance of a qualified healthcare professional. Individual results may vary. Please consult your pediatrician or orthopedic specialist for professional advice. This article is for informational purposes only and does not constitute medical advice. Always follow your doctor’s recommendations and instructions.

MAM-MM-126

https://family.opsb.com/wp-content/uploads/sites/2/2026/03/1X6A9009-scaled.jpg 1707 2560 mhoff /wp-content/uploads/sites/2/2026/03/family-resource-hub-logo.png mhoff2026-03-06 14:04:392026-03-10 15:07:22Tips for Adjusting to a Scoliosis Brace

Pages

  • Home
  • Accessibility Statement
  • Publicity and Data Use Authorization & Release Policy
  • Cookie Policy
  • Terms of Use
  • Privacy Policy
  • Medical Disclaimer
  • About
  • Blogs
  • Product Resources
  • Scoliosis
  • Clubfoot
  • Lower Limb Bracing
  • Hip Dysplasia
  • Plagiocephaly
  • Femur Fracture
  • Prosthetics & Limb Difference
  • Surgical Resources
  • Connect with OP Specialty Bracing

Categories

  • Uncategorized
  • Stories
  • Condition
  • Clubfoot
  • Plagiocephaly
  • Femur Fracture
  • Prosthetics
  • Experience
  • About
  • Scoliosis
  • Hip Dysplasia
  • Lower Limb
  • Surgical Resources
  • Featured Stories

Archive

  • May 2026
  • April 2026
  • March 2026
  • February 2026
  • December 2025
  • October 2025

This website is for educational purposes only and does not constitute medical advice or replace consultation with your healthcare provider. PLEASE CONSULT YOUR PEDIATRICIAN OR ORTHOPEDIC SPECIALIST FOR PROFESSIONAL ADVICE REGARDING DIAGNOSIS AND TREATMENT OPTIONS. OPSB products should be used under the guidance of healthcare professionals. Full prescribing information can be found in product labeling. Individual results may vary.

Medical Disclaimer

©2026 OrthoPediatrics Corp.
OrthoPediatrics Specialty Bracing

Privacy Policy | Terms of Use | Cookie Policy | Accessibility Statement

Contact Us

Phone: 877-766-7384
Email: info@mdorthopaedics.com

Quick Links

  • Scoliosis
  • Clubfoot
  • Lower Limb
  • Hip Dysplasia
  • Plagiocephaly
  • Femur Fracture
  • Prosthetics & Limb Difference
  • Surgical Resources
Visit the OP Specialty Bracing website

Design and development by RainCastle Communications

  • Scoliosis
  • Clubfoot
  • Lower Limb
  • Hip Dysplasia
  • Plagiocephaly
  • Femur Fracture
  • Prosthetics & Limb Difference
  • Surgical Resources

    Quick Links

  • About
  • For Providers
  • Product Resources
  • Blogs
  • Find a Clinic