OPSB Family Resource Hub
  • About
  • For Providers
  • Product Resources
  • Blogs
  • Find a Clinic
Search Search
  • Scoliosis
  • Clubfoot
  • Lower Limb
  • Hip Dysplasia
  • Plagiocephaly
  • Femur Fracture
  • Prosthetics & Limb Difference
  • Surgical Resources
  • Menu Menu

Clubfoot Treatment Phases: Casting, Tenotomy, Bracing Explained

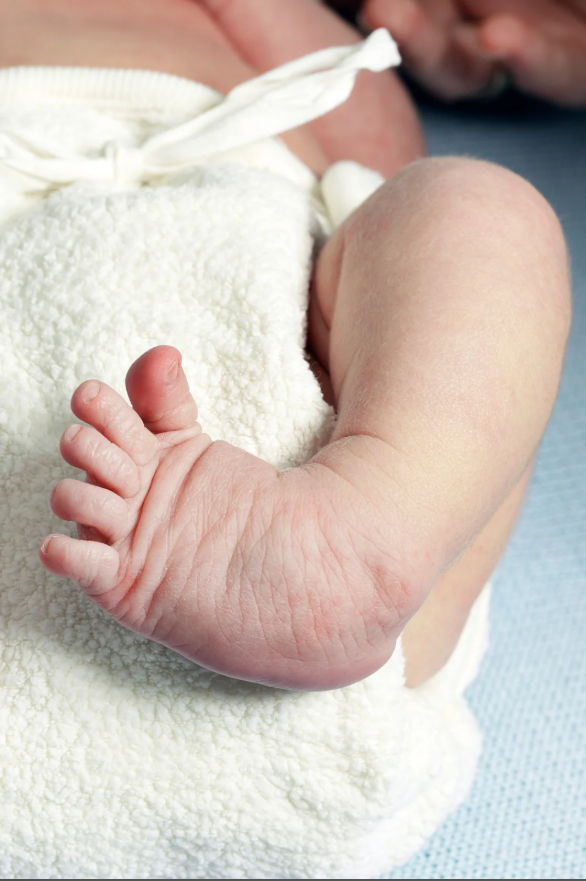
Clubfoot is a common birth defect where a baby’s foot turns inward and downward. The good news, when treatment starts in the first weeks of life, most children grow, play, and move with confidence.

Today, the Ponseti method is the gold standard, non-surgical approach. It follows clear clubfoot treatment phases: casting to gently guide the foot into position, a quick tenotomy to release a tight tendon, and bracing to hold the correction as your child grows.

In this post, you’ll see what each phase involves, how long it may take, and what parents can do at home. We’ll cover weekly casts, what to expect on tenotomy day, and how to make bracing easier for your baby. You’re not alone, and there’s a proven plan ahead.

The Casting Phase: Gently Correcting Your Baby’s Foot

The clubfoot casting phase is the start of the Ponseti method. A specialist guides the foot into a better position each week, then holds that progress with a cast. Most babies need 5 to 6 casts, changed weekly, to reach the right alignment. When started early, this approach corrects clubfoot in about 90 percent of cases and helps families avoid major surgery.

How Casting Sessions Are Done Step by Step

Each visit follows a calm, predictable rhythm. Knowing the flow makes it easier for you and your baby.

  1. Arrival and check-in
    • Your team reviews last week, checks skin and toes, and notes any slipping or swelling.
    • Measurements and photos help track progress.
  2. Gentle manipulation by a specialist
    • The clinician supports the leg and uses steady hands to correct the foot in a set order.
    • Cavus (high arch) is addressed first by aligning the forefoot with the hindfoot.
    • Adduction (foot curved inward) is eased by abducting, turning outward, the foot around the talus.
    • Varus (heel tilted inward) improves as the foot abducts further.
    • Equinus (tight Achilles with toes pointed down) is corrected last, often after adduction and varus are improved.
    • Key detail: the clinician applies firm counter-pressure on the head of the talus, not on the heel. This protects the heel and steers the correction.
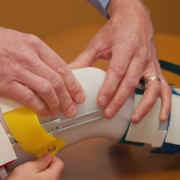
  3. Applying the cast
    • A long-leg cast goes from toes to upper thigh to control the knee and prevent slipping.
    • Soft padding protects bony areas, then plaster or fiberglass goes on to hold the new position.
    • Toes stay visible so you can check color and warmth.
  4. Final checks and education
    • The team checks circulation and comfort, then reviews home care.
    • You get the next appointment, usually in one week.

Progress is checked at every visit. The foot should abduct more each week, and the heel moves into a straighter position. If equinus remains after the final cast in this series, a small tendon lengthening is often planned next to release the tight Achilles, followed by a final cast.

Quick home tips that make a big difference:

  • Keep the cast dry and clean. Use sponge baths and a cast cover for diaper changes.
  • Check toes twice daily for color, warmth, and swelling.
  • Look for slipping, soft spots, or a strong odor. Call your clinic if you notice changes.
  • Position your baby with the cast supported. Tummy time is fine with supervision.
  • Dress in loose, front-opening clothes and size up in onesies or pants.

Common Questions About Clubfoot Casting

Parents ask smart questions. Here are clear answers you can trust.

  • Does it hurt?
    • Manipulations are gentle. Babies may fuss from being handled, not from sharp pain.
    • Some feel mild soreness the first day after a new cast. Cuddles, feeds, or a pacifier help.
  • How long does it last?
    • Most babies need 5 to 6 weekly casts in the clubfoot casting phase.
    • The goal is steady gains, not rushing. Each cast builds on the last.
  • What if we miss a session?
    • Call your clinic right away. A short delay is usually manageable.
    • Try not to skip. Weekly timing keeps tissues soft and the correction on track.
  • Is it safe and effective?
    • Yes. When started early and done by trained providers, success is around 95 percent.
    • Most children avoid major surgery and move into bracing after casting.
  • Will insurance cover it?
    • Most insurance plans cover clubfoot casting, tenotomy, and bracing. Confirm details with your provider and clinic.

Ways to soothe your baby during cast changes:

  • Feed during or right after the visit. A pacifier can help too.
  • Bring a favorite blanket or soft toy.
  • Use white noise, gentle shushing, or soft music.
  • Schedule visits after a nap when possible.
  • Keep your baby warm. Cool rooms can make babies fuss more.

Example that sets expectations: Many families notice the foot looks straighter after the second or third cast. By week five, the foot usually points forward with a flatter heel. That steady, gentle progress is the goal throughout the casting phase.

Tenotomy: The Quick Procedure That Unlocks Full Correction

A clubfoot tenotomy procedure is a brief, targeted step that finishes the correction started by casting. It releases the tight Achilles tendon so the foot can dorsiflex, which means toes can lift toward the shin. Most babies have this minor surgery around week 6 to 8 of treatment, after adduction and heel position have improved with casts. It takes only a few minutes, uses local anesthesia, and avoids major surgery.

What to expect: your provider makes a tiny incision or uses a needle to cut the tight tendon, then places a final cast to protect healing. After three weeks, your baby moves into bracing to hold the full correction.

Preparing for and Recovering from Tenotomy

Good prep and simple aftercare make the day smooth and calm.

Before the procedure:

  • Timing: Often planned after the last corrective cast, when only the tight heel cord remains.
  • Anesthesia: Local anesthesia numbs the area. Some providers use mild sedation. Babies often feed or suck during the quick procedure.
  • Feeding: Follow your clinic’s instructions. Some ask for a short fasting window, others allow feeding as normal before arrival.
  • Comfort plan: Bring a bottle or pacifier. Swaddling and white noise help most infants relax.

What happens during tenotomy:

  • The clinician cleans the skin and numbs the area.
  • A small incision or fine needle cuts the Achilles tendon in a controlled way.
  • The foot is gently dorsiflexed to the correct position.
  • A long-leg cast is applied to hold the new range.
  • Total time: about 5 to 10 minutes in an office or procedure room.

After the procedure:

  • Final cast: Worn for about 3 weeks. It protects the tendon while it heals and lengthens.
  • Pain: Most babies are comfortable. Mild fussiness on day one is common and eases with feeding and cuddles.
  • Skin checks: Look at the toes at least twice a day.
  • Watch for: Swelling that does not settle, toes that look blue or very pale, a bad smell from the cast, fever, or drainage at the heel.
  • Bathing: Keep the cast dry. Use sponge baths.
  • Sleep and positioning: Usual sleep positions are fine. Support the casted leg when holding or feeding.

Follow-up timeline:

  • A quick check within the first week if you have concerns about swelling or toe color.
  • Cast removal at about 3 weeks, then immediate transition to the foot abduction brace.
  • First bracing check soon after fitting to confirm fit, skin comfort, and foot position.

The cast’s role in healing:

  • The final cast holds the foot in dorsiflexion (a more neutral position) while the tendon regrows at the correct length.
  • It protects the small incision, limits stress on the heel cord, and locks in the last part of the correction.

Quick reminder for parents:

  • Keep a simple log of toe checks and any concerns.
  • Call sooner rather than later if something feels off. You know your baby best.

Why Tenotomy Is a Game-Changer in Clubfoot Care

Casting brings the foot close to straight, but the tight Achilles often blocks the last bit of upward motion. Tenotomy solves this bottleneck. By releasing the tendon, the heel drops, the ankle flexes up, and the foot reaches the final position needed for stable bracing.

Key benefits:

  • High need, high impact: About 80 to 90 percent of babies in the Ponseti method need tenotomy to complete correction.
  • Quick and low risk: Done under local anesthesia in 5 to 10 minutes with a tiny incision and minimal bleeding.
  • No major surgery: It finishes the correction phase without open surgery, large scars, or hospital stays.
  • Better dorsiflexion: The ankle gains the upward motion needed for normal steps later on.
  • Smooth transition to bracing: The final cast heals the tendon in the right length, then bracing holds the gains.

What outcomes look like:

  • Parents often notice the foot points forward with an easy upward flex after the final cast comes off.
  • Clinics report strong success when tenotomy is paired with consistent bracing after healing.
  • Complications are uncommon and usually minor, such as small skin irritation near the incision.

Short success snapshot:

  • Procedure: Local anesthesia, tiny cut, 5 to 10 minutes.
  • Healing: Final cast for 3 weeks while the tendon regrows.
  • Next step: Straight into bracing to protect the correction.

Think of casting as steering the foot into line, and tenotomy as releasing the parking brake at the end. Once the brake is off, the foot can reach the right position, and bracing keeps it there as your child grows.

The Bracing Phase: Keeping Your Child’s Feet Straight and Strong

The clubfoot bracing phase holds the hard-won correction from casting and tenotomy. A foot abduction orthosis (FAO) keeps your child’s feet pointed in the right direction while bones, tendons, and ligaments grow. Most families use the brace almost full time at first, then for sleep only for several years. Consistent wear lowers the chance of relapse and sets your child up for normal walking and play.

Recommended wear schedule at a glance:

PhaseHours per dayTypical duration
Full-time22 to 23 hoursFirst 3 months after final cast
Nights and naps12 to 14 hoursFor several years

Why it matters: studies have shown that relapse rates can be over 30% percent when bracing is not followed. High compliance is the difference-maker.

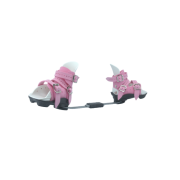
Types of Braces and How to Use Them Right

Most children use a Ponseti-style FAO, also called boots-and-bar brace. It is simple, sturdy, and designed to hold the feet in the corrected position.

How the standard brace works:

  • Two open-toe shoes (or soft boots) attach to a metal or carbon bar.
  • The bar keeps feet turned outward and slightly up, which blocks the foot from turning in again.
  • The bar length is set close to shoulder width to match hip spacing.

Typical angle settings:

  • Bilateral clubfoot: both feet turned out about 60 to 70 degrees.
  • Unilateral clubfoot: affected foot 60 to 70 degrees, unaffected foot about 30 to 40 degrees.
  • Ankle is set in a few degrees of dorsiflexion to help keep the heel down in the shoe.
  • Your provider and orthotist will set these specifically for your child’s foot.

Fit and daily use tips:

  • Use thin, seamless socks. Pull the heel of the foot snugly into the back of the shoe.
  • Tighten across the midfoot first, not the toes. The heel must stay down and back in the heel pocket of the sandal.
  • Check skin after the first 30 to 60 minutes. Red spots that fade are normal, but hot spots or blisters need attention.
  • Let your baby kick and move with the bar on. That movement keeps hips and knees active.

Adjustments for growth:

  • Expect new shoes or size adjustments as your child grows. Early on, refits often happen every 3 to 4 months.
  • Recheck bar length and angles at each visit. Feet should stay at the prescribed settings.
  • Ask for help if you notice heel slip, curling toes, or pressure marks that do not fade.

Variations you may see:

  • Quick-release bar clips for fast diaper changes.
  • Soft boots instead of hard shoes for smaller feet or sensitive skin.
  • Shorter bars for early days at home, then standard length once you are confident.

Cleaning and storage:

  • Wipe the bar daily with a damp cloth, then dry.
  • Wash shoe liners or socks daily. Replace worn straps or liners.
  • Air-dry gear out of direct heat. Heat can warp plastic and weaken glue.
  • During baths, store the brace in the same safe spot so it does not get lost.
  • When your child outgrows a set, clean, dry, and label it with the angles and bar length before storing.

What to do if something feels off:

  • Persistent redness, swelling, or blisters call for a fit check.
  • Clicking hardware or loose screws need tightening or replacement.
  • If the shoe looks crooked on the bar, pause use and call your clinic.

Overcoming Challenges in the Bracing Journey

The first weeks can feel like a big change. A simple routine makes it easier for you and your baby.

If your baby is fussy:

  • Start with short comfort breaks during the day, then return to full wear time.
  • Use feeds, swaddling, or white noise during brace on and off times.
  • Build a soothing bedtime routine: warm bath, lotion, pajama, socks, brace, story, feed.

If you see skin irritation:

  • Use thin, dry socks without seams. Moist skin rubs more.
  • Re-seat the heel and tighten at the midfoot. Most rubbing comes from heel slip.
  • Add a cotton barrier only if your clinic agrees. Extra padding can hide poor fit.
  • Call early for new red spots that do not fade within an hour.

If the brace feels heavy or awkward:

  • Try play mats and floor time so your baby can kick freely.
  • Offer stroller walks, babywearing with legs supported, and gentle bicycle legs.
  • Keep toys at kicking distance. Movement builds strength and comfort.

Ways to boost compliance:

  • Track wear time with a simple log or phone reminder.
  • Keep the brace at the crib for nights and the changing table for naps.
  • Pack a spare pair of socks in the diaper bag.
  • Replace worn parts fast. A smooth brace is easier to love.

Make the hours fly with small wins:

  • Distraction helps. Use music, mobiles, teething toys, or a short massage.
  • Choose outfits that fit over the brace, like wide-leg pants or sleep sacks.
  • Celebrate streaks. A sticker chart or photo diary motivates older toddlers.

Stay connected:

  • Schedule regular check-ups to review fit, angles, and skin. Early visits are often at 1 to 2 weeks after fitting, then every few months.
  • Join a clubfoot support group or parent forum. Borrow tips, share photos, and learn from families who have been there.
  • Ask your team about growth plans, travel tips, and what to watch for between visits.

Long-term payoff:

  • Consistent bracing protects the correction and supports normal walking.
  • Most kids run, jump, and play sports just like their peers.
  • The habit you build now gives your child strong, straight feet for life.

Conclusion

Casting corrects the foot, tenotomy unlocks ankle motion, bracing maintains alignment during growth. With early care and steady brace wear, clubfoot treatment success is the norm. Most kids walk, run, and play like their friends.

Disclaimer:

OPSB products should be used under the guidance of a qualified healthcare professional. Individual results may vary. Please consult your pediatrician or orthopedic specialist for professional advice. This article is for informational purposes only and does not constitute medical advice. Always follow your doctor’s recommendations and instructions.

IAM-MM-042

https://family.opsb.com/wp-content/uploads/sites/2/2026/02/Screenshot-2025-10-29-143755.png 448 796 mhoff /wp-content/uploads/sites/2/2026/03/family-resource-hub-logo.png mhoff2026-02-26 21:25:322026-03-13 21:24:05Clubfoot Treatment Phases: Casting, Tenotomy, Bracing Explained

Ponseti Method Clubfoot Braces: Common Questions Answered

Clubfoot is a common birth difference that twists a baby’s foot inward and downward. The Ponseti method gently corrects it with a series of casts, then a small procedure (called Achilles tenotomy) for most babies, and long-term bracing. The casts create the correction. The braces help keep it in correction.

If you feel nervous about the brace phase, you are not alone. Parents worry about fit, sleep, skin, and how long this will last. The good news is that braces are safe, proven, and very effective when used as directed.

Here’s what this post covers in plain language. How the brace works, how many hours to wear it, and what a good fit looks like. Skin checks, socks, and comfort tips. What to do if the brace slips, squeaks, or your baby cries. When to call your care team.

You will also find practical advice for daily life. Nap routines, nighttime stretches, and diaper changes. Bath time, travel, daycare, and growing shoe sizes. Simple tweaks make a big difference.

This guide draws on expert guidelines and real parent experiences, so you get both the why and the how. You will see what to expect in the first weeks, then during maintenance. Clear steps help you stay consistent without second-guessing.

You’ve already done the hard part by starting treatment. With the right brace habits, most families see strong, lasting results. Let’s take the worry out of this next step and answer your most common questions with clarity and care.

What Are Ponseti Method Clubfoot Braces and How Do They Work?

Ponseti braces are simple, smart tools that protect the correction made by casting. The brace is a bar connected to two lightweight boots. The boots hold the feet in an outward, upward position that matches the corrected shape. Think of it as a gentle trainer that keeps the feet pointed in the right direction while your baby grows.

The goal is not to push hard. The brace maintains the stretch that the casts created, then uses growth to your advantage. Tendons and soft tissues adapt slowly over time. With steady positioning, the corrected foot learns its new shape, which lowers the risk of relapse.

Most babies begin bracing right after the final cast, often around 3 to 4 months old. At first, the brace is worn full time as advised by your care team, then at night and naps for several years. This schedule supports natural foot growth during key stages.

Here is how it works in practice:

  • Positioning: The boots set the feet at the right angle, usually turned outward and slightly up.
  • Symmetry: The bar keeps both feet moving together, which prevents twisting back in.
  • Consistency: Regular wear holds the stretch, so tissues remodel in a safe, steady way.

Surgery tries to correct shape by cutting or moving tissues. Ponseti bracing supports correction without cutting. That means less pain, fewer complications, and a focus on normal growth. When used as directed, it guides the foot with calm, predictable forces instead of forceful fixes.

Parents often ask why a bar and boots are still used today. The answer is science and results. The brace aligns the foot with the line of growth. It provides a constant, low load that tissues accept well. Over time, that steady cue helps the corrected foot stay flexible, strong, and ready for play.

Why Choose Braces Over Other Treatments?

Bracing works for most families and most feet. When paired with proper casting, published clinical data show over 90% correction without major surgery. Large multicenter reports and international clubfoot groups have confirmed these results across different settings.

Key advantages for your child and your budget:

  • High success, low risk: The brace maintains correction without cutting tissue. That means fewer complications and less pain than operations.
  • Cost-effective: Braces and follow-up visits typically cost less than surgery, hospital stays, and repeat procedures that follow relapse.
  • Strong long-term outcomes: Children treated with Ponseti casting and bracing usually walk, run, and play at normal activity levels.
  • Family friendly: Most care happens at home. You control routines, comfort, and consistency.

Some parents worry the brace looks old-fashioned or might not be enough. Current guidelines and studies still favor bracing after casting because it prevents relapse better than any other option. The method is modern in its results, simple in its design, and kind to babies.

If you want the safest path to a stable, flexible foot, bracing after Ponseti casting is the standard for a reason. It protects the work already done, supports natural growth, and helps your child move into toddler life with confidence.

How Long Do Children Need to Wear Clubfoot Braces?

Most families follow a clear plan. Right after the last cast, babies wear the brace full time, 23 hours a day, for about 3 months. After that, the schedule shifts to nights and naps for several years. This routine keeps the correction your team worked hard to achieve.

Care teams may adjust timing based on your child’s foot, age, and growth. Some kids stay on full-time wear a bit longer if the foot was very stiff. Others move to nights and naps sooner if progress is strong and consistent. Your orthopedist checks angles, range of motion, and skin, then fine-tunes the plan.

Helpful ways to stay on track:

  • Use a timer or app: Track daily hours and streaks.
  • Keep a simple journal: Note wear time, naps, and any issues.
  • Make it routine: Brace on after bath, after feeding, and at bedtime.

Most families say the shift to part-time wear feels like a win. Sleep improves, days feel lighter, and the habit sticks. One parent shared that a calendar with stickers kept their toddler excited. Another used a phone reminder, and the brace became part of the bedtime story.

What Happens If Bracing Is Skipped or Inconsistent?

Relapse is the main risk. The foot can drift inward again if the brace is not used as prescribed. That can lead to recasting, extra clinic visits, and, in some cases, surgery. Published studies link poor brace use with higher relapse rates. Strong adherence keeps correction in place, with success often above 90%.

The goal here is prevention, not pressure. Families who hit bumps early often get back on track with support. Small fixes help a lot, such as better socks, a fit check, or a new nap routine. Many parents report that once comfort is solved, nightly wear becomes second nature and stress drops fast.

When Can Kids Stop Using the Braces Completely?

Most children stop around school age, but rarely beyond age 4 and 5 years. The team will taper use as your child grows, then reassess at follow-ups. Signs of readiness include flexible ankles, a straight foot, and no inward drift after long play days.

Even after bracing stops, your child still gets periodic checks. This is normal. Kids run, jump, play sports, and outgrow shoes fast, so quick check-ins protect long-term results. The great news, backed by long-term outcomes, is that most kids move on to active, full lives with strong, pain-free feet.

Tips for Comfort, Care, and Daily Life with Clubfoot Braces

Small tweaks make bracing easier for you and your child. Build a simple routine, choose soft layers, and keep checks quick. The goal is steady wear with calm, happy days.

  • Sizing basics: Toes should not curl or press against the front. The heel should sit all the way back with the heel cup visible through the window, if present. Straps sit snug, not tight.
  • Clothing that works: Knee-high cotton socks, footless pajamas, and wide-leg pants. A sleep sack keeps blankets away from the bar.
  • Cleaning: Wipe boots with mild soap and water, then air dry. Do not use heat. Wash socks daily.
  • Sleep positions: Back sleeping is safest. Place the bar above the blanket, not under it. A sleep sack reduces tangles and fuss.

How to Handle Common Challenges Like Fussiness or Skin Problems?

Babies fuss for many reasons. Comfort first, then check the fit. Quick fixes help most families.

  • Soothing during wear: Feed, swaddle the upper body, sing, or use white noise. Try a mobile, books, or a short massage before bed. Many babies settle after 10 to 15 minutes.
  • Reduce friction: Use thin, tall cotton socks with no wrinkles. Smooth socks to the toes. Add a soft brace cover or leggings over the bar to stop drafts and squeaks.
  • Dryness or mild redness: A small amount of plain, fragrance-free moisturizer on dry skin after bath, not right before strapping in. Let skin dry fully.
  • When to call the doctor: Redness that lasts more than 20 to 30 minutes after removal, swelling, blisters, bleeding, warmth, foul odor, or your baby will not bear touch. Also call for repeated heel slip.
  • Hot day hacks: Cool room, breathable socks, shorter cuddle breaks with the brace off only if your schedule allows and your team agrees. Keep consistent wear time.
  • Bath time: Remove the brace, wash and dry skin well, especially between toes. Put socks and boots back on once skin is fully dry.

Maintaining and Adjusting the Braces Over Time

Feet grow fast, which means regular checks and small adjustments. Plan quick fit checks each week and growth checks every few months.

  • Growth schedule: Most kids need size or bar adjustments every 2 to 3 months in the first year, then less often. Follow your clinic plan.
  • Fit signs to watch: Toes near the boot edge, strap marks that look deep, heel not staying down, or new fussiness after calm weeks. Bar width should match shoulder width, unless your team says otherwise.
  • At-home care: Wipe boots weekly with mild soap, air dry, and keep straps clean. Replace worn liners or straps.
  • Storage: When off, loosen straps, keep the brace dry and out of direct sun. Store in a breathable bag, not a sealed plastic bin.
  • Warranty and replacements: Check the maker’s policy. Brands like Markell or Boots for Clubfoot often have limited warranties for defects and may offer size exchanges or replacement parts. Keep receipts and note serial numbers.
  • Travel tips: Pack spare socks, a small screwdriver or hex key if your brace uses one, and a thin blanket to wrap the bar in the car seat. At the airport, allow extra time for screening.
  • Playtime: Floor time is great. Babies can kick and roll with the bar. Use soft mats and avoid toys that catch on the bar.

Conclusion

Clubfoot braces do the quiet work that keeps correction strong. Consistent wear, good fit, and simple routines protect the progress earned through casting. Small issues respond well to early tweaks, which keeps nights calm and results steady.

Stay in close touch with your orthopedist or physical therapist. Ask for fit checks, skin guidance, and schedule updates as your child grows. Use reputable resources, like your clinic’s education materials, national clubfoot groups, and parent communities that share real-world tips.

Most families report what matters most. Kids walk, run, and play with confidence after the Ponseti plan. Keep going, stay consistent, and celebrate each easy bedtime and smooth morning.

Have a question or a tip that helped your family? Share your experience in the comments, and consider joining a clubfoot support group to keep the momentum and the encouragement going.

Disclaimer:

OPSB products should be used under the guidance of a qualified healthcare professional. Individual results may vary. Please consult your pediatrician or orthopedic specialist for professional advice. This article is for informational purposes only and does not constitute medical advice. Always follow your doctor’s recommendations and instructions.

IAM-MM-042

https://family.opsb.com/wp-content/uploads/sites/2/2026/02/Picture17.png 535 535 mhoff /wp-content/uploads/sites/2/2026/03/family-resource-hub-logo.png mhoff2026-02-26 21:19:572026-02-26 21:20:01Ponseti Method Clubfoot Braces: Common Questions Answered

A Parents Guide to Clubfoot Diagnosis: When and How

Worried about a foot that looks turned in at birth? Clubfoot means a baby’s foot points inward and downward from birth, and it is common and treatable. It is not your fault, and with early care most children walk, run, and play without limits.

Clubfoot is often found during a routine prenatal ultrasound, usually around the second trimester. If it is not seen before birth, your pediatrician or a pediatric orthopedist can diagnose it at the newborn exam. Sometimes only one foot is affected, sometimes both.

Early diagnosis leads to better outcomes, especially with the Ponseti method. This gentle approach uses a series of casts, a small outpatient procedure on the Achilles tendon in many cases, and bracing to guide the foot into a healthy position. Starting treatment in the first weeks sets kids up for strong, flexible feet.

This guide explains when clubfoot is usually diagnosed, how doctors confirm it, and what parents can expect next. You will learn who is involved, what tests are used, and the first steps after diagnosis. The goal is to ease worry with clear, practical facts.

If you are searching for clubfoot diagnosis for parents, you are in the right place. You will get plain answers you can trust, along with tips to prepare for appointments. Keep reading to feel ready, confident, and supported from day one.

When Can Clubfoot Be Diagnosed During Pregnancy?

Some cases are first seen on the mid-pregnancy ultrasound, usually around 18 to 22 weeks. Sonographers look at both feet during the anatomy scan and can spot a foot that points inward and downward. Detection rates are about 60 percent, which means some cases are missed until birth or flagged but later turn out normal. Early knowledge from early detection can help you plan care, but it is important to remember that if your child is diagnosed before or after birth, the time of diagnosis does not impact your child’s treatment or outcome.

The Role of Ultrasounds in Early Detection

During the standard anatomy scan, the sonographer reviews the baby head to toe. For the feet, they assess:

  • Foot shape and position: Is the sole facing inward and downward relative to the leg?
  • Alignment: Does the foot line up with the tibia and fibula?
  • Movement: Does the foot move freely or stay fixed in one direction?

If a view is unclear, your provider may schedule a follow-up scan in a week or two. Fetal position, low amniotic fluid, a wriggly baby, or later gestational age can hide the feet. This is common. Ultrasound is non-invasive, safe, and routine.

Helpful questions to ask during or after the scan:

  • Can you check the baby’s feet in a few different views?
  • Do the feet move normally today?
  • If the view is limited, when should we repeat the scan?
  • If clubfoot is suspected, can you note if one or both feet are affected?

False positives can occur, especially if the foot is pressed against the uterus. Your provider will look for consistent signs before making a likely diagnosis.

Other Prenatal Tests for Confirmation

If the initial scan suggests clubfoot and images are limited, your provider may consider:

  • 3D ultrasound: Offers clearer foot contours. Helpful for counseling, not always required.
  • Fetal MRI: Rarely needed. Used when the view is very limited or other concerns exist.
  • Amniocentesis: Considered if there is a family history or other anomalies on ultrasound. It checks for genetic links. It carries a small miscarriage risk, so it is optional and not routine.

Most families do not need advanced testing. Ask about the pros and cons, what each result would change, and whether a pediatric orthopedist visit during pregnancy would help you prepare.

How Clubfoot Is Diagnosed After Birth

Clubfoot diagnosis at birth usually happens in the delivery room or nursery. Doctors look at the shape and flexibility of each foot, then decide if a specialist should see your baby. The process is quick, hands-on, and gentle. If clubfoot is suspected, you will get a referral to a pediatric orthopedist so treatment can start early.

The Newborn Physical Examination Process

Right after birth, your baby gets a routine head-to-toe exam. For the feet, the doctor will:

  • Gently move the foot in different directions to check flexibility.
  • Look for alignment: the foot pointing down and in, with the sole facing up.
  • Compare both feet and legs, then note any stiffness, skin creases, or asymmetry.

This bedside check is painless and takes just a few minutes. If the foot moves easily into a normal position, it may be positional and not true clubfoot. If it stays stiff or springs back, clubfoot is more likely.

Specialists often use the Pirani score, a simple 0 to 6 scale that grades six signs of severity. Higher scores mean a stiffer foot and help guide how many casts might be needed. Ask your provider to share the score in plain terms so you know what to expect.

Helpful steps for parents:

  • Mention any family history of clubfoot or foot issues.
  • Take clear photos of the feet in a relaxed position for your records.
  • If you feel unsure about the plan, ask for a second opinion from a pediatric orthopedist. That is common and welcome.

Advanced Imaging and Tests Post-Birth

Most babies do not need imaging right away. The exam alone is enough to start treatment. When needed, your team may use:

  • X-rays after a few weeks or months to confirm bone position once the tiny bones harden.
  • Ultrasound in very young infants to look at cartilage structures and/or soft tissues, like tendons and ligaments.

These tests confirm the diagnosis and help tailor the care plan, but they rarely delay casting. Your provider will explain each step and keep it simple. The goal is clear: start gentle correction early so your child has a strong, flexible foot.

Signs to Watch For and Next Steps After Diagnosis

Once clubfoot is on your radar, small details matter. You will not catch every sign at once, and that is okay. Look during diaper changes, bath time, and when your baby relaxes. What if your baby has mild symptoms? Pay attention anyway, then share what you see with your doctor.

Common Symptoms Parents Might Notice

Some signs are easy to spot. Others are subtle and appear during daily care.

  • Foot twisted inward and downward: The sole may face inward, and the toes point down.
  • Stiff foot: The foot does not flatten when you change a diaper or press gently.
  • Deep skin creases: Extra creases on the inside or back of the ankle.
  • Tight Achilles tendon: The heel does not touch the surface easily, and the foot resists lifting up.
  • Smaller calf on the affected side: The lower leg looks slimmer, and the foot may look shorter.
  • Limited movement: The foot springs back when you try to move it into a neutral position.

How is this different from temporary positioning issues? Positional feet feel soft, move into a normal position, and often improve in a few days. True clubfoot stays stiff and does not correct with gentle stretching.

Helpful tip: take clear photos or short videos in the same positions each week. Add notes about stiffness, skin marks from the brace or cast, or feeding and sleep changes. These details help your doctor fine-tune care.

What Happens Next: From Diagnosis to Treatment

After diagnosis, you will get a referral to a pediatric orthopedist. Most teams start the Ponseti method in the first weeks.

  1. Serial casting: Weekly casts guide the foot into better alignment. Expect about 4 to 8 casts.
  2. Achilles tenotomy: A quick outpatient procedure in many cases to release tightness of the Achilles tendon that allows the final correction of the downward appearance.
  3. Bracing phase: A foot abduction brace holds the correction. Full time at first, then nap and night wear for several years.

Your role matters. Check toes for color and warmth after each cast, keep skin clean and dry, and report redness or swelling right away. Attend each follow-up. Small concerns today prevent bigger issues later.

Helpful resources: the Ponseti International website, your hospital’s orthopedic clinic, and parent support groups. Hearing from other families brings calm and practical tips.

You are not alone. With early care and steady follow-through, most kids walk, run, and play without limits.

Conclusion

Early answers calm fear. Most families first hear about clubfoot on the mid-pregnancy ultrasound, then confirm details after birth with a hands-on exam. From there, the path is clear. A trained pediatric orthopedist starts gentle serial casting, often follows with a small Achilles release, then protects the correction with bracing. Starting early, showing up for every visit, and keeping skin and toes checked lead to strong, flexible feet.

Use this guide to clubfoot diagnosis for new parents to plan next steps with confidence. Bring photos, ask about severity scores, and agree on a start date for casting. If imaging is suggested, learn what it adds and whether it changes the plan. Partner with your pediatrician and orthopedist, and keep notes between visits. Small details you share help the team tailor care.

Clubfoot is treatable, and informed parents lead to happy outcomes. Your child can walk, run, and play without limits. Thank you for reading and caring so deeply for your baby. If this guide helped, share your experience or questions in the comments to support the next family. For more parent-friendly insights on diagnosis, treatment, and daily care, follow along and stay connected.

Disclaimer:

OPSB products should be used under the guidance of a qualified healthcare professional. Individual results may vary. Please consult your pediatrician or orthopedic specialist for professional advice. This article is for informational purposes only and does not constitute medical advice. Always follow your doctor’s recommendations and instructions.

IAM-MM-047

https://family.opsb.com/wp-content/uploads/sites/2/2026/02/Screenshot-2025-10-16-142626.png 881 586 mhoff /wp-content/uploads/sites/2/2026/03/family-resource-hub-logo.png mhoff2026-02-24 23:34:472026-02-25 20:16:22A Parents Guide to Clubfoot Diagnosis: When and How

Compression for Child Fracture Healing: How Bracing Helps

It happened in a blink. A backyard cartwheel turned into a fall, a sharp cry, and a trip to urgent care. Your child is brave, you hold it together, and then you hear the word fracture. Now you want clear steps that help healing start fast.

Kids do not heal like adults. Their bones are growing, with active growth plates and a sturdy outer layer that responds quickly when supported well. This is good news, as long as the break gets the right kind of steady support.

That is where gentle compression matters. A consistent, light squeeze at the fracture site limits tiny shifts, calms swelling, and helps bone ends stay in close contact. Less motion means less pain and a stronger signal for the body to build new bone.

Bracing can deliver that steady compression without a bulky cast in many stable fractures. It keeps alignment, protects tender tissue, and can be adjusted as swelling changes where casts cannot. Many braces allow skin checks and easier hygiene, which kids and parents appreciate.

In this post, you will get the science in simple terms, no jargon. You will learn what compression does, how bracing supports healing in children, and when doctors choose it. You will also get tips for home care.

Parents should care because smart compression can shorten recovery time, improve comfort by reducing pain, and reduce setbacks. It supports safe movement, better sleep, and fewer worries about bumps at school or play. The goal is proper healing, less pain, and a confident return to fun.

What Compression Does for Healing Broken Bones in Kids

Gentle compression is a steady, light squeeze that holds bone ends close, like cupping a cracked egg so it does not wobble. Compressing the abundant soft tissue surrounding the femur fracture reduces swelling, keeps alignment, and signals the body to weld the break with new bone. For kids, whose bones bend before they break, that steady hold brings faster comfort and helps them return to school and play sooner.

The Science Behind Compression and Bone Repair

Ever wonder why kids bounce back so quickly? Their bones have a thick periosteum, the tough outer sleeve that stays partly intact during many breaks. That sleeve helps guide new bone, especially when compression keeps the pieces still.

Here is what happens:

  • Inflammation: Right after the break, blood rushes in. Compression limits swelling, eases pain, and protects tiny vessels so oxygen and nutrients keep flowing.
  • Repair: A soft callus forms like a bridge of gel. Think of squeezing a sponge so its sides touch again. Compression holds the gap narrow, so the soft callus hardens into solid bone faster.
  • Remodeling: Over weeks to months, the bone reshapes to normal shape. Stable pressure keeps forces predictable, so the new bone organizes stronger.

Kids often heal in weeks rather than months. Compared with adults, many pediatric fractures heal two to three times faster when supported well with steady compression from a brace or cast. A brace has the ability to be adjusted to allow for constant compression over the fracture site as swelling dissipates during the healing process. Compression from a fracture brace creates less motion, less pain, better bone contact.

Common Fractures in Children That Benefit Most

Greenstick fractures are partial breaks that happen because a child’s flexible bone bends, then cracks. Buckle fractures are compressions in the bone’s surface, common after a fall on an outstretched hand. Simple forearm breaks, wrist injuries, and some tibia and fibula fractures from playgrounds or sports also fit this pattern. About 80% of pediatric fractures involve the arms or legs, and most heal well without surgery when compression keeps the pieces quiet and aligned.

Common fracture types for pediatric femoral shaft fractures are spiral, oblique and transverse.

  • Spiral- the fracture moves from the bottom to the top or down from the top of the length of the bone while wrapping around it.
  • Oblique- the fracture is at an angle to the bone
  • Transverse- the fracture goes straight across the length of the bone horizontal to the floor

Why Children’s Fractures Heal Differently and Need Compression

Kids’ bones are not just smaller versions of adult bones. They are softer, more elastic, and covered by a thick periosteum, or outer layer, that helps guide repair. They also remodel better, which means small bends can straighten with time. Because of these favorable fracture healing dynamics in kids, a femoral fracture brace like the DF2® brace may be prescribed by your doctor.

How Bracing Delivers Compression for Faster Kid Recovery

Think of a brace as a custom-fit sleeve that hugs the injured area. It applies even pressure, limits unwanted motion, and still lets your child move a bit. Many stable pediatric fractures do well with this steady, gentle squeeze. Research in pediatric orthopedics reports faster healing with functional bracing for many stable arm and leg fractures, often 20 to 30 percent shorter than casting.

Braces come in styles that match a child’s needs:

  • Soft braces for wrists and forearms, light and breathable, easy for school days.
  • Semi-rigid wraps for elbows or ankles, with adjustable straps for swelling.
  • Rigid shells for shins and thighs, sturdy for walking and active kids.
  • Hybrid like the DF2®, that has soft areas like the waist section, flexible plastic over the leg to create mild compression, and an adjustable hip hinge to allow, limit, or lock motion.

How it helps:

  • Compression calms swelling and keeps bone ends in contact.
  • Controlled motion prevents the tiny shifts that trigger pain.
  • Skin checks are easier, so you can spot irritation early.

From clinic to home, the process is simple:

  1. Doctor checks fracture stability and selects brace type.
  2. A pediatric orthopedist or trained tech fits it snug, not tight.
  3. You get wear-time rules, activity limits, and a checkup date.
  4. At home, you monitor skin, adjust straps as swelling falls, and keep it clean.

Why parents like bracing:

  • Adjustability as swelling changes.
  • Easier bathing, as allowed by your doctor, and better sleep comfort.
  • Fewer setbacks from pressure points or stiffness.
  • No general anesthesia needed; can put the brace on outside of the OR, usually in a clinical setting
  • Use existing child care equipment. Do not need to rent or purchase specialized car seats, strollers, high chairs often needed to accommodate a spica cast.

Used the right way, bracing delivers steady compression, supports safe movement, and gets kids back to routine sooner.

Conclusion

Compression gives children’s fractures the steady support they need to heal properly. It limits motion, reduces swelling, and keeps bone ends touching, which protects and guides the callus into stronger bone. Fracture bracing delivers that gentle, even pressure, and it adapts as swelling changes. It also makes skin checks and daily care easier, which helps kids stay comfortable and active within safe limits.

Act early, then stay watchful. Get prompt medical care to confirm the fracture type and stability. Follow fit and wear instructions, check skin and circulation daily, and note any new pain or numbness. Keep follow-up visits, and ask how activity, school, and sleep should adjust while healing.

Most pediatric fractures heal well with mild compression and a well-fitted brace. Kids return to play, confidence rises, and daily life gets back on track. Talk with your pediatric orthopedist if you have concerns. Your attention, paired with the right brace, sets the stage for safe, steady, and speedy recovery.

Healing bones are strong bones in training. With the right plan and consistent care, your child can heal fully, feel better sooner, and come back ready for fun.

Disclaimer

OrthoPediatrics Corp. products should be used under the guidance of qualified healthcare professional. Individual results may vary. The DF2® brace is intended for femur fracture fixation and post-operative stabilization in pediatric patients from approximately 6 months to 5 years of age by providing immobilization of the femur, knee, and hip. Please consult your pediatrician or orthopedic specialist for professional advice, including product warnings, precautions, side effects and contraindications. This article is for informational purposes only and does not constitute medical advice. Always follow your doctor’s recommendations and instructions.

MAM-MM-099

https://family.opsb.com/wp-content/uploads/sites/2/2026/02/1X6A5234.jpg 683 1024 mhoff /wp-content/uploads/sites/2/2026/03/family-resource-hub-logo.png mhoff2026-02-26 22:51:162026-03-27 17:05:07Compression for Child Fracture Healing: How Bracing Helps

Broken Femur in Children: Healing Process, Recovery Timeline

It happens fast. Your child sprints across the yard, trips, and lands hard. The cry is different this time, the leg looks off, and a quick ER visit confirms it, a broken femur or thigh bone. The shock is real, and questions pile up before you even leave triage.

A broken femur in children is more common than most parents think. Kids move a lot, jump from heights, crash bikes, and play contact sports. Their bones are still growing, with softer areas near growth plates that change how fractures happen. Pain, swelling, and trouble standing are early signs that need prompt care.

Here is the good news. Children’s bones heal faster than adults’, and with the right plan, most kids return to normal play within a few months. In this article, you will learn what causes these injuries, what the healing process looks like, and how long recovery usually takes. We will also share clear care tips you can use at home and during follow-ups.

We will walk through each healing stage, from early inflammation to callus formation and bone remodeling. You will see how doctors set the bone, when a cast, brace, or surgery is used, and how to manage pain and swelling. You will also get guidance on nutrition, safe activity, walking aids, and when to call your provider.

If you are worried right now, you are not alone. With steady care and patience, the healing process is measured in weeks to months, not years. Most children heal well, grow strong, and get back to the games they love faster than adults. They also get more comfortable, and any pain usually subsides within a week or two after the injury.

Common Causes and Types of Femur Fractures in Children

Kids are active, fast, and fearless. The femur takes on big forces because it is long and carries body weight. When impact goes beyond what the bone can handle, it breaks. Children’s bones act like a young tree branch. They bend more than an adults, but they can still snap with the right force. Femur fractures are among the most common long-bone injuries in children under 5, especially with high-impact falls.

Everyday Accidents That Lead to Breaks

Most femur fractures in kids come from high-energy impacts. Think falls from bikes, jumps off playground equipment, or crashes on scooters and skateboards. Car crashes also cause femur fractures due to sudden force through the thigh and hip.

Lower-energy twists can break a young child’s femur too. Toddlers can catch a foot while sliding off furniture or turning during play, then the bone twists under their body weight. The femur’s length and weight-bearing role make it vulnerable in these moments.

Common scenarios parents see:

  • Bike or scooter falls at speed, often on uneven pavement.
  • Playground falls, from monkey bars or higher platforms.
  • Roughhousing with siblings, where a leg gets trapped and twisted.
  • Slips and falls on wet floors or grass, with the leg taking an awkward load.
  • Car seat restraint forces during a collision.

Understanding Different Break Patterns

An X-ray confirms the fracture and shows the pattern. That pattern guides treatment, from casting to surgery. Picture drawing lines on paper to make sense of it:

  • Transverse: A straight line across the bone, like drawing a short dash from left to right. This happens with a direct hit.
  • Oblique: A diagonal line, like a slash across the page. It often comes from a sharp angled force.
  • Spiral: A corkscrew line that wraps as it goes, like twisting a ribbon. This comes from a twisting injury, common in falls where the foot is stuck.
  • Impacted: The ends of the bone push into each other, like stacking two chalk pieces and pressing hard. This can occur when a child lands hard on a straight leg.
  • Comminuted: The bone breaks into several pieces, like a cracker that shatters. Usually a high-energy injury, such as a car crash.
  • Greenstick: Unique to kids. The bone bends and cracks on one side but does not break all the way through, like bending a fresh twig. This reflects the natural flexibility of growing bone.

Why kids’ fractures differ from adults:

  • Children’s bones are softer and more flexible, which allows bending and greenstick patterns.
  • Growth plates near the ends of bones change how forces travel through the femur.
  • Adults tend to have cleaner breaks with less bending, like snapping a dry twig.

Key takeaway: The X-ray tells the story. The pattern, the child’s age, and the injury force shape the plan. That is how the team decides between a cast, brace, or surgical fixation.

The Step-by-Step Healing Process for a Child’s Broken Femur

Bone healing follows a steady path. First comes inflammation, then a soft bridge of tissue, called callus, then hard bone, and finally reshaping. Kids, especially under the age of 5, tend to heal in about 6 weeks, faster than adults, thanks to strong blood supply and growth hormones. Doctors guide this process with immobilization, sometimes surgery, and close monitoring with X-rays.

Inflammation and Early Stabilization

The first 48 hours are busy inside the body. Blood rushes to the break and brings in healing cells. This causes swelling, warmth, and pain. Think of it like the body calling in a cleanup crew after a storm.

Go to the ER if your child cannot walk, the leg looks crooked or short, or pain is severe with any movement. These signs could indicate a fracture which needs to be evaluated by a medical professional.

At the hospital, the team reduces the fracture, which means they line up the bone ends. They then stabilize the leg with a cast, brace, or temporary splint while swelling settles. Pain medicine helps a lot, and dosing is tailored to your child’s weight. Your doctor may recommend ice and leg elevation reduce swelling and ease throbbing.

Key early steps you will see:

  • Reduction: The fractured bone is set by the doctor so it can heal in the right position.
  • Immobilization: A cast, brace, or splint keeps the leg still to protect the repair.
  • Pain control: Safe medications, rest, and elevation keep your child comfortable.

Deciding between a brace or cast

The choice depends on your child’s age, the fracture pattern, how stable the break is, and swelling. The goal is simple, keep the bone aligned while it heals and still let your child be safe at home.

Common options and when they are used:

  • Spica cast: Often used in toddlers and younger children. It stabilizes the hip and thigh.
  • Functional brace: Can be used in place of a spica cast in younger children (aged 1-5) as the treatment for the fracture.

When a cast or brace is not enough, surgeons may recommend fixation:

  • Flexible nails or rods: Common in school-aged kids with unstable fractures.
  • Plates and screws: Used for certain patterns or in older children and teens.
  • External fixator: Less common, used when soft tissues are injured or swelling is severe.

Pros and trade-offs to consider:

  • Cast: Strong control of motion, but heavier than a fracture brace and limits bathing.
  • Brace: Lighter, adjustable, does not need general anesthesia to apply like a spica cast does and can be removed to inspect skin. Removing the brace should be done by your doctor or after consulting with your doctor.
  • Surgical fixation: Earlier mobility and easier care, but involves an operation, a general anesthesia and later removal in some cases.

Your care team will weigh alignment, comfort, and your child’s daily needs.

Building New Bone and Remodeling

Healing moves from soft tissue to hard bone, like a plant sprouting, then growing a sturdy stem.

  • Weeks 1 to 3, soft callus: A rubbery bridge forms across the break. This is early repair tissue. It is not strong yet but it closes the gap. Keep weight off unless your doctor says otherwise.
  • Weeks 3 to 6, hard callus: Osteoblasts, the bone-building cells, replace the soft callus with hard bone. The leg feels more solid. Many kids shift from strict non-weight-bearing to partial, based on X-rays.

If physical therapy is prescribed by your doctor, the goals  often include:

  • Range of motion: Prevent knee and hip stiffness after immobilization.
  • Gentle strength: Rebuild thigh and hip muscles to support walking.
  • Gait training: Practice safe steps with crutches or a walker, then wean off.

Remodeling continues for months. The bone reshapes in response to daily stress, much like a tree branch that thickens where wind pushes. Children remodel well. Angles and minor offsets often smooth out over time, especially in younger kids.

Follow-up matters:

  • Regular visits: X-rays at set intervals confirm alignment and callus growth.
  • Activity steps: Move from rest, to light activity, to sports when cleared.
  • Watch-outs: Increased pain, new swelling, fever, numbness, or cast or brace fit issues need a call to your provider.

With calm, steady care, the body does the heavy lifting. Acceptable alignment, time, and smart movement bring most children back to full play within 3 months.

Recovery Timeline and What to Watch For

Kids’ femurs heal well with time, rest, and the right plan. Expect a faster pace in toddlers, a steadier pace in older kids, and a full return to play in a few months. Track progress with clear milestones, and keep an eye out for warning signs that need quick care.

Every case has its own timeline. A pediatric orthopedist can review your child’s age, fracture pattern, and X-rays, then give a personalized plan.

Milestones and Red Flags in Recovery

The checkpoints below help you know what to expect. Your child’s surgeon may adjust based on X-rays and comfort.

Typical progress:

  • Weeks 0 to 2: Swelling settles, pain improves with rest, ice, and medicines.
  • Around week 6: Cast or brace removal for many kids, if X-rays show solid callus. Full or partial weight bearing is usually allowed.
  • Around 3 months: Return to full activity.

Helpful ranges by age:

Age groupTypical immobilizationWeight-bearing progressionFull activity window
Toddlers (1 to 5 years)4 to 6 weeksFaster shift to weight-bearing with guidance3 to 4 months

Signs of good progress:

  • Less pain and swelling day to day.
  • Stronger leg and smoother steps with aids.
  • X-rays that show growing callus and steady alignment.

Red flags that need a call now:

  • Severe or rising pain that pain medicine does not help.
  • New numbness, tingling, or pale, cool skin below the cast or brace.
  • Increased swelling that does not ease with elevation.
  • Fever, chills, or wound drainage after surgery.
  • Bad odor, soft spots, or cracks in the cast or odor while wearing brace.

Follow-up rhythm:

  • X-rays every 2 to 4 weeks early on, then less often as healing strengthens.
  • Possible Physical therapy after immobilization to restore motion, strength, and balance.

Conclusion

Pediatric femur fractures tend to heal very well due to the growth and remodeling capabilities of children. Regardless of the method of treatment that your doctor chooses to treat the fracture, follow all instructions and make sure to attend all scheduled follow up appointments. The cast or brace treatment should last about 6 weeks with kids getting back to full activities within 3 months of the fracture.

Disclaimer

OrthoPediatrics Corp. products should be used under the guidance of qualified healthcare professional. Individual results may vary. Please consult your pediatrician or orthopedic specialist for professional advice, including product warnings, precautions, side effects and contraindications. This article is for informational purposes only and does not constitute medical advice. Always follow your doctor’s recommendations and instructions.

MAM-MM-095

https://family.opsb.com/wp-content/uploads/sites/2/2026/02/Screenshot-2025-11-20-133835.png 494 668 mhoff /wp-content/uploads/sites/2/2026/03/family-resource-hub-logo.png mhoff2026-02-26 22:48:302026-03-27 17:24:21Broken Femur in Children: Healing Process, Recovery Timeline

Parent Guide to Cranial Helmet Therapy: What to Expect

Picture your baby at the first helmet fitting, tiny fingers grabbing the edges, eyes wide, and you wondering if you’re doing the right thing. You are. Cranial helmet therapy is a non-invasive treatment that uses a custom helmet to gently guide your baby’s skull growth for flat head syndrome and similar shapes. It’s common for infants under 12 months, and it works best when started early.

This parent guide to cranial helmet therapy will help you feel prepared. You’ll learn your child can be diagnosed, what the scan and fitting look like, and how long treatment usually takes. We’ll cover daily wear, cleaning, sleep, and tummy time, plus how to handle stares and questions with confidence.

The helmet doesn’t hurt, and most babies adapt within days. You’ll likely start with short wear periods, then build to the usual schedule your clinician sets. Regular check-ins keep the fit right as your baby grows, and steady progress is the goal, not overnight change.

You may worry about comfort, milestones, or missed cuddles. Parents often share the same fears at first, then feel relief once they see their baby smiling, playing, and hitting milestones with the helmet on. You’re still doing the same loving care, just with a helpful tool in the mix.

By the end, you’ll know what to expect and how to make each day smoother. You’ll have clear steps, realistic timelines, and simple tips for calm routines. Most of all, you’ll feel ready to support your baby through a safe, effective, and time-limited phase that leads to more rounded head shape and peace of mind.

Understanding Why Your Baby Needs Cranial Helmet Therapy

Babies’ skulls grow fast and stay soft for a short window. A cranial helmet acts like a gentle mold during that time, guiding growth toward a rounder, more symmetrical shape. Doctors often suggest starting a helmet treatment at 4 to 6 months old.

Common Conditions Treated with Helmets

Most helmet prescriptions follow one of three head shape patterns. These are common, often from sleep position or tight neck muscles, and they do not affect brain growth.

  • Plagiocephaly (one-sided flatness): The back of the head is flatter on one side. You may notice one ear shifted forward, a little forehead bump on the flat side, or a diagonal shape from above. Babies sometimes have a tight neck (torticollis) that makes them prefer turning one way.
  • Brachycephaly (wide flat back): The back of the head looks wide and flat across. The head may appear shorter front to back, with extra width near the ears. From above, it can look like a rounded rectangle.
  • Scaphocephaly (long narrow head): The head looks long and narrow from the top. In common positional cases, it comes from spending long periods on the side.

What do parents notice first? Uneven ears, a flat spot that grows more obvious, a bald patch where the head rests, or the forehead looking fuller on one side. The earlier you act, the easier the correction. Helmets guide growth to open spaces by providing room for growth in the flattened areas.. They help prevent worsening, not just fix what is there.

The Diagnosis Process Step by Step

  1. Initial check: Your pediatrician or specialist looks at head shape from several angles. They ask about sleep position, tummy time, birth history, and whether your baby favors one side.
  2. Measurements: They use calipers, specialized measurement tools, or a 3D scan to measure asymmetry and length-to-width ratios. It is not painful.
  3. Discussion: You review results, age, growth rate, and options. For moderate to severe cases, helmets are most effective when started between 4 and 6 months. They can still work up to 18 months and sometimes beyond, with slower progress. https://www.aans.org/patients/conditions-treatments/positional-plagiocephaly/
  4. Plan and timing: If a helmet is recommended, you receive a prescription and a referral to a certified orthotist. The helmet is custom made to redirect growth gently by guiding and not squeezing.
  5. Follow-ups: Visits every few weeks track growth and adjust the fit with the your healthcare team. Most babies adapt within days.

Insurance often covers helmets for moderate to severe cases. Plans may require photos, measurements, a doctor’s note, and proof that repositioning was tried. Ask about prior authorization and expected out-of-pocket costs. Choose a certified orthotist with infant experience, and make sure your pediatrician stays looped in.

Want to feel more in control at the appointment? Try these questions:

  • How severe is my baby’s head shape on your scale?
  • Would repositioning or physical therapy be enough right now?
  • What is the ideal start date for the best results?
  • How many hours per day is the wear schedule?
  • How often will we have check-ins and adjustments?
  • What success looks like for my baby’s age and shape?
  • What will insurance need, and who handles the paperwork?

Clear steps and the right timing make this process simpler With early action and a good fit, most families see steady, visible change.

The Helmet Fitting and Treatment Timeline

The cranial helmet fitting process is structured. Your baby’s helmet is custom made, with fit adjustments made on a schedule that follows growth. Most babies wear the helmet for 3 to 6 months. You will leave the first visit knowing how to put it on, what to watch for, and when to come back.

StageWhat HappensTypical Timing
First fittingInitial fit, with fit adjustments1 to 2 hours
Break-in periodShort wear times, skin adjustment checksFirst 2 to 3 days
Ongoing adjustmentsRegular growth checksEvery 1-4 weeks (dependent on age)

What Happens During the First Fitting

Plan for a 1 to 2 hour visit.

Here is the flow you can expect:

  1. Measurement and imaging: This happens prior to the fitting appointment, usually during the evaluation appointment, where the orthotist takes precise measurements with tools or does a 3D scan.
  2. Helmet selection: You may see brand options, and those options will vary depending on clinic location.
  3. Helmet fit & delivery: The helmet is placed, marked, and removed several times. The orthotist trims edges, adds small pads, and checks for appropriate fit. You practice putting it on and taking it off.
  4. First wear plan: Most clinics start with a short schedule on day one, then build to full-time wear. Mild fussing is common at first. Babies usually adjust within a few days.

A few simple steps help the visit go smoothly:

  • Feed before you arrive, and bring a favorite pacifier, toy, or swaddle.
  • Dress your baby in loose clothing with a wide neck. Avoid thick collars.
  • Skip lotions on the scalp the day of the fitting.

You will learn how to do quick skin checks. After a wear period, look for:

  • Light pink areas that fade within 30 minutes, which are normal.
  • Bright red spots that last longer than 30 to 60 minutes, which can signal pressure.
  • Rubbing at the edges, which can improve with padding or trimming.

If you see lasting red marks, call your orthotist. The orthotist can add padding, reshape inserts, or make adjustments to relieve pressure.

How Often You’ll Visit for Adjustments

Growth is fastest at the start, so appointments are closer together early in treatment. Expect:

  • Every 1 to 4 weeks throughout treatment. Many families land on every 2-3 weeks.

At each visit, you can expect:

  • Helmet removal, with a quick look at the helmet and pads.
  • Fit review for pressure points and alignment with your baby’s growth.
  • Reshaping or swapping inserts to open space where growth is needed and reduce pressure on flat areas.
  • A progress check with measurements or a repeat 3D scan to track improvement.

Between visits, you are the daily expert. Watch for:

  • Red marks that last longer than 30 to 60 minutes after removing the helmet.
  • New rubbing at the edges or near the ears.
  • Helmet movement that shifts or spins, which can mean it is too loose.

Keep a simple log of wear time, skin notes, and photos each week. Share it at your appointments. It helps the orthotist fine-tune the fit and shows progress you might miss day to day.

Most plans aim for 23 hours of wear per day once you reach full time. With regular appointments and good home care, the helmet works with growth to guide a more balanced shape.

Daily Life and Care Tips for Helmet Therapy Success

Daily routines make helmet therapy smoother. Most clinics recommend 23 hours of wear per day, with the helmet off only for bathing, cleaning, and quick skin checks. Expect a short adjustment period. Many parents say the first 1 to 2 weeks feel bumpy, then life feels normal again. Keep the goal in sight, caring for baby in cranial helmet gets easier with practice.

Cleaning Your Baby’s Helmet and Skin

A simple routine keeps the helmet clean and your baby’s skin relaxed.

  1. Daily wipe soap and water
    • Wipe the inside foam with water and a small drop of mild, fragrance-free soap.
    • Let the helmet air dry fully before putting it back on. Do not use a hair dryer or heater.
  2. Weekly deep clean
    • Disinfect weekly with a 70% isopropyl alcohol cleaner like
    • Let the helmet air dry fully before putting it back on. Do not use a hair dryer or heater.
  3. Sweat and warm weather
    • Expect extra moisture on hot days or after active play.
    • During the daily off-time, pat the scalp dry.
    • Dress your baby in breathable cotton. Skip hats or liners inside the helmet.
  4. Skin care basics
    • Keep the scalp clean and dry. Avoid oils and lotions before helmet wear.
    • Check for pink areas after removal. Light pink that fades within 30 minutes is common and normal.
    • For rubbing at edges of the helmet, contact your orthotist to address your concerns.
    • If you see bright red spots that last longer than 30 to 60 minutes, or any blistering, remove the helmet, and call your orthotist.
  5. Quick stink fix
    • Odor in the helmet is typical. This can occur even with regular and proper cleaning due to the baby’s oils and skin.
    • Odor can happen. Stay consistent with the daily wipe and weekly wash.
    • If smell lingers, ask your clinic about an approved cleaner. Do not use bleach, or strong sprays.

Example daily flow: Morning bath, dry hair and skin, quick helmet wipe, air dry 10 to 15 minutes, put helmet back on. Evening off-time for a skin check and a light wipe if sweaty.

Managing Sleep, Play, and Family Activities

Sleep

  • Follow safe sleep: place baby on their back for every sleep.
  • Use a light sleep sack and keep the room cool. Helmets hold heat, so avoid thick layers.
  • Night waking in the first week is common. White noise, a brief cuddle, or a feed can help.

Tummy time and play

  • Keep sessions short and frequent. A play mat, mirror, or high-contrast toy adds interest.
  • Encourage your baby to keep play, rolling, sitting, and crawling. The helmet may feel heavy for a few days, then your baby adapts.

Soothing fussiness

  • Distraction works. Offer a favorite toy, sing, walk, or step outside for fresh air.
  • If your baby cries when the helmet goes on, keep calm and consistent with the helmeting routine.

Involving siblings

  • Invite siblings to help with simple jobs, like choosing a clean cloth or bringing a toy.
  • Many clinics allow stickers or decals on the helmet. Let siblings add a small to make it “the cool helmet.”
  • Encourage joy and celebrate progress as a family.

Travel and outings

  • Pack a mini care kit: soft cloths, mild soap, a small fan or cooling cloth, and spare onesies.
  • Airport security is straightforward. Helmets can go through X-ray, and babies can usually wear them during screening. Let officers know it is a medical device.
  • Keep the helmet in your carry-on if your baby is not wearing it. Heat in the cargo hold can damage the foam and plastic.
  • On vacation, stick to the 23-hour routine. Plan the off-time around morning baths or evening wind-down.

Daycare and caregivers

  • Share a simple plan: wear schedule, how to put on and take off, daily wipe steps, and what skin changes to report.
  • Ask caregivers to log any red marks, sweaty periods, or unusual fussiness.

Small habits add up. Keep cleaning simple, protect sleep, and use the off-hour for skin checks. With steady routines and a little creativity, caring for baby in cranial helmet fits right into family life.

Overcoming Common Challenges in Cranial Helmet Therapy

Many parents worry about the first week, social stares, or cost. These are common challenges of cranial helmet therapy for parents, and there are clear ways to handle them. Expect a short adjustment period, a few curious looks in public, and bills that vary by clinic. The typical cost ranges from $2,000 to $4,000. Ask about payment plans, prior authorization, and charity care tied to your hospital system.

Helpful options to explore:

  • Insurance and appeals: Submit photos, measurements, and a letter of medical necessity.
  • Payment plans: Many clinics spread costs over several months.
  • Health accounts: Use HSA or FSA funds when available.
  • Community support: Local nonprofits or state programs sometimes help with medical devices.

Dealing with Initial Discomfort and Adjustment

Most babies resist at first because the helmet feels new.

Maintain skin health:

  • Keep the scalp clean and dry. Skip oils and heavy lotions before wear.
  • Expect light pink areas that fade in 30 minutes. Call the clinic for bright red marks that last longer, swelling, or any blistering.
  • A lukewarm bath during off-time can relax tense muscles. Avoid medicated creams unless your pediatrician suggests them.
  • If your baby seems in real pain or unusually fussy, stop, remove the helmet, and call your orthotist or pediatrician.

Stay motivated with a simple progress journal:

  • Take weekly photos from the same angles and in the same light.
  • Log daily wear time and any skin notes.
  • Write one win per week, like better sleep or easier tummy time.
  • Celebrate small gains. Growth change is gradual.

Most babies adapt within days. Consistency and calm help your baby feel safe, and your steady routine is the best signal that all is well.

Handling Questions from Friends and Strangers

You will get comments, from kind to clumsy. Decide ahead how you want to respond. Keep it short, friendly.

Ready-to-use replies:

  • “It’s helping shape his head nicely.”
  • “She’s in treatment for a flat spot. It works really well.”
  • “We’re a few months in, and we’re already seeing great progress.”

If someone pushes for more, try:

  • “We appreciate your concern. We’re following our doctor’s plan.”
  • “Thanks for asking, we’re in good hands.”

Use positive framing with friends and family:

  • Share a before and after photo from your clinic visits.
  • Explain that the helmet guides growth and does not hurt.
  • Ask for practical help, like a ride to the appointment or a quick grocery run during nap time.

Build confidence through community:

  • Join parent support groups online for real photos, timelines, and tips.
  • Follow your clinic’s resources for Q&A and care guides.
  • Share your weekly journal wins with your partner or a trusted friend.

Set boundaries on social media if that feels safer. A simple caption like “Medical device, short-term, big results” keeps the focus where you want it.

Know when to call the doctor. Reach out if your baby has a fever, unusual fussiness that does not settle, poor feeding, vomiting, blisters, or bright red marks that last longer than 60 minutes after helmet removal. Trust your gut and call if something feels off.

Conclusion

Cranial helmet therapy is a short period with long-term gains. Comfort grows, routines settle, and confidence follows. Keep taking weekly photos, notice better symmetry, and celebrate small wins along the way.

Next steps are simple. Attend your follow-up scans, and plan for a gradual taper off the helmet with your clinician. Keep a consistent tummy time routine and skin care simple, and stick with the routine that works.

Most families finish with a rounder head shape and parents feel proud of what they did with calm, consistent care. You started this journey to help your child, and you did.

Share your experience in the comments to help another parent feel ready. If you are deciding what to do next, talk with a certified orthotist or your pediatrician to get a clear plan for your baby.

Disclaimer:

OPSB products and products distributed by OrthoPediatrics Corp. should be used under the guidance of qualified healthcare professional. Individual results may vary. Please consult your pediatrician or orthopedic specialist for professional advice, including intended use, warnings, precautions, side effects and contraindications. This article is for informational purposes only and does not constitute medical advice. Always follow your doctor’s recommendations and instructions.

MAM-MM-102

https://family.opsb.com/wp-content/uploads/sites/2/2026/02/5M1A2353.jpg 683 652 mhoff /wp-content/uploads/sites/2/2026/03/family-resource-hub-logo.png mhoff2026-02-26 22:44:182026-04-30 10:13:40Parent Guide to Cranial Helmet Therapy: What to Expect

Torticollis and Flat Head Syndrome

Noticing a slight head tilt in photos, or a flat spot that wasn’t there before, can make any parent pause. You’re not imagining it, and you’re not alone. Many babies develop a tight neck (torticollis) that makes them favor one side, and that constant pressure can lead to a flat area on the head (flat head syndrome, also called plagiocephaly).

Torticollis happens when neck muscles are tight or imbalanced, so your baby prefers turning one way. Flat head syndrome is a change in skull shape from repeated pressure on one spot. The two conditions often show up together, since a head that rarely turns spreads pressure to the same area day after day.

Why does this matter now? Early detection helps you guide head position, keep neck range of motion, and support even head growth. With simple daily routines, like tummy time, varied sleep positions on the back, and playful stretches, many babies improve quickly. Some need extra help from pediatric physical therapy, which is gentle, practical, and parent friendly.

This guide explains how to spot the signs, what to try at home, and when to ask your pediatrician or a therapist for support. You’ll learn what works, what to skip, and how to build small habits that add up. The goal is a neck with full range of motion, a well-rounded head shape, and more relaxed days for your family.

Take a breath. You’ve already done the most important thing by paying attention. Let’s make a simple plan that fits your baby, your routine, and your peace of mind.

What Is Torticollis? Understanding the Neck Tilt in Babies

Torticollis means the neck muscles are tight or imbalanced, so the head tilts to one side and turns more easily in one direction. The sternocleidomastoid muscle, a strap-like muscle in the neck, is often involved. When it shortens, it pulls the head toward one shoulder and rotates the chin the other way. This affects how a baby looks around, plays, feeds, and rests. The good news is that with early attention, it is very treatable.

Signs and Symptoms of Torticollis to Watch For

Spotting torticollis early helps you protect neck movement and comfort. Look for patterns over a few days, not just a single moment.

  • Head tilts to one side: The ear seems closer to the shoulder on the same side most of the day.
  • Limited head turn to the one side: Your baby turns easily toward one shoulder, then struggles or resists the opposite way. Your baby can also turn their head to both sides easily but can still show signs of torticollis by not turning their head the same amount in both directions.
  • Fussiness in certain positions: Cranky during diaper changes or car seat time if asked to look the “hard” way.
  • Feeding preference: Prefers one breast or one bottle side because turning the other way feels tough.
  • Uneven play and tracking: Follows toys or faces only to one side during play or tummy time.
  • Plagiocephaly risk sign: You might notice more time resting on one side of the head.
  • Small, firm lump in the neck: A pea-sized bump in the muscle on one side of the neck can appear in some babies. It is a benign muscle “knot” that usually softens over time with care.
  • Asymmetry in the face or shoulders: One eyebrow or cheek looks more forward, or one shoulder sits a bit higher when held.

How is this different from normal baby behavior? Newborns often favor a side for a day or two. Torticollis sticks around, shows up in many settings, and limits movement. If the tilt and rotation pattern is consistent, or you see discomfort when you guide the head the other way, it points to torticollis rather than a fleeting preference.

Quick at-home checks can help you catch it:

  1. During play, move a bright toy slowly side to side. Note if one direction is easy, the other is avoided.
  2. During feeds, try both sides. Watch for refusal or frustration on one side.
  3. During tummy time, position toys slowly side to side and note if one direction is easier and the other is avoided.

Common Causes of Torticollis in Newborns

Most cases are present at birth, called congenital muscular torticollis, but some develop after. The causes are often simple and not serious, yet they need attention to protect comfort and motion.

  • Intrauterine positioning: A snug position in the womb can keep the neck turned or tilted for weeks. Twins, breech positioning, or limited space can add to this.
  • Difficult or assisted delivery: Long labor, forceps, or vacuum use can stress neck tissues, leading to muscle tightness or minor injury.
  • Muscle injury or tightness: Small tears in the neck muscle can heal with fibrosis, which shortens the muscle and pulls the head to one side.
  • Post-birth habits: Spending long periods in one position, like in a car seat or swing, reinforces a side preference and can tighten the neck further.
  • Vision differences: A subtle vision issue can make a baby favor one viewing angle, which then trains the neck to hold a tilt.
  • Reflux or comfort patterns: Babies may guard one side if turning the other way feels uncomfortable due to reflux or sensitivities.

Most torticollis is mild and responds well to early steps. Gentle stretches, varied positions, and guided play usually restore motion and comfort. Monitoring helps you avoid secondary issues like a flat spot, but the main goal is full neck range of motion. If you spot the signs, mention them to your pediatrician. Early, simple care makes a fast difference.

Flat Head Syndrome: What Causes a Baby’s Head to Flatten?

Flat head syndrome, also called positional plagiocephaly or brachycephaly, happens when a flat spot forms on the back or side of a baby’s head. Babies have soft, flexible skull bones. Repeated pressure on one area shapes those bones over time, much like a soft clay mold. Safe sleep practices are important and you can encourage adjustments to sleeping positions, such as turning the way your baby is facing etc. The goal is to vary pressure during awake time and notice early signs so growth stays even.

How Flat Head Develops and Its Early Signs

A baby’s skull has plates that are not fully joined. Constant pressure on one spot nudges those plates and changes the curve of the head. Daily habits can add up, especially in the first 3 to 4 months when growth is fast.

Common pressure patterns include:

  • Long stretches on the back: Extended time in cribs, bassinets, car seats, strollers, or swings.
  • Same head position during sleep: Babies often rest with the face turned to a preferred side.
  • Limited variety in awake positions: Less tummy time or fewer side-lying play sessions.
  • Environmental pull: Light, windows, or a mobile always placed on the same side of the crib.

Early signs to watch for:

  • Uneven head shape: One side of the back of the head looks flatter, or the back looks wide and flat across. The forehead on the same side may appear slightly more forward.
  • Bald spot: A patch where hair rubs off on the flat area.
  • Ear shift: One ear sits a bit more forward when viewed from above.
  • Facial asymmetry: One cheek looks fuller, or the eye on the flat side looks slightly different in shape.
  • Preferred head turn: Your baby consistently looks the same way during rest and play.
  • Clothes fit check: Hats or headbands sit unevenly, or you notice a tilt in photos.

Track head growth at well-baby visits. Ask for head circumference to be measured and charted at each checkup. If you notice shape changes between visits, take photos from the top and sides. Bring them to your pediatrician for comparison.

Potential Long-Term Effects If Left Untreated

Most cases affect appearance more than function. Still, uneven pressure over many months can have ripple effects.

Possible risks include:

  • Persistent asymmetry: A visible flat spot or uneven forehead that remains into childhood.
  • Jaw and bite changes: Jaw shift or bite alignment issues from facial asymmetry.
  • Ear alignment differences: One ear positioned slightly forward can affect how glasses or helmets fit.
  • Helmet or hat fit: Ongoing trouble with uniform fit in any protective head gear.

Here is the encouraging part. With action before 6 months, most babies show strong improvement, and many resolve fully. The skull is very responsive to change in the first year, especially in the first 0 to 8 months. Simple steps that spread out pressure, paired with active play and position changes, guide the head back toward a rounded shape. If shape does not improve, your pediatrician may recommend a physical therapy plan or, in some cases, a molding helmet.

The Connection: How Torticollis Leads to Flat Head Syndrome

Neck tightness limits how a baby turns the head. When the head rarely moves off one spot the steady pressure flattens the bone plates. This is why torticollis and flat head syndrome often appear together.

The Mechanism Behind the Link

Tight neck muscles act like a short bungee cord. They pull the head into a preferred tilt and turn, then keep it there.

Here is the simple chain of events:

  1. Neck muscles tighten on one side, which limits rotation and tilt.
  2. The baby rests in the same position during sleep and play.
  3. Constant contact loads the same skull area each day.
  4. The bone plates grow in the path of least resistance.
  5. A flat spot appears, and the head shape starts to look uneven.
  6. The flatter it gets, the more the head rolls back to that side.

A quick example makes it clear:

  • If a baby always turns the face to the right, the right side of the back part of the head takes most of the pressure. Over time, the left back flattens, and the left ear may shift slightly forward.

Key takeaway:

  • Ignoring torticollis raises the risk of a flat spot, since the tight muscle keeps feeding the same pressure pattern.
  • Early steps that restore head movement spread out pressure and protect shape.

Diagnosing the Torticollis-Flat Head Combo Early

Pediatric visits are the front line. The 2 to 4 month window is the sweet spot to diagnosis and begin treatment, since head growth is fast and bones respond well to change.

What doctors look for:

  • Physical exam: Neck range of motion, head tilt, and a consistent turn preference.
  • Head shape checks: Visual inspection from the top and sides, ear and forehead alignment, and head circumference tracking.
  • Measurements: Simple tools can estimate asymmetry. Some clinics use 3D photos or scans if shape is unclear.
  • Imaging: Rarely needed. Ultrasound or X-ray may be used if the exam suggests another issue.

Who may be involved:

  • Pediatrician: First assessment and monitoring.
  • Pediatric physical therapist: Stretching, positioning, and play-based exercises.
  • Craniofacial physician or orthotics team: For moderate to severe shape changes or helmet discussions.

Smart home tracking helps you spot patterns early:

  • Take weekly photos from the top, back, and both sides in the same lighting.
  • Note preferred head turn during sleep, feeds, and play.
  • Jot quick notes on tummy time, side-lying play, and any stretches you use.

Early identification leads to simple, effective care. When you catch the combo early, small daily changes often guide the head back to a rounder shape and improve neck motion and reduce neck tightness.

Preventing and Treating Torticollis and Flat Head Together

Neck tightness and head shape can influence each other, so a combined plan works best. Pair daily position changes with playful movement, then layer in professional help if progress stalls. Early steps are gentle, safe, and effective when done often.

Simple Home Strategies for Prevention and Relief

Small habits throughout the day can increase range of motion in your baby’s neck. Keep Safe Sleep per AAP on the back, then change positions during awake time.

  • Alternate head turns in the crib: Place your baby at the opposite end of the crib each night and switch which way the head faces. Put the interesting view or a parent’s spot on the non-preferred side. (Recommended for brachycephaly or preventing flatness)
  • Carry upright: Use a chest-to-chest hold or babywearing to take pressure off the back of the head. Vary which arm you use to encourage turning both ways.
  • Side-lying play: Lay your baby on each side with a rolled towel behind the back for support, then place toys at eye level.
  • Even feeding: Offer both breasts or switch arms for bottles so your baby turns toward the tighter side during some feeds.
  • Limit container time: Use car seats for travel only. Rotate time in swings or bouncers with floor play.
  • Engage the “hard” side: Place toys, light, or your face on the side your baby avoids. Lead with fun, not force.

Safe tummy time from day one:

  1. Start with 1 to 2 minutes, 3 to 5 times a day, always supervised and awake.
  2. Build to 15 to 30 minutes total per day by 2 months, broken into short sessions.
  3. Use your chest, a rolled towel under the chest, or a firm play mat for comfort.
  4. Keep it upbeat with songs, mirrors, and short breaks to avoid fatigue.

Helpful extras:

  • Diaper-change turns: Gently encourage your baby to look both ways at every change.
  • Visual trick: Move mobiles or a nightlight to the non-preferred side.
  • Photo check: Weekly top-down and side photos help you spot change early.

What to skip:

  • No sleep positioners or pillows in the crib. They are unsafe for sleep.
  • No DIY helmets or online head-shaping gadgets. They are not FDA approved.
  • Avoid forceful stretches. Gentle, pain-free movement wins.
  • Be cautious with unproven remedies like special mats or magnetic devices. Focus on position changes, play, and guidance from your care team.

Conclusion

Torticollis can limit your baby’s head movement which causes repeated pressure on your baby’s head which can in turn shape the skull. That is the link to flat head syndrome, also called plagiocephaly. Change the pattern early, and you change the outcome.

Simple daily steps  can go a long way to help. Mix tummy time with side-lying play, switch feeding sides, and carry upright to take pressure off the back of the head. If progress stalls, pediatric physical therapy adds safe stretches, strength, and position coaching.

Trust what you see. If photos show a tilt or a flat area, take notes, then talk with your pediatrician. Early intervention protects neck range, supports even head growth. Keep the routine light, playful, and consistent.

Disclaimer:

OPSB products and products distributed by OrthoPediatrics Corp. should be used under the guidance of qualified healthcare professional. Individual results may vary. Please consult your pediatrician or orthopedic specialist for professional advice, including intended use, warnings, precautions, side effects and contraindications. This article is for informational purposes only and does not constitute medical advice. Always follow your doctor’s recommendations and instructions.

MAM-MM-104

https://family.opsb.com/wp-content/uploads/sites/2/2026/02/Screenshot-2026-03-06-122652.png 385 661 mhoff /wp-content/uploads/sites/2/2026/03/family-resource-hub-logo.png mhoff2026-02-26 22:39:512026-03-27 17:20:36Torticollis and Flat Head Syndrome

Plagiocephaly vs Brachycephaly: Key Differences for Parents

Plagiocephaly means a flat spot on one side of the back of the head, often with an ear shift or forehead asymmetry. Brachycephaly means the back of the head is flat across both sides, which can make the head look wider from ear to ear. Both are common, positioning related, and treatable.

Knowing the difference matters. Early steps, like more tummy time, varied positions, and guided stretches when needed, can shape the head as your baby grows. Acting soon can reduce long-term concerns and support steady motor development.

This post explains what each term means, how to tell them apart, what causes them, and the signs to watch for at home. You’ll also get simple, parent friendly steps to start today.

Take a breath. These head shape changes do not affect brain growth, and most improve with time and in daily routine. With the right guidance, you can help your baby’s head round out as they grow.

Keep reading for plain language definitions, side by side differences, and practical next steps you can use this week. You’ll finish confident about what you’re seeing, what to do next, and when to check in with your pediatrician.

Common Causes and Risk Factors for Brachycephaly

A baby’s skull has soft spots, called fontanelles, and flexible sutures. These areas let the head mold and grow. Regular pressure on one broad area, over weeks, can flatten the back.

Common risks include:

  • Multiples: Twins or triplets share tight space in the womb.
  • Low birth weight or prematurity: Softer skulls and longer time in carriers or NICU positioning.
  • Limited movement: Torticollis, reflux discomfort, or delayed motor skills.
  • Prolonged back time: Swings, car seats, bouncers, or carriers used for long stretches.

Simple routines help redistribute pressure:

  • During feeds: Try side-lying bottle feeds or switch arms every feed.
  • Play: Use tummy time in short sets, then try propped side-lying with a rolled towel behind the back.
  • Holding: Wear your baby upright for play when awake, and vary which shoulder you use.
  • Sleep environment: Rotate crib orientation so your baby looks to different sides to see you or the room.

What Is Plagiocephaly and Why Does It Happen to Babies?

Plagiocephaly means one side of a baby’s head becomes flat, which can make the head look slightly tilted or asymmetrical. This usually happens from pressure on the same spot, often from sleeping on the back, time in car seats or swings, or a head-turning preference.

All cases of plagiocephaly are positional. Common causes include premature birth, torticollis (tight neck muscles that pull the head to one side), and limited tummy time. It is common to first notice signs of plagiocephaly in infants under 6 months, when skull bones are soft and growing fast. The good news is that it often improves with simple changes at home, like more varied positions and daily tummy time.

Practical prevention helps. If you are noticing signs of your baby favoring one side or have some flatness, switch your baby’s head turn each sleep period, vary crib orientation, and increase supervised tummy time during the day. Hold your baby upright for play and feeds when you can, and give equal time to both sides for visual play and carrying.

Signs to Watch for in Your Baby’s Head Shape

Spotting changes early, around 2 to 4 months, makes correction easier. Use light and check from above or with a mirror during bath time or diaper changes.

Look for:

  • One ear positioned a little forward compared with the other
  • A flat spot on one back corner of the head
  • A slight bump or fullness on the forehead on the same side as the back flattening
  • Subtle facial asymmetry, like one cheek looking fuller
  • A bald patch on the flattened side
  • A head-turning preference to one side

At home, gently view the crown from above while your baby sits in your lap. You can also take a photo from the top down. Most babies are not in pain. Some may resist tummy time or find rolling harder at first due to tightness, not injury.

How Plagiocephaly Differs from More Serious Conditions

Positional plagiocephaly is different from craniosynostosis. In craniosynostosis, skull bones fuse early and restrict growth, which requires surgery. In positional plagiocephaly, the skull is not fused and able to be reshaped without surgical intervention.

See your pediatrician for a clear diagnosis. A physical exam is usually enough. If needed, your provider may order imaging to assess the sutures. Most positional cases improve with repositioning, tummy time, and, when needed, guided stretches for torticollis. Caught early, many resolve without helmets.

Brachycephaly Explained

Brachycephaly is flattening across the back of the head, not just one side. The head can look wider from ear to ear and shorter front to back. This shape is common in early infancy and is usually positional. Safe back sleeping protects your baby, yet long periods on the same surface can add pressure.

How to Spot Brachycephaly Early at Home

Track from birth so you catch small changes. Symmetry is usually maintained in brachycephaly. The head looks even side to side, but proportions look wide and the back looks flat.

Try these simple checks:

  1. Take photos from the top, side, and behind in good light. It can help to wet down the hair to make the head shape better. Compare the photos every week.
  2. Look for a broad head shape, fuller sides above the ears, or a flat spot on the back of the head.

Keep back sleeping for safety https://www.aap.org/en/patient-care/safe-sleep/?srsltid=AfmBOoqhf4crC0k2FZ2zYIeP8juyDrx_fsS9jRoc940-MmIwO6QQcr7H . Vary positions during awake time, encourage rolling and reaching, and ask your pediatrician about wedges or supports only if advised.

Treatment Options and When to Start Them

Start with the basics, then build. Early weeks deliver the biggest gains.

  • Repositioning and routine tweaks: Rotate crib orientation, switch arms during feeds, and shift toys to encourage head turning to the non-flat side. Increase upright holding when awake and limit long stretches in swings or car seats.
  • Address neck tightness: If you see a head-turning preference, ask for a physical therapy referral. Gentle stretches and guided play often fix torticollis, which helps the head round out evenly.
  • Helmet therapy (cranial remolding orthosis): Consider for moderate to severe cases, usually started between 4 and 6 months once repositioning has been tried. Helmets are worn 23 hours per day and can aide with correction during peak growth. Pros: more predictable reshaping. Cons: cost, skin care needs, and frequent adjustments.

Timing matters. Begin repositioning as soon as you notice flattening, request a PT referral if turning is limited, and discuss a helmet if changes stall. After 12 to 18 months, growth slows, and helmets are less effective. Stay consistent, track progress with monthly photos, and keep your pediatrician in the loop.

Conclusion

Plagiocephaly vs brachycephaly comes down to pattern and symmetry as both are forms of flat head syndrome.  Repositioning, tummy time, and addressing torticollis can help guide a baby’s head shape. If needed, helmet therapy can help during the fastest growth months.

Keep it simple and consistent. Schedule a quick check-up with your pediatrician and track progress with monthly top-down photos. Small daily habits, like varied positions and more floor play, add up fast. Most babies show clear improvement within a few months of focused care.

If you want more support, ask your pediatrician about physical therapy or review trusted safe sleep resources. You are doing enough, and your calm, steady routine matters.

Babies grow fast, and they adapt quickly. With early steps and kind patience, positional plagiocephaly and brachycephaly become short chapters, not the headline.

Disclaimer:

OPSB products and products distributed by OrthoPediatrics Corp. should be used under the guidance of qualified healthcare professional. Individual results may vary. Please consult your pediatrician or orthopedic specialist for professional advice, including intended use, warnings, precautions, side effects and contraindications. This article is for informational purposes only and does not constitute medical advice. Always follow your doctor’s recommendations and instructions.

MAM-MM-103

https://family.opsb.com/wp-content/uploads/sites/2/2026/02/Screenshot-2026-03-06-103829.png 540 542 mhoff /wp-content/uploads/sites/2/2026/03/family-resource-hub-logo.png mhoff2026-02-26 22:35:442026-03-27 16:26:55Plagiocephaly vs Brachycephaly: Key Differences for Parents

Flat Spot on Baby’s Head: What It Means and When to Act

Have you noticed a flat area on the back of your little one’s head? Take a breath. This is common in babies, and most of the time, it gets better with simple changes at home.

A baby’s skull is soft and flexible in the first months of life. That helps the head grow, but it also means pressure on one spot can cause a flat area. Back-sleeping is important for safe sleep, so many babies develop a mild flat spot.

Doctors often call this flat head syndrome, or positional plagiocephaly. It sounds scary, but it usually improves as your baby starts rolling, sitting, and spending more time upright. Gentle daily habits can help the head round out over time.

Still, it helps to know the signs of flat spot on baby’s head that need a closer look. Watch for a preference to turn their head to one side, a flat area that seems to widen, or uneven ears or forehead shape. If you see these, talk with your pediatrician.

This article explains what a baby flat head means, why it happens, and what you can do now. You’ll learn easy tips to reduce pressure on one spot, when to ask for an evaluation, and what treatment looks like if needed.

You’re not alone in this. With the right steps, most babies improve without helmets or procedures. Let’s help you spot what’s normal, and know when it’s time to act.

What Causes a Flat Spot on Your Baby’s Head?

A flat spot often comes from how a baby rests and spends time each day. The skull is soft in the early months, so steady pressure on one area can change it’s shape. Safe sleep on the back is safest choice per the APP . The goal is to balance that time with varied positions while your baby is awake.

Common Everyday Causes

Many flat spots start with simple positioning. Babies love cozy gear, and they often rest in the same spot for long stretches.

  • Too much time in gear: Long stretches in car seats, swings, bouncers, or carriers can press the same spot on the back of the head.
  • Limited tummy time: Less time on the tummy while awake means more time on the back, which adds pressure in one area.
  • Sleeping in one direction: If baby routinely prefers one head position to sleep night after night.
  • Feeding on the same side: If caregivers and/or baby have preference in holding baby in routine position and lead to a head turn preference.

This is not from bad parenting. It is a common mix of comfort, routine, and a soft skull. Small changes make a big difference over time.

Early signs to watch for during daily routines:

  • A patch on the back or side of the head that looks flatter than the rest.
  • Hair thinning in one area from rubbing.
  • A baby who tilts or turns the head the same way most of the day.
  • Ears that look slightly uneven when viewed from above.

Try simple shifts, like more supervised tummy time, changing which end of the crib you place your baby’s head, and switching arms during feeds.

When It’s Linked to Other Issues

Sometimes a flat spot happens because the neck is tight or weak. The most common issue is torticollis, when neck muscles on one side are tight. This can make a baby favor one direction. Over time, that steady pressure can shape the head.

Other links to consider:

  • Neck tightness or stiffness: Trouble turning the head to both sides.
  • Developmental delays: Babies who move less or reach milestones later may spend more time on their backs.
  • Prematurity: Earlier birth can mean softer bones and more time in one position.

Reach out to your pediatrician if you notice:

  • A strong preference for one side during sleep or play.
  • Trouble turning the head equally both ways.
  • A flat spot that worsens over a few weeks despite position changes.

Most of the time, the plan is simple: guided stretches, more varied positions, and sometimes a referral to physical therapy. Early help eases neck tightness, improves head movement, and supports a more even head shape.

Signs That Your Baby’s Flat Head Needs Attention

Most flat spots are mild and fade with simple changes at home. Still, some signs call for a closer look. Use the checks below to tell when you can wait and watch, and when to book a quick visit.

Mild Flat Spots You Can Watch at Home

Subtle flattening is common in the first months. It often improves with repositioning and more time off the back of the head.

What mild looks like:

  • A small flat area on the back or one side.
  • The head shape looks even when viewed from most angles.
  • Your baby turns the head both ways during play and sleep.

Simple home checks:

  • View from above. Stand behind your baby when seated and look at the head shape. A gentle curve with a small flat patch is usually mild.
  • Check ear line. Are the ears mostly level when you look from above? Slight differences are common.
  • Look at the forehead. A smooth, even forehead on both sides points to mild flattening.
  • Try repositioning for 2 to 4 weeks. Add tummy time, switch crib orientation, and change feeding sides. Mild spots often look better with these steps.

Helpful tip: Take a photo from above once a week in the same light. Compare over time to see progress.

Warning Signs for Quick Doctor Visits

Some changes need a prompt check. Early visits bring peace of mind, and if care is needed, it works best when started early.

Red flags to watch for:

  • Severe asymmetry that you can see at a glance.
  • No improvement after 4 months of age, or after 4 weeks of steady repositioning.
  • Facial changes, like one forehead side bulging or the face looking fuller on one side.
  • Ear misalignment, where one ear sits farther forward than the other.
  • Prominent forehead or a ridge along the skull.
  • A head shape that looks more like a parallelogram from above, not a soft oval.
  • A strong head turn preference that does not ease with stretching or play.
  • Flattening that spreads or deepens over a few weeks.

Other symptoms to note:

  • Baby avoids turning to one side or seems uncomfortable.
  • Delays in rolling, sitting, or lifting the head during tummy time.
  • Uneven eye line or jaw shift when you look straight on.

If you see these signs, call your pediatrician. A quick exam can rule out other issues, guide home care, or start a referral if needed. Early action protects head shape and keeps you confident in your plan.

How to Prevent and Fix a Flat Spot on Your Baby’s Head

Simple Prevention Tips for Everyday Care

Varied positions spread pressure and give the head time to round. Build these habits into your day.

  • Alternate sleep positions: Place your baby at opposite ends of the crib on different nights. Turn the head to the left one sleep, then to the right the next. Keep baby on the back for sleep, always.
  • Boost tummy time: Aim for 15 to 30 minutes a day while awake. Break it into short bursts after diaper changes or naps. Use your chest, a rolled towel under the chest, or a firm play mat. https://safetosleep.nichd.nih.gov/reduce-risk/tummy-time
  • Switch carry methods: Rotate how you hold your baby. Try upright on your chest, on the opposite shoulder, or in a side-carry hold. Limit long stretches in car seats when not in the car.
  • Encourage head turning: Place toys, a soft mirror, or a bright book on the side your baby avoids. Move the mobile or light source to the other side once a week.
  • Vary feeding sides: Switch arms during bottle feeds. If nursing, start on the less favored side more often.
  • Make playtime dynamic: Try side-lying play with a small towel behind the back for support. Sit your baby upright on your lap for short periods with gentle support.

Example: During a 10-minute play block, try 3 minutes tummy time, 3 minutes side-lying, 2 minutes upright, then a quick cuddle. Short, frequent changes work best.

Key reminder: Start from birth and keep it consistent. Habits now reduce the chance of a flat spot later.

Treatment Options If It Persists

If the flat spot does not improve, help is available. The plan depends on age and how the head looks on exam.

  • Physical therapy: If your baby shows a strong preference to turn their head to one side, or has tight neck muscles, therapy can help. A therapist teaches gentle stretches, positioning, and play moves that improve range of motion.
  • Helmet therapy: For moderate to severe flattening that is not improving, a custom helmet can help to guide growth. The window for starting treatment is 4 to 6 months, while the skull grows fast. Some babies start a bit later based on exam and growth pattern. Wear time is usually several months, with regular checks. https://www.aans.org/patients/conditions-treatments/positional-plagiocephaly/
  • Surgery: Surgery is not needed for positional flat spots. It is considered only for other skull conditions that a specialist diagnoses.

Next step: Talk with your pediatrician if you are worried. They may refer you to a pediatric physical therapist or a craniofacial physician (or doctor) or orthotist for a personalized plan. Early action makes treatment shorter and more effective.

Conclusion

Most flat spots are common and improve with simple changes at home. Follow safe sleep guidelines, then balance it with tummy time, varied holds, and playful head turns. Watch for signs that need attention, like a strong head turn to one side, facial asymmetry, or no change after a few weeks. When in doubt, talk with your pediatrician.

Trust your instincts. You know your baby best. Small daily habits add up. Your care now supports head shape, comfort, and milestones in the months ahead. For clear, reliable guidance, visit the American Academy of Pediatrics and save it for quick reference.

Keep going. Your baby is growing stronger, moving more, and spending less time on the back of the head. Progress often comes little by little, then all at once.

Disclaimer:

OPSB products and products distributed by OrthoPediatrics Corp. should be used under the guidance of qualified healthcare professional. Individual results may vary. Please consult your pediatrician or orthopedic specialist for professional advice, including intended use, warnings, precautions, side effects and contraindications. This article is for informational purposes only and does not constitute medical advice. Always follow your doctor’s recommendations and instructions.

MAM-MM-100

https://family.opsb.com/wp-content/uploads/sites/2/2025/09/Rectangle-626.png 300 467 mhoff /wp-content/uploads/sites/2/2026/03/family-resource-hub-logo.png mhoff2026-02-26 22:31:542026-03-27 17:21:17Flat Spot on Baby’s Head: What It Means and When to Act

How Cranial Helmet Therapy Works for Flat Head

baby in cranial helmet for plagiocephaly treatment

If you notice a flat spot after naps or long car rides, and tummy time feels like it isn’t fixing it fast enough. You’re not alone. Many parents see head shape changes in the first few months of life, and they want a safe plan that works.

Cranial helmet therapy for babies is a noninvasive treatment that uses a custom helmet to gently guide skull growth. Contact is maintained on the more prominent aspects of the head, while space is provided for the flattened areas.

In this article, you’ll learn how the helmets are made and fit, when to start, and how often adjustments happen. We’ll cover daily wear, comfort tips, expected timelines, and results you can watch for, so you feel clear and confident moving forward.

What Causes the Need for Cranial Helmet Therapy?

Different medical terms include: positional plagiocephaly which means a flat or slanted area on one side of the back of the head. Brachycephaly means the back of the head is flat across the center, which can make the head look wider. Both often come from babies spending a lot of time on their backs, which is the safest sleep position, or in containers (ie swings, car seats) that press on the same spot.

This is common, affecting up to 1 in 5 babies. Risk rises with prematurity (softer skulls, more time lying down), multiple births (less space in the womb), and torticollis (tight neck muscles that make a baby favor one head turn).

Early intervention matters because skull growth is fastest between birth and 9 months. Repositioning, more tummy time, and treating tight neck muscles can improve mild cases. When flattening is moderate or severe, or when it does not respond to these steps, a cranial helmet can guide growth into a more balanced shape. Starting early can help keep treatment times shorter.

Common Signs to Watch For in Your Baby

  • Flat area: A flat spot on the back or one side of the head.
  • Ear position: One ear looks farther forward than the other.
  • Facial asymmetry: One cheek looks fuller, or the forehead bulges on one side.
  • Head shape: Wider head from the front, or a slanted back corner.
  • Preferred head turn: Baby looks one way most of the time, or resists turning.
  • Photos tell a story: Compare pictures month to month for change.

Plan to bring this up at the 4-month checkup, or  at a pediatrician appointment sooner if you notice fast changes or a strong head preference. Your pediatrician may check head shape, ear alignment, and neck range of motion, then guide timing for intervention as needed.

Start with simple repositioning. These small daily tweaks add up.

  • Tummy time: Aim for short, frequent sessions while baby is awake.
  • Alternate sides: Switch feeding arms and crib sleep direction so baby looks the other way.
  • Hold more, container less: Use swings and car seats for travel and short periods only.
  • Promote head turning: place toys and engage your baby on the opposite side of their turn preference.
  • Stretch and strengthen: If torticollis is present, follow a physical therapy plan.

If flattening is moderate to severe, and if there is little change by 4 months despite these steps, a cranial helmet can help guide growth where space is needed. It works with your baby’s natural growth, not against it. Treatment is proven to be effective and wearing a helmet is typically tolerated very well, especially when starting early.

How Does the Cranial Helmet Actually Work?

A cranial helmet guides growth into a rounder, more balanced shape. Think of it like braces for teeth. It does not force change overnight. It uses steady, gentle contact while your baby’s head grows at a fast pace.

The Science Behind Skull Reshaping

In the first year, the brain nearly doubles in size. That brain growth pushes the skull plates apart, and the helmet simply guides where that growth goes. The helmet acts like a mold with two jobs: it applies light, constant contact on areas that stick out, and it leaves space over flat spots so they can fill in.

A traditional helmet is constructed with one or multiple layers of soft, hypoallergenic foam encased in a thin plastic shell. It is manufactured using FDA-approved, medical grace materials and custom design from a precise 3D scan to allow appropriate room for growth while guiding the head toward improved symmetry.

How it works day to day is simple:

  • Custom-molded fit: A 3D scan sets the baseline shape with room planned over flat areas.
  • Gentle guidance: The contact is maintained where the skull is more prominent, while open space is provided for the flattened areas.
  • Consistent wear: Babies wear it 23 hours per day, usually for a few months, with routine adjustments as the head grows.

What about comfort?. Babies usually adapt in a few days, if not sooner, much like getting used to a new hat. Skin checks and minor fit tweaks are part of follow-ups. As one parent shared, “After day three, it was just part of the outfit. He smiled, ate, and slept like normal.”

Key takeaways:

  • Growth does the work, the helmet guides it.
  • Safety is built in, with FDA-approved materials and professional oversight.
  • Consistency wins, with full-time wear and scheduled adjustments.

Step-by-Step Guide to Starting Helmet Therapy

Starting helmet therapy is straightforward when you know the path. You will meet a specialist team, get a custom fit, follow a clear wear plan, and check in regularly. Parents play a big role day to day, and that partnership drives results.

  • Doctor referral to a specialist: Your pediatrician refers you to a pediatric craniofacial team or orthotist with infant helmet experience. A prescription will be needed if helmet is going to ordered for treatment. Ask about their training, measurement methods, and follow-up schedule.
  • Evaluation and 3D scan: The specialist reviews head shape, neck motion, and photos. A quick, no-contact 3D scan maps your baby’s head. You receive a treatment plan and estimated timeline.
  • Helmet fabrication and fitting: The lab builds a custom helmet from the scan. This takes about 1 to 2 weeks. At fitting, the provider checks for any excessive contact, trims edges, and teaches skin checks and cleaning.
  • Wear schedule and follow-ups: Expect near full-time wear, usually about 23 hours per day. Follow-up visits happen every 2 to 4 weeks for adjustments as your baby grows.

Age matters. The sweet spot is 4 to 6 months for faster change. Costs vary by region and insurance type. provider. Your clinic’s billing team will provide clarification on pre-authorization and out of pocket costs before fitting of the helmet.

Your daily care is the engine of progress. The clinic sets the plan, you run it at home. Most families see clear changes by 2 to 3 months, with full results in 3 to 6 months.

Daily Care and What to Expect During Treatment

Daily care keeps the helmet clean, the skin healthy, and your baby comfortable. A simple routine works best.

  • Cleaning the helmet: Wipe the inside once daily. Use a soft cloth with mild baby soap and warm water, then dry fully. Many clinics also allow 70% rubbing alcohol on a cloth for odor control. Let it air out before putting it back on. Skip harsh cleaners and heavy scents.
  • Caring for your baby’s skin: Keep the scalp clean and dry. Avoid lotions right before wear since they trap moisture. Discuss with your orthotist if any powders are safe to use in the helmet. Cornstarch-based baby powder may be used if sweating is persistent.
  • Skin checks that matter: Look for redness during each break. Any redness should fade within 30-45 minutes. Call your provider if a spot stays bright red, blisters, or peels. That often means an adjustment is needed.
  • Make wear time fun: Dress the helmet with safe stickers or a paint job from a local artist. Read a special “helmet story” at bedtime. Use mirror play, peekaboo, or songs when you put it on to build a positive cue.
  • Summer sweat tips: Dress light, take short cool-down breaks during the daily off hour, and use a fan during naps. Hydrate feeds on schedule.
  • Travel without stress: Pack a small care kit and a spare cloth. Try to maintain a similar wear schedule for consistency. At airport security, babies can usually keep helmets on.

Track progress with photos. Take a top view, side view, and front view once a week in the same spot, with the same lighting. Label the date. Side-by-sides make subtle changes easy to see.

Example schedule that works for many families:

  • Break-in plan from your clinic for the first 3 to 5 days.
  • Then 23 hours of wear daily, with 1total hour off, usually broken into 2 30 minute breaks, for bathing, cleaning, and cuddles.

Potential Challenges and How to Overcome Them

  • Initial fussiness: Follow the break-in schedule your provider gives you. Pair helmet time with feeds, snuggles, and walks.
  • Rashes or hot spots: Prevent issues with daily cleaning and dry skin before wear. of any areas of concern should be sent to your orthotist. Providers can advice if you need to return for an adjustment or how to address the issue at home. Providers can add or remove padding, or smooth an edge.
  • Social stares or comments: Keep a simple script. “It helps his head grow round, like braces for teeth.” Most people respond with support. Some families add fun decals to spark friendly conversations.
  • Support helps parents too: Look for parent groups online, like our OPSB Boston Band and Plagiocephaly Support Group local therapy clinics that host meetups, or ask your provider for resources. Hearing real stories can lower stress and keep you motivated.

Consistency drives results. Aim for full-time wear on a daily basis. That level of consistency strongly predicts success. Your team will monitor progress and adjust the fit every 2 to 4 weeks. Speak up if something feels off. Small tweaks today prevent bigger issues later.

Key takeaways:

  • Short adjustment, then your baby adapts.
  • Clean and check skin every day.
  • Stay consistent, and let your provider fine-tune.
  • Track photos, and celebrate steady gains.

Benefits, Results, and When to Seek Help

Parents want two things here, a plan that works and peace of mind. Helmet therapy offers both when started at the right time. It guides growth, improves symmetry, and helps you feel confident about your baby’s head shape long term.

What You Can Expect From Helmet Therapy

Helmet therapy focuses on three clear outcomes that you can see and measure.

  • Rounder head shape: The flat area fills out as growth follows the guided path.
  • Peace of mind: knowing you took action to address an issue that was concerning you versus waiting for it to look better over years of growth.

You also get day-to-day wins:

  • Predictable progress: Changes build week by week with consistent wear.
  • Comfort: Once fitted, most babies adapt in a few days.
  • Support: Regular visits keep the fit right and the skin healthy.

When Helmet Therapy May Not Be Needed

Many mild cases improve with time and smart daily habits. The skull is growing fast, so small changes add up.

  • Good candidates for watchful waiting: Mild flattening, baby still under 4 months, and strong response to repositioning.
  • Signs of progress: The flat spot looks less noticeable in photos and baby turns both ways with ease.
  • Keep going with basics: Tummy time, alternating sides, stretching tight neck muscles, and reducing time in containers, such as swings and car seats.

If progress stalls for a month or two, check in again. A delay can make treatment longer later.

When to Seek Help

Trust your gut. If you are worried, ask early.

  • Bring it up at the next well visit, or call sooner if the flat spot looks worse.
  • Ask for a measurement or 3D scan to track shape, not just a visual check.
  • Seek help right away if you see strong ear shift, a bulging forehead on one side, or a baby who cannot turn the head both ways.

Clear next steps:

  1. Talk to your pediatrician today. Share photos from above, front, and side.
  2. Ask about a referral to a pediatric orthotist or craniofacial clinic.
  3. If torticollis is present, start PT alongside any helmet plan.

The Parent Takeaway

You are not late, and you are not alone. Early action gives you options, shortens treatment, and leads to a more balanced head shape. The end result is simple to picture, a rounder head, a more even face, and a lighter heart knowing you took care of it.

Conclusion

Flat spots often stem from safe back-sleeping, tight neck muscles, or long time in carriers, and they respond well to early action. Cranial helmet therapy guides growth with gentle, steady contact, starting after an evaluation, a 3D scan, and a custom fit, then consistent wear and quick follow-ups. Families see rounder heads, better symmetry, and real peace of mind, which is why cranial helmet therapy success for parents is common when started at the right time.

Take the next step today. Talk with your pediatrician and ask for a referral to a pediatric orthotist or a craniofacial clinic finder. You are doing the right thing by learning and planning, and your care now pays off for years to come.

Disclaimer:

OPSB products and products distributed by OrthoPediatrics Corp. should be used under the guidance of qualified healthcare professional. Individual results may vary. Please consult your pediatrician or orthopedic specialist for professional advice, including intended use, warnings, precautions, side effects and contraindications. This article is for informational purposes only and does not constitute medical advice. Always follow your doctor’s recommendations and instructions.

MAM-MM-101

https://family.opsb.com/wp-content/uploads/sites/2/2025/12/1X6A5287.jpg 683 1024 mhoff /wp-content/uploads/sites/2/2026/03/family-resource-hub-logo.png mhoff2026-02-26 22:18:072026-03-27 17:21:55How Cranial Helmet Therapy Works for Flat Head
Page 1 of 3123

Pages

  • Home
  • Accessibility Statement
  • Publicity and Data Use Authorization & Release Policy
  • Cookie Policy
  • Terms of Use
  • Privacy Policy
  • Medical Disclaimer
  • About
  • Blogs
  • Product Resources
  • Scoliosis
  • Clubfoot
  • Lower Limb Bracing
  • Hip Dysplasia
  • Plagiocephaly
  • Femur Fracture
  • Prosthetics & Limb Difference
  • Surgical Resources
  • Connect with OP Specialty Bracing

Categories

  • Uncategorized
  • Stories
  • Condition
  • Clubfoot
  • Plagiocephaly
  • Femur Fracture
  • Prosthetics
  • Experience
  • About
  • Scoliosis
  • Hip Dysplasia
  • Lower Limb
  • Surgical Resources
  • Featured Stories

Archive

  • May 2026
  • April 2026
  • March 2026
  • February 2026
  • December 2025
  • October 2025

This website is for educational purposes only and does not constitute medical advice or replace consultation with your healthcare provider. PLEASE CONSULT YOUR PEDIATRICIAN OR ORTHOPEDIC SPECIALIST FOR PROFESSIONAL ADVICE REGARDING DIAGNOSIS AND TREATMENT OPTIONS. OPSB products should be used under the guidance of healthcare professionals. Full prescribing information can be found in product labeling. Individual results may vary.

Medical Disclaimer

©2026 OrthoPediatrics Corp.
OrthoPediatrics Specialty Bracing

Privacy Policy | Terms of Use | Cookie Policy | Accessibility Statement

Contact Us

Phone: 877-766-7384
Email: info@mdorthopaedics.com

Quick Links

  • Scoliosis
  • Clubfoot
  • Lower Limb
  • Hip Dysplasia
  • Plagiocephaly
  • Femur Fracture
  • Prosthetics & Limb Difference
  • Surgical Resources
Visit the OP Specialty Bracing website

Design and development by RainCastle Communications

  • Scoliosis
  • Clubfoot
  • Lower Limb
  • Hip Dysplasia
  • Plagiocephaly
  • Femur Fracture
  • Prosthetics & Limb Difference
  • Surgical Resources

    Quick Links

  • About
  • For Providers
  • Product Resources
  • Blogs
  • Find a Clinic