OPSB Family Resource Hub
  • About
  • For Providers
  • Product Resources
  • Blogs
  • Find a Clinic
Search Search
  • Scoliosis
  • Clubfoot
  • Lower Limb
  • Hip Dysplasia
  • Plagiocephaly
  • Femur Fracture
  • Prosthetics & Limb Difference
  • Surgical Resources
  • Menu Menu

A Parent’s Guide to Treatment Options for Hip Dysplasia in Infants

At a routine checkup, you notice your baby’s thigh folds don’t line up, or the hips feel stiff when the nurse moves their legs. Your mind jumps to big worries and you start searching for clear answers.

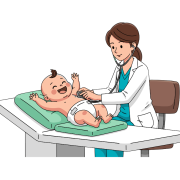
Hip dysplasia in infants means the hip joint doesn’t form as it should, so the ball of the thigh bone doesn’t sit snug in the socket. Common signs include a soft clicking sound in the hips, uneven creases in the thighs, or one leg that looks a bit shorter. Some babies also have limited hip movement.

It’s more common than it sounds, affecting about 1 in 1,000 babies, and early detection helps prevent long-term problems like pain and arthritis. Most cases are found in the first months, when treatment is gentlest and recovery is most effective.

In this guide, you’ll learn the main treatment options for hip dysplasia in infants, from soft-positioning devices like the Pavlik harness to braces, closed reduction with a cast, and surgery when needed. With prompt care and good follow-up, most babies recover fully and go on to crawl, walk, and play without limits.

Non-Surgical Treatments: Gentle Options for Early Intervention

Early treatment steers the hip into a healthy position while bones and soft tissues are still flexible. Most babies respond well to soft braces that guide the ball into the socket without surgery. Care is team-based, with an orthopedic specialist fitting the device, nurses teaching daily care, and regular imaging checks, usually ultrasounds at first, then X-rays as the bones harden.

These methods protect normal growth, reduce pain later in life, and often prevent the need for surgery. With good fit and consistent use, success rates are high.

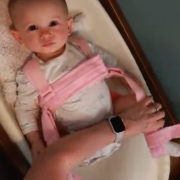
How the Pavlik Harness Works and What to Expect

The Pavlik harness is a soft brace with straps around the shoulders and legs. It holds the hips flexed and gently turned out, often described as a relaxed frog-like position. This keeps the femoral head centered in the socket so the joint can mold into the right shape.

  • Ideal timing: Best for newborns and infants under 6 months.
  • Wear schedule: Usually 24/7 for 6 to 12 weeks, then gradual weaning as advised.
  • Monitoring: Regular clinic visits every 1 to 3 weeks for strap adjustments and skin checks, plus ultrasounds to confirm the hip stays centered.
  • Success: Over 90% when started early and worn as prescribed.

Daily life looks different at first, but it becomes routine. Use these practical tips to keep your baby comfortable and on track:

  • Diapering: Place the diaper under the straps. Use one diaper layer only, keep the hips wide, and avoid pulling legs together.
  • Clothing: Choose loose, wide-bottom pants or sleep sacks. Skip tight onesies.
  • Skin care: Check skin under straps daily for redness, swelling, or blisters. Pat dry after any moisture. Call the clinic if redness lasts longer than 30 minutes.
  • Bathing: Most babies cannot remove the harness for baths early on. Use sponge baths and gentle wipes. When the doctor allows breaks, follow the exact schedule.
  • Positioning: Hold your baby with hips apart. Use a soft carrier that supports a wide hip spread. Avoid swaddling with legs straight.
  • Soothing a fussy baby: Try side cuddles, gentle rocking, white noise, and contact naps. Short tummy time is okay only if your doctor says it is safe with the harness on.
  • Sleep: Back to sleep is still the rule. Use a firm, flat surface with no extra pillows.
  • Feeding: Feed in a semi-upright position with hips relaxed and apart.

What to expect over time:

  1. Fitting day: An orthopedic specialist sets the angles and teaches you how to handle diapering and clothing without loosening straps.
  2. Weeks 1 to 3: Frequent checks and ultrasound to confirm reduction. Mild fussiness is common as your baby adjusts.
  3. Weeks 4 to 8: Growth-based strap adjustments. Signs of progress on imaging. Babies usually adapt well and meet milestones like smiling and rolling to the side.
  4. Weaning phase: Fewer hours per day as the hip stabilizes. Your care team guides this step.
  5. After removal: Temporary stiffness or weaker hip muscles can occur. Short-term physical therapy and home exercises help rebuild strength and symmetry.

A quick note on results: Consistent wear drives success. If the harness is not worn as prescribed, the chance of full correction drops.

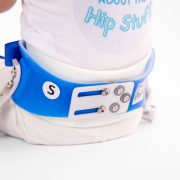
Other Bracing Devices: When Pavlik Isn’t Enough

If the Pavlik harness does not maintain hip position, or if the baby is closer to 6 months, doctors may recommend a more structured brace. Devices like the Ilfeld splint or the von Rosen splint are rigid and hold the hips in a set abducted and flexed position to keep the joint centered.

What sets these devices apart:

  • More structure: Firm bars or shells limit motion to maintain the correct angle.
  • Use cases: After a failed Pavlik trial, unstable hips that need stricter control, or older infants up to about 6 months.
  • Duration: Often 3 to 6 months, adjusted to growth and imaging results.
  • Monitoring: Clinic checks for fit and skin health. Ultrasound early on, then X-rays as the bones ossify.
  • Effectiveness: Non-invasive and often successful, with results around 80 to 85% in the right candidates.

Quick comparison for context:

DeviceStructureTypical AgeWear PatternUsual MonitoringReported Success
Pavlik harnessSoft strapsNewborn to <6 months24/7, then weanUltrasound, clinic checksOver 90% when early and compliant
Ilfeld splintRigid abduction barUp to ~6 monthsNear full-timeUltrasound then X-rayAbout 80–85%
von Rosen splintRigid frameUp to ~6 monthsNear full-timeUltrasound then X-rayAbout 80–85%

How to choose the next step:

  • Follow your specialist’s plan: Age, hip stability, and imaging guide the choice.
  • Prioritize fit and comfort: Proper padding, daily skin checks, and quick strap or bar adjustments prevent sores.
  • Stay consistent: Full-time wear, unless told otherwise, helps the hip mold and hold.

These braces keep treatment non-invasive and protect growth while giving the hip more control. With structured support and steady follow-up, many babies avoid surgery and go on to crawl and walk on time.

Surgical Treatments: Correcting Severe Hip Dysplasia

When bracing does not hold the hip in place, or when a baby is diagnosed after 6 months, surgery steps in as a safe next move. Procedures happen under general anesthesia with close monitoring. Teams at pediatric centers perform these operations often, with strong outcomes and low complication rates. Most hips stabilize well after treatment, and most children will walk normally.

Parents play a big role in recovery. You will help with cast care, pain control, and follow-up visits. Your care team will guide each step so you never feel alone.

Closed Reduction: A Less Invasive Surgical Approach

Closed reduction re-centers the hip without a cut on the skin. It is common for babies between 6 and 18 months when bracing is not working.

Here is how it usually goes:

  1. Sedation and anesthesia keep your baby comfortable and still.
  2. The surgeon gently moves the thigh bone into the socket while watching live imaging. This uses ultrasound in very young infants or X-ray in older babies.
  3. Once the hip sits in the right spot, a plaster or fiberglass spica cast is applied from the chest to the toes to hold the position.
  4. A final X-ray confirms the hip is stable in the cast.

What to expect after surgery:

  • Same-day or next-day discharge: Many babies go home the same day. Some stay one night.
  • Cast duration: Often 6 to 12 weeks, with a possible cast change at the midpoint as swelling goes down.
  • Pain management: Scheduled acetaminophen or ibuprofen as your team advises. Stronger medicine is rarely needed after the first day.
  • Skin and comfort: Keep the cast dry. Pad edges with soft tape. Check toes for warmth and color.
  • Position changes: Shift your baby every few hours to avoid pressure sores. Use pillows to prop the cast and keep hips supported.
  • Imaging and follow-up: Clinic visits and X-rays confirm the hip stays centered.
  • After cast removal: Some babies wear a night brace for several weeks to hold gains.

Family support matters:

  • Gear tips: A wide stroller, extra pillows, and a cast-friendly car seat make daily life easier.
  • Care team check-ins: Nurses and therapists can show diaper hacks, safe lifting, and sleep setups.
  • Reassurance: Closed reduction has high success and low risk. Most families settle into a steady routine within days.

Expected outcomes:

  • Over 95% of hips stabilize with timely treatment and follow-up.
  • We expect the children to walk normally and stay active without limits.

Risks are uncommon:

  • Infection is under 1%.
  • Cast sores, stiffness, or redislocation can occur, which your team checks for at each visit.

Open Reduction and Osteotomy: For Tougher Cases

Open reduction helps when the hip keeps slipping out, when tissue blocks the socket, or when closed reduction does not hold.

What happens in an open reduction:

  • The surgeon makes a 2 to 3 inch incision at the hip.
  • Soft tissue that blocks the joint, like tight ligaments or a thickened capsule, is removed or released.
  • The femoral head is placed into the socket and held with sutures or a small device if needed.
  • A spica cast keeps the hip stable during healing.

About osteotomy:

  • If the socket is shallow or the femur angle needs correction, the surgeon reshapes bone to guide the hip. This is called an osteotomy.
  • Pelvic osteotomy deepens or redirects the socket. Femoral osteotomy adjusts the thigh bone angle.
  • These are more common after age 1 ½  and are very rare in young infants.
  • Hardware like small plates or screws may be used and can be removed later if needed.

Care setting and safety:

  • These operations happen in specialized pediatric centers with teams trained in infant anesthesia and imaging.
  • Complication rates are low, and teams watch closely for swelling, bleeding, or nerve irritation.

Recovery and follow-up:

  • Hospital stay: Often 1 to 3 days for pain control, cast fitting, and parent teaching.
  • At home: Keep the cast clean and dry. Use sponge baths. Check skin daily. Maintain range of motion in free joints like knees and ankles.
  • Pain control: A short course of acetaminophen or ibuprofen works well for most babies.
  • Imaging: Regular X-rays track hip growth and position. Follow-up continues until age 5 to 10 to confirm normal development.
  • Long-term outlook: Early, accurate surgery lowers the chance of early arthritis and can reduce the need for a hip replacement in adulthood.

Key benefits you can count on:

  • Stable hips that grow in the right shape.
  • Strong function for crawling, walking, and play.
  • Low risk with careful technique and follow-up.

Short list of risks and how teams reduce them:

  • Infection under 1%, with antibiotics and sterile technique.
  • Stiffness, managed with cast planning and later therapy.
  • Redislocation, monitored with frequent imaging and precise casting.

Surgery sounds big, yet it is routine in children’s hospitals and guided by clear protocols. With the right plan and steady follow-up, most babies heal well, move well, and grow into active toddlers.

Follow-Up Care and Long-Term Outlook for Treated Infants

Treatment is only the first step. Strong follow-up keeps the hip stable as your baby grows and moves more. You will partner with a pediatric orthopedist for checkups, imaging, and a simple home routine. With steady care, most children reach milestones on time and stay active without limits.

Routine Checkups and Imaging

Expect regular visits so the care team can track hip growth and alignment. Frequency depends on age and treatment, but early follow-up is usually closer together.

  • First year after treatment: Visits every 3 to 6 months.
  • Toddler years: Visits every 6 to 12 months if hips remain stable.
  • School age: Yearly checks in some cases, especially after surgery.

Imaging confirms progress:

  • Ultrasound: Best for babies before the hip bones harden.
  • X-rays: Used once the bones ossify, often after 4 to 6 months.

A quick snapshot of typical follow-up:

TimeframeVisit FrequencyUsual ImagingFocus
First 6–12 monthsEvery 3–6 monthsUltrasound, then X-ray as bones hardenPosition, stability, growth
1–3 yearsEvery 6–12 monthsX-raySocket depth, alignment
4–10 yearsAs advisedX-ray if neededLong-term shape, function

Bring your questions and any photos or videos of your child’s walk or play. Small changes are easier to judge when the team can see them.

Therapy, Movement, and Daily Activities

Therapy is rarely needed after bracing or surgery. The baby will develop motion on her own, and build up strength as she progresses. If the baby is falling behind, which is not common, the doctor will assess that.

Simple home habits help:

  • Tummy time in short, frequent bursts.
  • Floor play with toys placed to both sides to encourage symmetry.
  • Squat-to-reach games once your child stands.

Activities to pause until cleared:

  • Jumping off furniture or steps.
  • Trampolines.
  • Wide straddle toys that force the legs too far apart.
  • Contact play that risks falls.

Ask your therapist for a short home plan. Two or three focused exercises a day make a real difference.

Signs to Watch For Between Visits

Most children do well. Still, call your care team if you notice any of the following:

  • Limping or toe-walking on one side after early walking starts.
  • Hip or groin pain, crying with diaper changes, or clear guarding.
  • Uneven leg lengths or new asymmetry in thigh creases.
  • Stiffness that limits diapering or dressing.
  • Clicking with pain or a hip that looks unstable.

Early calls prevent small issues from growing into big ones. Trust your instincts.

Long-Term Outcomes and What Parents Can Expect

The outlook is strong. With early diagnosis and proper treatment, most children develop normal hip function and play sports without limits. Many families see typical crawling by the first year, walking by 12 to 18 months, and steady progress after that.

What supports the best outcome:

  • Consistent brace or cast wear during treatment.
  • Scheduled follow-up with imaging.
  • A short course of therapy and a simple home routine.
  • Clear activity guidance during recovery.

Some children need longer follow-up into grade school, especially after surgery. This is a safety net, not a setback. It keeps growth on track and protects hip health for the long run.

Helpful Resources and Parent Support

You do not have to figure this out on your own. Reliable, parent-friendly resources offer education, guides, and community:

  • International Hip Dysplasia Institute (IHDI): Education, brace tips, success stories, and links to parent support groups.
  • Hospital-based pediatric orthopedic teams: Classes, nurse call lines, and therapy programs.
  • Local early intervention services: In-home support for movement and play.

Stay encouraged. Early treatment works, steady follow-up protects progress, and most treated babies grow into active kids with strong, pain-free hips.

Conclusion

Early detection through newborn screenings and well-baby visits sets the stage for success. Treatment options for hip dysplasia in infants range from the Pavlik harness and structured braces to closed reduction with a cast, then surgery for tougher cases. With prompt, guided care, success rates are high and most children develop strong, pain-free hips.

If you have any concern, call your pediatrician today and keep scheduled checkups. Share your experience in the comments and explore trusted resources like the International Hip Dysplasia Institute. This guide is educational, so always seek personalized advice from your medical team. Babies bounce back, and families overcome challenges together.

Disclaimer:

OPSB products should be used under the guidance of a qualified healthcare professional. Individual results may vary. Please consult your pediatrician or orthopedic specialist for professional advice. This article is for informational purposes only and does not constitute medical advice. Always follow your doctor’s recommendations and instructions.

MAM-MM-136

https://family.opsb.com/wp-content/uploads/sites/2/2026/03/5M1A4312.jpg 683 1024 mhoff /wp-content/uploads/sites/2/2026/03/family-resource-hub-logo.png mhoff2026-03-06 17:01:182026-03-11 18:03:17A Parent’s Guide to Treatment Options for Hip Dysplasia in Infants

Hip Dysplasia Bracing Options for Children: When Each Is Used

Many parents spot small signs like uneven leg folds or a slight limp before a routine check up with your child’s pediatrician, then learn their baby has developmental dysplasia of the hip or hip dysplasia, a condition where the ball does not sit deep in the hip socket.

Hip Dysplasia is common in newborns and often caught early with routine screening, like a gentle physical exam or an ultrasound. The good news is that many babies do well with non-surgical care like bracing. Bracing guides the ball of the femur bone into a safe, stable position so the hip socket can form the way it should.

In this article, you will learn the main bracing options and when doctors frequently use them. We will touch on the Pavlik harness for young babies, abduction braces used as children grow, and night-time braces that help hold progress after treatment. You will also see how age, hip stability, and follow-up scans shape each choice.

If you are searching for hip dysplasia treatment for babies, you are in the right place. We keep the terms simple, explain what to expect, and share generally how long bracing may last. Most important, you will see why starting early can help make treatment more effective.

Early bracing often sets the hip on a healthy path, and in many cases, can help prevent avoid surgery later.

What Causes Hip Dysplasia and Why Early Bracing Helps

Hip dysplasia happens when the ball of the femur, or thigh bone, does not sit snugly in the hip socket. In infants, the socket is shallow and soft, so a loose fit can let the ball slip out. If this continues, the socket does not deepen as it should, which can lead to dislocation and later joint problems.

Common causes and risk factors often stack together:

  • Family history of hip dysplasia
  • Breech position in late pregnancy or at birth
  • Being first born female
  • Tight swaddling with legs pressed straight

About 1 in 1,000 babies has hip dislocation at birth, and many more have mild instability. Doctors confirm suspected cases with a gentle physical exam and a follow up ultrasound in the first months of life.

Why bracing early works: a brace holds the legs in a comfortable, frog-like position, called abduction and flexion. This places the ball deep in the socket so the rim of the hip can mold around it. It is most effective in babies under 6 months, when bones are soft and can reshape quickly. Early treatment succeeds in many mild to moderate cases. For these babies, bracing is simpler, safer, and less stressful than surgery.

Signs to Watch For in Your Baby

Watch for small clues during daily care. Uneven leg creases, a hip that clicks during diaper changes, or one leg that does not open as wide as the other can be signs of hip dysplasia. In toddlers, look for a limp or toe walking on one side. Ask your pediatrician about screening at birth and again around 6 weeks, especially if your baby was breech or you have a family history. Most cases are treatable when caught early. Keep swaddles loose at the hips, place legs in a natural “M” shape, and follow up if something feels off.

Top Bracing Options for Treating Hip Dysplasia

Bracing holds the hip in a safe, stable position while the socket matures, allowing both the head of the femur and the hip socket to form correctly. The right bracing option depends on your child’s age, hip stability, and how the hip responds over the first weeks of care. Here is how the most used braces compare, when each is used, and what parents can expect day to day.

The Pavlik Harness: Best for Newborns

The Pavlik harness for hip dysplasia is the first choice for most infants from birth to about 6 months. It is a harness made of fabric with chest and leg Velcro straps that position the hips in 90 to 100 degrees of flexion and 40 to 60 degrees of abduction. This frog-like posture centers the ball in the socket so it can deepen and stabilize.

  • When it is used: Located but dis-locatable hips in newborns (positive Barlow). Dislocated hips with the hip still reducible (positive Ortolani).
  • How it is worn: Usually 23-24 hours a day for 6 to 12 weeks, then nights only for several weeks to hold progress.
  • Adjustments: The pediatric orthopedic surgeon sets strap lengths and checks them at each visit. Parents do not re-adjust unless told to.
  • Success: High success rates, often 80 to 95 percent in mild to moderate cases when started early.

Parent care responsibilities:

  • Skin care: Keep the straps dry. Gently clean skin under the straps at diaper changes if your team allows removal for brief care. Pat dry. Watch for redness at the shoulders or behind the knees. Alert your medical team if you identify any persistent skin issues that need to be addressed.
  • Diapers and clothing: Diaper under the straps. Use loose onesies and wide-bottom pants. Avoid tight swaddles. Keep legs in an “M” shape.
  • Monitoring: Follow all ultrasound or X-ray checks. Ask about signs of limited blood flow to the femoral head, called avascular necrosis. It is rare, and careful positioning lowers the risk. Make sure the baby can kick both knees.
  • Daily routine: Tummy time is still helpful. Use a rolled towel for support under the chest if needed.

Pros and cons:

  • Pros: Fabric, allows movement, higher success in young infants, no rigid bars.
  • Cons: Requires near-constant wear at first, regular clinic checks, strap care to prevent skin issues.

Quick trust boost: Many families see improvement on ultrasound within a few weeks. Early progress helps shorten total wear time.

Abduction Braces for Older Infants

When the Pavlik harness fails, or when a child is 6 to 18 months old, doctors often switch to a rigid abduction brace. These devices hold the hips out to the side and block adduction (knees touching), which keeps the hip centered.

Common types you may hear about:

  • Ilfeld splint- Holds the hips gently out to the sides and slightly bent to keep the ball securely positioned in the socket while it stabilizes.
  • PediHip™ Modular Abduction Bar- Connects both legs with an adjustable bar to maintain controlled hip positioning and alignment during healing or post-reduction care.
  • Rhino® Cruiser Brace- Uses a foam lined, rigid frame to keep the hips abducted while still allowing safe movement for comfort and daily activity.

Key differences from Pavlik:

  • Stiff vs. soft: These braces are rigid to control motion, which is helpful in older or more active infants.
  • Wear schedule: Often full-time for about 3 months, then part-time or nights only as the hip stabilizes.
  • Fitting: A pediatric orthopedic surgeon or orthotist sets angles and checks the fit. Expect follow-up X-rays to confirm the hip stays reduced.

Daily care and comfort:

  • Dress in soft layers to prevent rubbing.
  • Use a wider car seat and stroller setting when available. Many standard seats work fine if able to adjust straps.
  • For sleep, a wearable blanket, like a sleep sack, with extra hip room helps.
  • Encourage floor play in safe positions. Babies adapt quickly to the brace.

Pros and cons:

  • Pros: Strong control of hip position, helpful after Pavlik failure, suitable for active older infants.
  • Cons: Bulkier, can be more difficult to adjust to for babies, harder for diapering, may cause skin irritation if not padded well.

Rigid Braces and Casts for Tough Cases

For children over 18 months or with severe dysplasia, such as Graf type IV, rigid solutions or casts may be needed, often after a closed or open reduction in the operating room.

Short-term immobilization:

  • Hip spica cast: A fiberglass or plaster cast from chest to legs that holds the hips reduced after surgery or closed reduction. Worn for several weeks to maintain position while tissues heal.
  • Petrie cast: Two leg casts connected by a bar, keeping the legs abducted. Used for short periods to hold gains after reduction.

Maintenance bracing after casting:

  • Ilfeld or Tubingen braces: Rigid devices that keep abduction while allowing limited movement. Worn part-time or at night to protect the reduction and support socket growth.
  • PediHip Rigid Brace: Rigid brace that keeps the hip stable and properly aligned in the correct position while it heals. Allowing the bone and soft tissues to recover safely.

What to expect:

  • Casting is less common, and it is usually part of a larger plan. Teams teach diapering, car seat options, and skin checks around the cast edges. Follow-up imaging confirms the hip stays in place.

When surgery might be needed:

  • If the hip cannot be reduced or does not stay reduced with bracing and casting, surgeons may recommend procedures such as open reduction, and in older toddlers, bone procedures to improve hip alignment. Bracing often continues after surgery to protect the repair.

Pros and cons:

  • Pros: Strong control of hip position, stabilizes severe or late-detected cases.
  • Cons: Limits mobility, higher care needs, often part of surgical care rather than a stand-alone fix.

Bottom line: start soft when the child is young, step up to rigid abduction if needed, and reserve casts and surgery for the small group that needs stronger support. Early, consistent treatment gives the best path to a stable, pain-free hip.

When Doctors Choose a Specific Brace and What to Expect

Parents often ask when to use a brace for hip dysplasia. Doctors look at three things first: your child’s age, how stable the hip feels during the exam, and the ultrasound grade or X-ray. With that info, they choose the least invasive option that still keeps the hip centered. Most plans last 3 to 6 months with steady check-ins, and the path gets clearer after the first few scans.

Age and Severity: Key Factors in Brace Selection

Age shapes the first step, and severity sets the pace. Here is the simple view most clinics follow.

  • Age at diagnosis
    • 0 to 6 weeks: Best window for the Pavlik harness.
    • 0 to 6 months: Pavlik is still first choice if the hip is reducible.
    • 6 to 24 months: Rigid abduction braces are common if Pavlik is not enough.
    • Over 2 years: Bracing alone will not fix a dislocated hip; surgery is often needed then bracing protects progress.
  • Hip stability on exam
    • Unstable or dislocated: Start bracing right away.
    • Stable but shallow: Short trial of observation may be safe with close scans.

What to expect with timing:

  • Immediate start if the hip is unstable or out.
  • Monitoring every 2 to 4 weeks with ultrasound early, then X-rays as bones harden.
  • Weaning once scans show a centered hip and the socket angle improves.

Success rates are high for early mild to moderate cases. Complications are uncommon when the hip is positioned and checked often.

Daily Life with a Hip Brace: Tips for Parents

The first fitting sets the tone. Your team adjusts the brace, checks leg position, and shows you daily care. You will learn how it should sit, how the skin should look, and what to watch between visits.

Practical tips that make each day easier:

  • Dressing: Choose loose onesies and wide-bottom pants. Diaper goes under the straps. Skip tight swaddles. Keep the legs in an “M” position.
  • Carrying: Hold your baby with hips apart, like a gentle squat. A soft carrier that supports the thighs works well if it keeps the hips flexed and apart.
  • Bathing: Ask if brief removal is allowed. If not, try sponge baths. Keep straps/brace dry. Pat skin dry after cleaning.
  • Sleeping: Back sleeping stays safest. Use a wearable blanket with extra hip room. Place pillows near the feet only for comfort if your team approves.
  • Skin care: Check shoulders, behind knees, and strap edges twice a day. Keep skin dry. Watch for rubbing or blisters.

Monitoring progress helps you see wins:

  • Ultrasounds every 2 to 4 weeks in early treatment.
  • Clinic checks to adjust the brace as your child grows.
  • Weaning off once scans stay stable. Many teams switch to nights only for several weeks before stopping.

When to call your doctor:

  • New redness or sores that do not fade after 30 minutes out of the brace.
  • Fever, swelling, or unusual fussiness that does not match normal patterns.
  • Cold or pale toes, or color changes in the feet.
  • Straps that slip or a brace that no longer fits snugly.

Emotional support matters too:

  • It is temporary. Most babies finish bracing within a few months.
  • Join parent groups for DDH. Shared tips lighten the load and reduce stress.
  • Stay active with floor play and cuddles. Babies adjust fast.

Looking ahead:

  • We expect the kids will walk normally and keep active lives.
  • Your team may follow your child until age 5 to confirm the hip matures well.
  • Complications are uncommon with careful positioning and steady follow-up. Early action gives the best results.

Conclusion

Early detection sets the pace for success. Most babies do well with simple bracing, and the Pavlik harness helps many in the first months. As children grow, abduction braces guide the hip as needed, and casts or surgery support the small group with tougher cases. The big idea is simple, choose the lightest touch that keeps the hip centered, then monitor and adjust.

If this post helped you understand hip dysplasia bracing options for children, take the next step. Schedule a visit with a pediatric orthopedist, bring your questions, and ask about follow-up scans and weaning plans. Explore our FAQs for quick answers, then save this page for reference.

Disclaimer:

OPSB products should be used under the guidance of a qualified healthcare professional. Individual results may vary. Please consult your pediatrician or orthopedic specialist for professional advice. This article is for informational purposes only and does not constitute medical advice. Always follow your doctor’s recommendations and instructions.

MAM-MM-134

https://family.opsb.com/wp-content/uploads/sites/2/2026/03/1X6A0064.jpg 683 1024 mhoff /wp-content/uploads/sites/2/2026/03/family-resource-hub-logo.png mhoff2026-03-06 16:56:442026-03-27 17:17:46Hip Dysplasia Bracing Options for Children: When Each Is Used

Signs and Symptoms of Hip Dysplasia in Infants

You’re changing a diaper or watching tummy time, and something with your baby’s hips feels off. Maybe one leg doesn’t move as freely, or the skin folds on each leg aren’t lining up. Your baby seems fine, yet your instinct is telling you to take a closer look. You’re not alone, and you’re right to pay attention.

Hip dysplasia means the hip joint didn’t form as it should. The thigh, or femur, bone doesn’t sit snug in the hip socket, which can affect movement and growth. It’s more common than most parents think, affecting about 1 in 1,000 babies. The positive news is early care often leads to full, healthy hips.

Catching it early can help prevent future pain, potential surgery, or early arthritis. Simple checks, like noticing leg differences during diaper changes or hearing a soft click, can be helpful clues. Pediatricians also screen for it at well visits.

In this article, you’ll learn what can raise the odds, what signs to watch for at home, how doctors diagnose it, and what treatment looks like. We’ll keep it clear and calm, so you know what steps to take and when to call your doctor. You’ve got this, and your baby does too.

Key Signs and Symptoms of Hip Dysplasia to Spot Early

Parents often spot the first clues during everyday care. You may notice uneven skin folds, a leg that looks shorter, or a hip that does not open as wide. These are common hip dysplasia symptoms that you might notice in your newborn at home, however some babies show no obvious signs. That is why routine checkups matter. Pediatricians screen at birth and at well visits, so small issues get caught early. For older infants, watch for a limp or a toe-walking pattern when they start to stand and cruise. Early detection usually means easier fixes, shorter treatment, and better long-term hip health.

Visual Clues During Everyday Baby Care

Look for asymmetry during diaper changes and tummy time, especially in the first 3 to 6 months. You might see more creases on one thigh compared to the other. On your baby’s back, the buttock folds may sit at different heights. A helpful mental image for the blog: one leg shows two neat folds, the other shows three deeper, uneven folds that do not line up.

Gentle home checks can guide what to mention at your next visit:

  • Gently spread the legs into a froggy position when your baby is calm. If one hip does not open as wide, note which side and when you noticed it.
  • Compare leg length by lining up the heels when the knees are bent. A lower knee can suggest the shorter side.
  • During tummy time, see if one thigh stays tucked in or seems tighter.

Keep it safe and soft. Do not force movement or try to diagnose. Take photos of the folds or leg position on different days, then share them with your pediatrician.

Sounds and Sensations That Signal Trouble

Some parents notice a soft click or a firm clunk when moving their baby’s legs during diaper changes. This can come from hip instability. Doctors check for this with the Ortolani and Barlow maneuvers, gentle tests that feel if the hip slides out and then back in. A positive test is when the hip relocates into the socket with light pressure. It is usually painless for the baby, which is why it can be missed at home. These sounds are one reason pediatricians screen hips at birth and at early visits, so small shifts do not become bigger problems.

When to Seek Help: Diagnosis and Early Treatment Options

Worried about your baby’s hips? Here is when to act, how hip dysplasia diagnosis in infants works, and the early treatments that set hips up for normal growth. Talk to your pediatrician now.

Standard Screening and Tests for Infants

Every newborn gets a hip check at birth, then typically at 2, 4, and 6 months during well visits. The doctor gently bends and opens the legs, feeling for smooth motion and a stable socket. If risk factors are present, such as breech position, family history, or physical symptoms during exam, an ultrasound is ordered. Ultrasound is safe for babies, it uses sound waves, not radiation. The process is simple: warm gel goes on the skin, a small wand glides over each hip, and images appear in real time. Many clinics repeat the scan around 4 to 6 weeks to confirm the hip sits deep in the socket. X-rays come later only if needed, usually after 3 to 4 months when bones show better on film. Early checks matter because treatment before 6 months works best, helps the socket mold correctly, and avoids longer care later for most affected infants.

Effective Treatments to Correct Hip Dysplasia

Most babies start with a Pavlik harness, a fabric brace that holds the hips in a flexed, open position. It is worn 23-24/7 at first, usually for a few weeks, then for naps and nights as the hip stabilizes. Your care team checks fit and progress often, with exams and repeat ultrasounds or X-rays. If the hip stays loose, a closed reduction in the operating room may follow. The surgeon gently places the ball back in the socket under anesthesia, confirms position with arthrography-guided imaging, then applies a spica body cast to keep it in place. Some older infants may need a small surgery to release tight tissues or reshape the socket. Most babies adjust quickly to harnesses and casts. Parents get training, supplies, and tips for diapering, bathing, and car seats. When treatment begins by 6 months, success rates are high and hips usually develop normally with early care.

Conclusion

Hip dysplasia is common, and it is treatable when caught early. The signs are usually simple to spot in daily care, like uneven thigh folds, a leg that looks shorter, or a hip that does not open as wide. Soft clicks or a firm clunk during diaper changes can also point to a loose joint. Add known risks like breech birth or family history, and you have a clear plan to watch closely.

Stay on schedule with well visits, since exams and imaging confirm what you see at home. If something feels off, call your pediatrician, share notes or photos, and ask about an ultrasound or next steps. Early care often means a harness, short follow up, and strong long term hip health. Most babies do very well, then move, crawl, and walk with confidence.

Keep trusting your instincts. Put the next checkup on your calendar, review your baby’s photos for any changes, and talk with your care team about what you notice. For reliable guidance, review parent resources from the American Academy of Pediatrics, and keep this list of signs handy. Share what you have learned with a partner or caregiver so everyone knows what to watch.

Your attention today helps your child stay active, comfortable, and ready to grow.

Disclaimer:

OPSB products should be used under the guidance of a qualified healthcare professional. Individual results may vary. Please consult your pediatrician or orthopedic specialist for professional advice. This article is for informational purposes only and does not constitute medical advice. Always follow your doctor’s recommendations and instructions.

MAM-MM-135

https://family.opsb.com/wp-content/uploads/sites/2/2026/03/9.png 1072 934 mhoff /wp-content/uploads/sites/2/2026/03/family-resource-hub-logo.png mhoff2026-03-06 16:53:402026-03-11 18:02:17Signs and Symptoms of Hip Dysplasia in Infants

What Causes Hip Dysplasia in Babies? Guide for New Parents

Hip dysplasia in babies means the hip joint doesn’t form quite right, so the ball and socket don’t fit well. With early care, most babies do great.

What causes it? It often comes from a mix of factors, like family history, a breech position late in pregnancy, being the firstborn, or tight space in the womb. Girls are affected more often. Swaddling with straight legs, especially when done tightly, can raise risk too. Sometimes it happens with no clear cause.

Knowing what to look for can help you spot signs early and get the right care. Early detection and treatment help protect the hip joint as your baby grows and crawls, then walks. Simple checks, done by your pediatrician, can catch it early.

This guide simplifies what you need to know. You’ll learn the common causes and risk factors, from genetics to breech birth. You’ll see early signs to watch for, like uneven leg creases or limited hip movement. You’ll understand how doctors confirm a diagnosis with exams and imaging.

We’ll cover treatment options, from watchful waiting and bracing to surgery. You’ll also get prevention tips, including safe swaddling and healthy hip positions for carriers. Each section aims to reduce worry and help you feel prepared.

Clear steps and timely checkup can protect your baby’s hips and support strong, steady movement.

Understanding Hip Dysplasia: The Basics Every Parent Should Know

Think of the hip joint as a golf ball sitting in a small cup. The ball is the top of the thigh bone, and the cup is the hip socket. For smooth movement, the ball needs to sit snugly in the cup. In hip dysplasia, that fit is loose or off-center. Sometimes the socket is shallow, so the ball slides around. In rare cases, the ball slips out. Doctors call this a dislocation.

Hip dysplasia ranges from mild looseness to full dislocation. It affects about 1 in 1,000 babies, and mild forms are even more common. It shows up more in girls and firstborns. Because the early months shape the joint, hospitals screen newborns at birth and again at early checkups. This helps catch small issues before crawling and walking put stress on the joint.

How the Hip Joint Develops in Newborns

In the womb, a baby’s hip is mostly cartilage. The socket, called the acetabulum, deepens as the ball stays centered. The more time the ball sits in the socket, the better the fit. Late in pregnancy, space gets tight. Hips often rest in a bent and turned-out position, which protects them while the bones and socket shape up.

Right after birth, the ligaments around the hip are still loose. Maternal hormones, such as relaxin, can make tissues more flexible. That is helpful for birth, but it can leave a baby’s hip a bit wobbly. The bones then harden over months, and ligaments tighten with normal movement.

Some babies start life with a socket that is a little shallow. If the ball does not sit deep and centered, the socket may not shape well. That is why the first three to six months matter so much. Centered contact tells the socket to grow deeper and stronger.

What are doctors looking for in those early checks?

  • Stable fit: The ball stays in place with gentle pressure.
  • Smooth motion: Hips open wide without stiffness or clicks.
  • Even look: Leg lengths and thigh creases appear symmetrical.

When these are off, your pediatrician may order an ultrasound. Ultrasounds are painless and show how the ball sits in the socket while the bones are still soft.

Why It’s More Common in Certain Babies

Some babies have a higher chance of hip dysplasia because of how their bodies respond to hormones and growth patterns.

  • Girls: Baby girls are affected more often. Their ligaments can be looser due to hormonal effects around birth, which makes the hip less stable.
  • Firstborns: First babies tend to have less room in the uterus. Tighter space can limit hip movement, which may affect how the socket shapes.
  • Family history: If a parent or sibling had hip dysplasia, the risk rises. Genes and shared body traits can influence ligament looseness and socket shape.

These patterns guide screening. If your baby is a girl, a firstborn, or has a family history, your doctor may watch more closely. Early checks and, if needed, early treatment help the hip form a deep, secure socket.

Types of Hip Dysplasia

Hip dysplasia is a spectrum. Some babies have hips that are a bit loose, others have a shallow socket, and a few are born with a hip already out of place. Knowing the types helps you understand timing, cause, and what treatment may look like.

Developmental Hip Dysplasia

Developmental hip dysplasia, often called DDH, starts around birth and can change during the first year. The hip is not fully formed yet, so the ball may not sit deep in the socket. With growth, the fit can improve or worsen, which is why follow-up matters.

What it looks like:

  • Mild instability: The hip feels a little loose on exam.
  • Shallow socket: The cup is not deep enough to hold the ball well.
  • Late-onset issues: A hip that was stable at birth can become unstable later.

Why it happens:

  • Body traits: Looser ligaments and a softer socket in early months.
  • Positioning: Tight swaddling with straight legs can push the ball up and out.
  • Shared risks: Family history, firstborn status, and being breech increase risk.

How it is found:

  • Newborn and infant exams by your pediatrician.
  • Ultrasound in the first 6 months, then X-ray as bones harden.

Congenital Hip Dislocation

Congenital hip dislocation is present at birth. The ball sits outside the socket from day one. This term is older, but doctors still use it to describe a hip that is truly dislocated at birth.

What it looks like:

  • Out of the socket: The head of the thigh bone rests outside the cup.
  • Limited motion: The hip may not open wide during diaper changes.
  • Asymmetry: One leg may look shorter or turn out.

Why it happens:

  • In‑womb pressure: Limited space late in pregnancy can push the hip out.
  • Ligament laxity: Hormones around birth make tissues looser.
  • Genetic influence: Family patterns in socket shape and ligament stretch.

How it is found:

  • Exam right after birth, often followed by ultrasound.
  • Early referral to a pediatric orthopedist.

Developmental vs. Congenital: What’s the Difference?

Use this quick guide to sort the terms.

TypeWhen it startsWhat happensHow it is foundCommon triggers
Developmental hip dysplasia (DDH)Around birth through infancyLoose hip or shallow socket that may change with growthNewborn checks, repeat exams, ultrasoundFamily history, breech, firstborn, female sex, tight leg-straight swaddling
Congenital hip dislocationPresent at birthHip is already out of the socketNewborn exam, early imagingBreech late in pregnancy, tight uterine space, ligament laxity, family history

A simple way to remember it: DDH can develop or improve over time, congenital dislocation starts out of place and needs early correction.

Causes of Congenital Hip Dislocation

Several factors in late pregnancy and birth raise the chance of a hip being dislocated at birth. These do not mean you did anything wrong. They reflect how a baby grows and fits in the uterus.

  • Breech position: Hips straight and knees extended in a breech baby put pressure on the socket.
  • Limited uterine space: First pregnancies, twins, or low amniotic fluid give the hips less room to move.
  • Hormone-related looseness: Maternal hormones can make a baby’s ligaments more flexible.
  • Family history: Parents or siblings with hip dysplasia suggest shared traits in bone shape or tissue stretch.
  • Linked conditions: Torticollis or foot deformities, like metatarsus adductus, often appear with hip issues.

Key takeaway: developmental problems can evolve after birth, while congenital dislocation is there from day one. Both benefit from early checks and, when needed, early treatment.

Key Causes of Hip Dysplasia in Babies

Hip dysplasia rarely stems from a single cause. It usually reflects a mix of genetics, position in late pregnancy, and how soft tissues respond to hormones and space. Knowing these roots helps you focus on smart screening and everyday habits that protect growing hips.

Common drivers include:

  • Family history, which raises the baseline risk.
  • Breech position, especially with legs extended.
  • Hormonal and environmental factors, such as low amniotic fluid and tight swaddling.

Genetic and Family History Factors

Family history matters. If a parent or sibling had hip dysplasia, the risk for a baby rises sharply. Studies show the chance can increase up to 20 times compared with families without a history.

Why genetics play a role:

  • Genes guide joint formation. They influence how the socket shapes and how round the ball of the hip becomes.
  • Ligament traits run in families. Some babies inherit looser connective tissue, which can let the hip shift more than it should.

Helpful context:

  • Higher risk is not a guarantee. Many babies with a family history never develop hip dysplasia.
  • Targeted screening helps. If hip issues run in your family, ask for early and repeat checks, often an ultrasound in the first months.

Breech Position During Pregnancy

Breech means a baby is positioned feet first or butt first near delivery. In many breech babies, the hips are straight and the knees extended. That posture can stress the socket and push the ball upward, especially late in pregnancy when space is tight.

Key points to know:

  • Risk is higher in breech babies. Research reports that about 20 to 30 percent of breech babies show some form of hip dysplasia.
  • Delivery type matters, but not completely. A C-section can lower stress on the hips during birth, but it does not remove the risk.
  • Late pregnancy breech counts most. Hips shaped in the last weeks are more affected by limited motion and extended legs.

What to do if your baby was breech:

  • Ask your pediatrician about a hip ultrasound at 4 to 6 weeks.
  • Keep legs free to bend and open in carriers and during diapering.

Hormonal and Environmental Influences

Hormones and space shape how the hip stabilizes in early life. Around birth, maternal hormones, such as relaxin, can make a baby’s ligaments more flexible. That flexibility helps with delivery, but it can also allow the hip to shift if the socket is shallow.

Other influences that raise risk:

  • Low amniotic fluid (oligohydramnios). Less fluid means less space to move, which limits healthy hip motion.
  • Tight quarters. Firstborns or multiples may have less room, which can keep hips straighter than ideal.
  • Swaddling style. Straight-leg, tight swaddling can push the ball up and out. This has increased risk in populations where legs are bound down after birth.

Protective habits to consider:

  • Hip-friendly swaddling. Wrap the arms snug, keep the legs loose and bent. Think “M” shape for the hips.
  • Ergonomic carriers. Choose carriers that support thighs and let hips spread, like a seat instead of a narrow sling.

Big picture: genetics set the stage, breech position adds pressure, and hormones plus space tune the final result. With awareness and simple habits, you can reduce avoidable stress on your baby’s hips.

Recognizing Symptoms and Getting an Early Diagnosis

Catching hip dysplasia early protects the joint and supports strong movement. The signs can be subtle, so a calm, steady look at everyday routines helps. Think diaper changes, bath time, and how your baby moves on the floor. When something feels off, a quick chat with your pediatrician sets the path forward. Early diagnosis lowers the risk of long-term pain and early arthritis.

Common Signs to Look For in Your Baby

You can spot clues during simple daily care. Not every baby shows symptoms, and many look completely typical. That is why routine checks with your pediatrician matter.

Watch for:

  • Clicking or popping in the hips during diaper changes or gentle leg movement.
  • Uneven thigh or buttock creases, especially when legs are stretched out.
  • Limited hip opening when you gently spread the legs for a diaper.
  • One leg appearing shorter or a foot that points outward more than the other.
  • Asymmetry when standing later, like one knee lower or a lean to one side.

Example: during a diaper change, one hip opens wide and the other stops early. That difference is a reason to call your pediatrician. Even small changes can matter.

Key reminder: many babies have no obvious signs. Regular hip checks at newborn monthly visits are essential.

Diagnostic Tests and What to Expect

The process is simple, quick, and gentle. Exams and images help confirm how the hip sits in the socket.

What usually happens:

  1. Hands-on exam. Your pediatrician moves each hip to feel stability and range.
    • The Ortolani maneuver gently opens the hip to see if it slides into place.
    • The Barlow test applies light pressure to check if a hip can slip out.
    • These moves are careful and brief. Babies may fuss, but it is not painful.
  2. Ultrasound. If the exam is unclear or risk is higher, the next step is imaging.
    • Best used in the first months, usually at 4 to 6 weeks.
    • Shows how the ball sits in the socket while bones are still soft.
    • The scan is painless. Gel on the skin, a small probe, and it is done.
  3. X-ray for older babies. As bones harden around 3 to 4 months, X-rays provide detail.
    • Quick images while your baby is positioned safely.
    • Very short exposure with standard safety steps.

If imaging confirms dysplasia, you may get a referral to a pediatric orthopedist. Early treatment, like a soft brace, often fixes the issue and protects future hip health. Early care reduces the chance of uneven gait, hip pain, and arthritis later in life.

If you notice any signs or feel unsure, call your pediatrician. Trust your instincts. A fast check now can save years of trouble later.

Simple Prevention Tips for New Parents

You can support healthy hips with a few daily habits. These steps are easy to use from day one.

  • Use hip-healthy carriers: Look for a seat that supports the thighs and lets the knees sit higher than the hips. Think “frog-leg” or “M” position. Baby’s hips should be bent and gently spread.
  • Swaddle smart: Keep the chest snug and the legs loose. Hips should bend and move. Avoid straight-leg, tight wrapping.
  • Follow AAP guidance: Review hip-safe swaddling and safe babywearing tips. Your pediatrician and the American Academy of Pediatrics offer clear, parent-friendly advice.
  • Go to every checkup: Routine hip exams at newborn, 1-, 2-, 4-, and 6-month visits catch small issues early. Ask for an ultrasound if your baby was breech or there is a family history.

Start simple, stay consistent, and keep those legs free to move. With early checks and hip-friendly habits, most babies develop strong, healthy hips.

Conclusion

Hip dysplasia often comes from a mix of genetics, breech position, and being first born. You can lower risk with hip-friendly swaddling, supportive carriers, regular checkups, and an ultrasound risk factors are present like breech birth or family history. Most cases are found early and respond well to gentle treatment, which protects long-term hip health.

Stay in close touch with your pediatrician, and consider joining a parent support group for tips and encouragement.

Disclaimer:

OPSB products should be used under the guidance of a qualified healthcare professional. Individual results may vary. Please consult your pediatrician or orthopedic specialist for professional advice. This article is for informational purposes only and does not constitute medical advice. Always follow your doctor’s recommendations and instructions.

MAM-MM-137

https://family.opsb.com/wp-content/uploads/sites/2/2026/03/15.png 1118 853 mhoff /wp-content/uploads/sites/2/2026/03/family-resource-hub-logo.png mhoff2026-03-06 16:50:492026-03-11 17:46:48What Causes Hip Dysplasia in Babies? Guide for New Parents

Barlow and Ortolani Tests Explained for Infant Hip Dysplasia

Worried about your baby’s hips during those first checkups? You’re not alone. Many new parents hear terms like hip dysplasia and feel concerned, needing more information.

Hip dysplasia means the hip joint didn’t form right. The ball and socket are not fitting well, which can make the joint loose or unstable. It’s common in newborns, often mild, and highly treatable when caught early.

That’s where the Barlow test and Ortolani test come in. These are quick, gentle exams doctors use to find signs of an unstable hip. They don’t hurt, and they help spot issues before a baby starts to crawl or walk.

In this post, you’ll get the basics of hip dysplasia in plain language. You’ll learn what each test checks, how a doctor performs them, and what the results mean. You’ll also see why early detection leads to simple solutions, like a soft harness, instead of surgery later.

Take a breath, you’re doing the right thing by learning now. With early screening, most babies grow strong hips and hit their milestones on time. Your role is simple, keep appointments, ask questions, and know what to expect.

If you’ve heard a click, felt unsure, or just want clarity, you’re in the right place. Let’s make sense of these tests, step by step, so you can feel confident at your child’s next visit.

What Is Hip Dysplasia and Why Spot It Early?

Hip dysplasia in infants means the ball of the thigh bone does not sit snug in the hip socket. Think of a loose puzzle piece that does not click in place. The joint can be wobbly or out of position, which makes movement less stable.

This is common. About 1 in 1,000 babies has hip dysplasia that needs treatment. Many more have mild looseness that settles with growth and monitoring. When untreated, the joint can wear faster, which may lead to pain, a limp, or early arthritis later in life.

The good news is simple. When spotted early, most cases respond to a soft brace or a gentle cast. These hold the hips in a healthy position while the socket grows. That means more play and less worry by the time walking starts.

You are building a foundation before we get into the Barlow and Ortolani tests. Knowing the signs and risks will help you ask clear questions and feel confident during checkups about developmental hip issues.

Signs and Symptoms to Watch For in Your Baby

You can spot a few early clues at home. These hints are not always obvious, so regular visits matter. Your pediatrician checks for hip dysplasia in infants at every well-baby exam.

  • Uneven thigh or buttock folds: Skin creases do not line up from side to side, meaning are not the same when comparing one side to the other.
  • One leg looks shorter: The knees sit at different heights when both hips and knees are bent.
  • Limited hip movement: One hip opens less during diaper changes.
  • Clicks or clunks with movement: A shift you can feel or hear when spreading the legs.

These signs do not confirm a problem, and many babies with hip dysplasia show none at all. That is why routine checks, including the Barlow and Ortolani exams, are key. Your doctor’s hands can feel subtle looseness long before it affects crawling or walking. We will expand on what each sign means as we walk through the tests later in the post.

Risk Factors That Increase the Chances

Some babies have a higher chance of developmental hip issues. These do not cause dysplasia on their own, but they raise awareness and guide early screening.

  • Breech position in late pregnancy or at delivery: Hips may press upward, which can loosen the joint.
  • Family history: A parent or sibling with hip dysplasia raises the odds.
  • First-born and female: Tighter space in the uterus and hormonal effects can play a role.
  • Tight swaddling with legs straight: Hips need room to bend and open.

These factors do not mean your baby will have hip dysplasia. They do mean timing matters. Share pregnancy details and family history with your pediatrician, and ask about hip-safe swaddling. Early awareness leads to simple checks, quick imaging when needed, and fast treatment that keeps your child on track.

Breaking Down the Barlow Test for Hip Stability

The Barlow test is the first of the two key checks for infant hip stability. It is a gentle part of the infant hip exam, used from birth through about 6 months. Named after Dr. Thomas Barlow, this quick maneuver looks for a hip that can slip out of the socket. That kind of hip is called dislocatable. Finding it early guides simple care that protects healthy growth.

Step-by-Step: How Doctors Perform the Barlow Test

Here is the Barlow test procedure your doctor follows during a routine newborn check. There is no special prep for parents or baby. Your child stays calm, often swaddled or soothed with a pacifier.

  1. Your baby lies on the back on a firm, warm surface.
  2. The hips and knees are gently bent to about 90 degrees.
  3. The doctor holds one thigh with one hand, steadying the pelvis with the other.
  4. With light pressure, the doctor presses the knee down towards the table.
  5. The doctor feels for a small shift as the hip moves backwards within the socket.
  6. The same steps are done on the other side.

This is a soft, controlled movement, not a forceful push. Most babies relax through it. The goal is to see if the ball of the hip can be nudged out of place, even for a moment. If it can, the joint is unstable and needs a closer look.

Key points parents find helpful:

  • Routine check: Done in the hospital and at early visits.
  • No pain: It is quick and gentle, usually well under a minute.
  • Age window: Most useful from newborn to 6 months, while the hip is still flexible.

What a Positive Barlow Test Means for Your Baby

A Barlow test is positive when the hip briefly dislocates during the maneuver. That signals potential dysplasia, which means the joint is loose or the socket is shallow. Your doctor will arrange an ultrasound to confirm, often within a few weeks. Early action keeps treatment simple.

A negative Barlow is good news. It means the hip stays stable with gentle pressure. Your pediatrician will still monitor the hips at checkups, since growth can change how the joint behaves.

What happens next if the test is positive?

  • Imaging: Ultrasound to see the hip in motion and measure stability. X-ray if the baby is older.
  • Referral: to pediatric orthopedic specialist.
  • Follow-up plan: Close monitoring in the first months of life.
  • Treatment: Many babies do well with a Pavlik harness, a soft brace that holds the hips in a safe position while the socket matures.

False positives are uncommon with trained hands, and repeat exams help confirm what was felt. The outlook is strong. When found early, most babies need only a brace and no surgery. Your role is simple, keep appointments, ask questions, and feel good that this careful check caught a fixable issue at the right time.

The Ortolani Test: Reducing and Diagnosing Dislocations

Think of the Ortolani as the companion to Barlow. If Barlow checks whether a hip can slip, Ortolani checks whether a slipped hip can go back in. Named after Dr. Marino Ortolani, this maneuver helps detect a reducible hip dislocation (one where the hip is displaced, but can be put back into the socket). In simple terms, the doctor gently feels for a loose joint that clicks back into place. Used together, these exams screen most cases of hip dislocation in newborns. Here is the Ortolani test explained in clear steps.

Performing the Ortolani Test: A Gentle Check

The Ortolani test is calm, controlled, and quick. Babies tolerate it well when handled softly.

Steps your clinician follows:

  • Your baby lies supine on a warm, flat surface.
  • Both hips and knees are gently flexed to about 90 degrees.
  • The doctor steadies the pelvis with one hand.
  • With the other hand, the doctor abducts (spreads) the thigh, opening the hip outward while lifting the thigh anteriorly (towards the ceiling).
  • A true positive is a smooth, clunk felt by the doctor, not a snap or crackle. That clunk is the ball sliding back into the socket.
  • Each hip is checked separately, with slow, even movements.

Key points:

  • Age window: Most useful under 3 months, when the hips are flexible and easier to assess.
  • Gentle approach: The goal is to reduce a dislocated hip, not to force movement.
  • Comfort matters: A quiet room, warm hands, and soft voice help avoid startling your baby.

What parents can expect during the visit:

  • The exam takes less than a minute per hip.
  • Your baby may suck a pacifier for comfort.
  • You may hear the word clunk described, but you might not hear it yourself. It is usually something the clinician feels more than hears.
  • If the exam suggests looseness, your doctor will outline next steps right away.

Interpreting Ortolani Results and Next Steps

A result is positive if the examiner feels a distinct clunk as the hip reduces. That means the hip was out and then went in. A positive Ortolani prompts ultrasound imaging to confirm anatomy and stability. A negative result means the hips feel stable and move smoothly without a reduction event.

What happens after a positive Ortolani:

  • Imaging: Ultrasound gives a clear picture in early infancy. It helps guide the plan without radiation.
  • Follow-up: Early referral to pediatric orthopedics is common when reduction is felt.
  • Treatment:
    • Monitoring for mild cases when the hip is borderline but improves on repeat exams.
    • Bracing with a Pavlik harness or similar device for most reducible dislocations.
    • Surgery only when bracing does not work or diagnosis is delayed.

Early action works. With prompt bracing in young infants, success rates are around 90%, which avoids invasive care later and supports normal growth. Combined with the Barlow test, the Ortolani helps clinicians sort out which hips are unstable and which are already dislocated but reducible. That partnership keeps screening efficient, decisions clear, and treatment simple when started early.

Why These Tests Are Game-Changers for Hip Health

Barlow and Ortolani work as a team. Together, they spot hip instability early, when the joint is still moldable and easy to guide into a healthy position. This is the heart of early detection of hip dysplasia. Quick, gentle exams, zero radiation, and decisions you can act on right away.

These screenings are part of standard newborn care. Every baby gets a physical hip exam, and at-risk infants get an ultrasound. The approach is simple, cost-effective, non-invasive, and accurate in skilled hands. Catching a loose hip in the first months prevents pain, limping, and early arthritis later in life.

If any result is unclear, your pediatrician will recheck or order imaging. Bring questions to each visit. A short talk now can save your child from bigger procedures later.

When and How Often Should Screenings Happen?

Routine hip checks happen during:

  • Birth hospitalization, before discharge.
  • The 2-month well visit.
  • The 4-month well visit.

Your pediatrician keeps checking hips at each visit in the first year, and again when your baby starts walking. This follows guidance from the American Academy of Pediatrics, which supports regular physical exams for all infants and targeted imaging for those at higher risk.

Who is high risk? Breech position in late pregnancy or delivery, a first-degree family history, or a positive or inconclusive exam. These babies get an ultrasound at about 6 weeks, after newborn laxity settles, to confirm hip stability.

Quick guide for parents:

  • All babies: physical exam at birth and well visits.
  • High-risk or abnormal exam: hip ultrasound at around 6 weeks.
  • Ongoing follow-up: repeat exams to track growth and movement.
Baby statusScreening plan
No risk factors, normal examPhysical exams at routine visits
Breech, family history, or concerning examUltrasound at ~6 weeks, plus physical exams

Ask your clinician to show you what they felt. A short demo builds confidence and helps you know what to watch for at home.

Treatment Options if Dysplasia Is Found

Most infants do not need surgery. Early, non-surgical care works in the great majority of cases.

Common, effective options:

  • Pavlik harness or similar brace for 6 to 12 weeks. It holds hips in a safe, flexed, open position while the socket matures.
  • Regular check-ins with ultrasound or X-ray, depending on age, to confirm progress.
  • Gentle positioning tips at home, like hip-friendly swaddling and safe babywearing.

Success rates are high when treatment starts early, often over 90 percent for reducible hips. Babies in harnesses still feed, sleep, and play. Most go on to sit, crawl, and walk on time.

What if bracing does not work, or diagnosis comes after 6 months?

  • Closed reduction (putting the hip back in the socket under anesthesia) with a spica (body) cast may be used.
  • Surgery is rare, and usually reserved for severe or late-detected cases.
  • Even then, children typically catch up well with the right follow-up.

Here is the good news. The combined power of the Barlow and Ortolani tests during routine screenings guides fast, simple care that protects hip growth. If you have concerns, talk with your pediatrician. Early action sets your child up for strong, pain-free movement.

Conclusion

Hip dysplasia is common, and when found early it is very treatable. The Barlow test checks if a hip can slip, and the Ortolani test checks if a slipped hip can go back in. Together, these simple exams catch unstable hips before walking starts, which protects growth and comfort.

Screening leads to clear next steps, often a short time in a soft brace. Most infants respond quickly, avoid surgery, and reach milestones on time. Trust the process, keep your well-baby visits, and speak up if something feels off.

If you have concerns, contact your pediatrician or a pediatric orthopedic specialist.. What you do today shapes strong hips for years to come.

Thank you for reading and caring about early detection. Stay curious, ask for a quick hip check at each visit, and use these insights to support your child with confidence.

Disclaimer:

OPSB products should be used under the guidance of a qualified healthcare professional. Individual results may vary. Please consult your pediatrician or orthopedic specialist for professional advice. This article is for informational purposes only and does not constitute medical advice. Always follow your doctor’s recommendations and instructions.

MAM-MM-138

https://family.opsb.com/wp-content/uploads/sites/2/2026/03/10.png 818 931 mhoff /wp-content/uploads/sites/2/2026/03/family-resource-hub-logo.png mhoff2026-03-06 16:29:212026-03-11 18:07:43Barlow and Ortolani Tests Explained for Infant Hip Dysplasia

Pages

  • Home
  • Accessibility Statement
  • Publicity and Data Use Authorization & Release Policy
  • Cookie Policy
  • Terms of Use
  • Privacy Policy
  • Medical Disclaimer
  • About
  • Blogs
  • Product Resources
  • Scoliosis
  • Clubfoot
  • Lower Limb Bracing
  • Hip Dysplasia
  • Plagiocephaly
  • Femur Fracture
  • Prosthetics & Limb Difference
  • Surgical Resources
  • Connect with OP Specialty Bracing

Categories

  • Uncategorized
  • Stories
  • Condition
  • Clubfoot
  • Plagiocephaly
  • Femur Fracture
  • Prosthetics
  • Experience
  • About
  • Scoliosis
  • Hip Dysplasia
  • Lower Limb
  • Surgical Resources
  • Featured Stories

Archive

  • May 2026
  • April 2026
  • March 2026
  • February 2026
  • December 2025
  • October 2025

This website is for educational purposes only and does not constitute medical advice or replace consultation with your healthcare provider. PLEASE CONSULT YOUR PEDIATRICIAN OR ORTHOPEDIC SPECIALIST FOR PROFESSIONAL ADVICE REGARDING DIAGNOSIS AND TREATMENT OPTIONS. OPSB products should be used under the guidance of healthcare professionals. Full prescribing information can be found in product labeling. Individual results may vary.

Medical Disclaimer

©2026 OrthoPediatrics Corp.
OrthoPediatrics Specialty Bracing

Privacy Policy | Terms of Use | Cookie Policy | Accessibility Statement

Contact Us

Phone: 877-766-7384
Email: info@mdorthopaedics.com

Quick Links

  • Scoliosis
  • Clubfoot
  • Lower Limb
  • Hip Dysplasia
  • Plagiocephaly
  • Femur Fracture
  • Prosthetics & Limb Difference
  • Surgical Resources
Visit the OP Specialty Bracing website

Design and development by RainCastle Communications

  • Scoliosis
  • Clubfoot
  • Lower Limb
  • Hip Dysplasia
  • Plagiocephaly
  • Femur Fracture
  • Prosthetics & Limb Difference
  • Surgical Resources

    Quick Links

  • About
  • For Providers
  • Product Resources
  • Blogs
  • Find a Clinic