OPSB Family Resource Hub
  • About
  • For Providers
  • Product Resources
  • Blogs
  • Find a Clinic
Search Search
  • Scoliosis
  • Clubfoot
  • Lower Limb
  • Hip Dysplasia
  • Plagiocephaly
  • Femur Fracture
  • Prosthetics & Limb Difference
  • Surgical Resources
  • Menu Menu

Hip Dysplasia Bracing Options for Children: When Each Is Used

Many parents spot small signs like uneven leg folds or a slight limp before a routine check up with your child’s pediatrician, then learn their baby has developmental dysplasia of the hip or hip dysplasia, a condition where the ball does not sit deep in the hip socket.

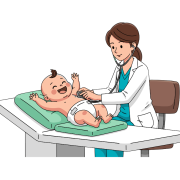
Hip Dysplasia is common in newborns and often caught early with routine screening, like a gentle physical exam or an ultrasound. The good news is that many babies do well with non-surgical care like bracing. Bracing guides the ball of the femur bone into a safe, stable position so the hip socket can form the way it should.

In this article, you will learn the main bracing options and when doctors frequently use them. We will touch on the Pavlik harness for young babies, abduction braces used as children grow, and night-time braces that help hold progress after treatment. You will also see how age, hip stability, and follow-up scans shape each choice.

If you are searching for hip dysplasia treatment for babies, you are in the right place. We keep the terms simple, explain what to expect, and share generally how long bracing may last. Most important, you will see why starting early can help make treatment more effective.

Early bracing often sets the hip on a healthy path, and in many cases, can help prevent avoid surgery later.

What Causes Hip Dysplasia and Why Early Bracing Helps

Hip dysplasia happens when the ball of the femur, or thigh bone, does not sit snugly in the hip socket. In infants, the socket is shallow and soft, so a loose fit can let the ball slip out. If this continues, the socket does not deepen as it should, which can lead to dislocation and later joint problems.

Common causes and risk factors often stack together:

  • Family history of hip dysplasia
  • Breech position in late pregnancy or at birth
  • Being first born female
  • Tight swaddling with legs pressed straight

About 1 in 1,000 babies has hip dislocation at birth, and many more have mild instability. Doctors confirm suspected cases with a gentle physical exam and a follow up ultrasound in the first months of life.

Why bracing early works: a brace holds the legs in a comfortable, frog-like position, called abduction and flexion. This places the ball deep in the socket so the rim of the hip can mold around it. It is most effective in babies under 6 months, when bones are soft and can reshape quickly. Early treatment succeeds in many mild to moderate cases. For these babies, bracing is simpler, safer, and less stressful than surgery.

Signs to Watch For in Your Baby

Watch for small clues during daily care. Uneven leg creases, a hip that clicks during diaper changes, or one leg that does not open as wide as the other can be signs of hip dysplasia. In toddlers, look for a limp or toe walking on one side. Ask your pediatrician about screening at birth and again around 6 weeks, especially if your baby was breech or you have a family history. Most cases are treatable when caught early. Keep swaddles loose at the hips, place legs in a natural “M” shape, and follow up if something feels off.

Top Bracing Options for Treating Hip Dysplasia

Bracing holds the hip in a safe, stable position while the socket matures, allowing both the head of the femur and the hip socket to form correctly. The right bracing option depends on your child’s age, hip stability, and how the hip responds over the first weeks of care. Here is how the most used braces compare, when each is used, and what parents can expect day to day.

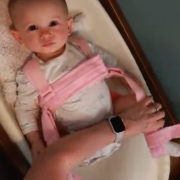
The Pavlik Harness: Best for Newborns

The Pavlik harness for hip dysplasia is the first choice for most infants from birth to about 6 months. It is a harness made of fabric with chest and leg Velcro straps that position the hips in 90 to 100 degrees of flexion and 40 to 60 degrees of abduction. This frog-like posture centers the ball in the socket so it can deepen and stabilize.

  • When it is used: Located but dis-locatable hips in newborns (positive Barlow). Dislocated hips with the hip still reducible (positive Ortolani).
  • How it is worn: Usually 23-24 hours a day for 6 to 12 weeks, then nights only for several weeks to hold progress.
  • Adjustments: The pediatric orthopedic surgeon sets strap lengths and checks them at each visit. Parents do not re-adjust unless told to.
  • Success: High success rates, often 80 to 95 percent in mild to moderate cases when started early.

Parent care responsibilities:

  • Skin care: Keep the straps dry. Gently clean skin under the straps at diaper changes if your team allows removal for brief care. Pat dry. Watch for redness at the shoulders or behind the knees. Alert your medical team if you identify any persistent skin issues that need to be addressed.
  • Diapers and clothing: Diaper under the straps. Use loose onesies and wide-bottom pants. Avoid tight swaddles. Keep legs in an “M” shape.
  • Monitoring: Follow all ultrasound or X-ray checks. Ask about signs of limited blood flow to the femoral head, called avascular necrosis. It is rare, and careful positioning lowers the risk. Make sure the baby can kick both knees.
  • Daily routine: Tummy time is still helpful. Use a rolled towel for support under the chest if needed.

Pros and cons:

  • Pros: Fabric, allows movement, higher success in young infants, no rigid bars.
  • Cons: Requires near-constant wear at first, regular clinic checks, strap care to prevent skin issues.

Quick trust boost: Many families see improvement on ultrasound within a few weeks. Early progress helps shorten total wear time.

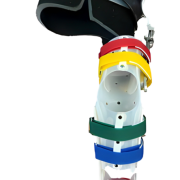
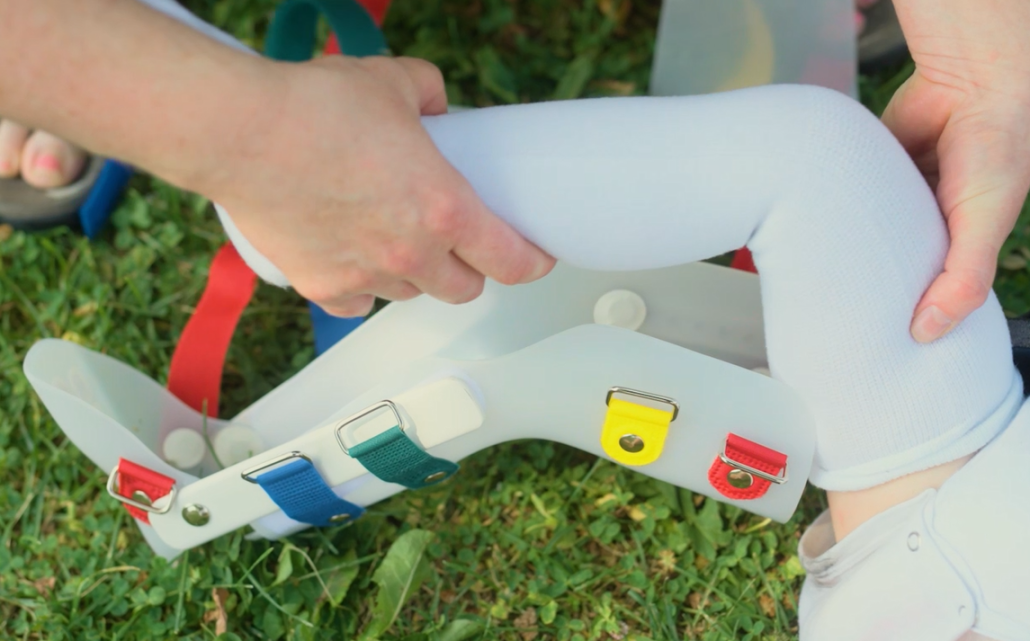
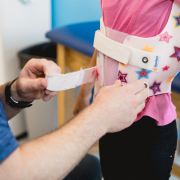
Abduction Braces for Older Infants

When the Pavlik harness fails, or when a child is 6 to 18 months old, doctors often switch to a rigid abduction brace. These devices hold the hips out to the side and block adduction (knees touching), which keeps the hip centered.

Common types you may hear about:

  • Ilfeld splint- Holds the hips gently out to the sides and slightly bent to keep the ball securely positioned in the socket while it stabilizes.
  • PediHip™ Modular Abduction Bar- Connects both legs with an adjustable bar to maintain controlled hip positioning and alignment during healing or post-reduction care.
  • Rhino® Cruiser Brace- Uses a foam lined, rigid frame to keep the hips abducted while still allowing safe movement for comfort and daily activity.

Key differences from Pavlik:

  • Stiff vs. soft: These braces are rigid to control motion, which is helpful in older or more active infants.
  • Wear schedule: Often full-time for about 3 months, then part-time or nights only as the hip stabilizes.
  • Fitting: A pediatric orthopedic surgeon or orthotist sets angles and checks the fit. Expect follow-up X-rays to confirm the hip stays reduced.

Daily care and comfort:

  • Dress in soft layers to prevent rubbing.
  • Use a wider car seat and stroller setting when available. Many standard seats work fine if able to adjust straps.
  • For sleep, a wearable blanket, like a sleep sack, with extra hip room helps.
  • Encourage floor play in safe positions. Babies adapt quickly to the brace.

Pros and cons:

  • Pros: Strong control of hip position, helpful after Pavlik failure, suitable for active older infants.
  • Cons: Bulkier, can be more difficult to adjust to for babies, harder for diapering, may cause skin irritation if not padded well.

Rigid Braces and Casts for Tough Cases

For children over 18 months or with severe dysplasia, such as Graf type IV, rigid solutions or casts may be needed, often after a closed or open reduction in the operating room.

Short-term immobilization:

  • Hip spica cast: A fiberglass or plaster cast from chest to legs that holds the hips reduced after surgery or closed reduction. Worn for several weeks to maintain position while tissues heal.
  • Petrie cast: Two leg casts connected by a bar, keeping the legs abducted. Used for short periods to hold gains after reduction.

Maintenance bracing after casting:

  • Ilfeld or Tubingen braces: Rigid devices that keep abduction while allowing limited movement. Worn part-time or at night to protect the reduction and support socket growth.
  • PediHip Rigid Brace: Rigid brace that keeps the hip stable and properly aligned in the correct position while it heals. Allowing the bone and soft tissues to recover safely.

What to expect:

  • Casting is less common, and it is usually part of a larger plan. Teams teach diapering, car seat options, and skin checks around the cast edges. Follow-up imaging confirms the hip stays in place.

When surgery might be needed:

  • If the hip cannot be reduced or does not stay reduced with bracing and casting, surgeons may recommend procedures such as open reduction, and in older toddlers, bone procedures to improve hip alignment. Bracing often continues after surgery to protect the repair.

Pros and cons:

  • Pros: Strong control of hip position, stabilizes severe or late-detected cases.
  • Cons: Limits mobility, higher care needs, often part of surgical care rather than a stand-alone fix.

Bottom line: start soft when the child is young, step up to rigid abduction if needed, and reserve casts and surgery for the small group that needs stronger support. Early, consistent treatment gives the best path to a stable, pain-free hip.

When Doctors Choose a Specific Brace and What to Expect

Parents often ask when to use a brace for hip dysplasia. Doctors look at three things first: your child’s age, how stable the hip feels during the exam, and the ultrasound grade or X-ray. With that info, they choose the least invasive option that still keeps the hip centered. Most plans last 3 to 6 months with steady check-ins, and the path gets clearer after the first few scans.

Age and Severity: Key Factors in Brace Selection

Age shapes the first step, and severity sets the pace. Here is the simple view most clinics follow.

  • Age at diagnosis
    • 0 to 6 weeks: Best window for the Pavlik harness.
    • 0 to 6 months: Pavlik is still first choice if the hip is reducible.
    • 6 to 24 months: Rigid abduction braces are common if Pavlik is not enough.
    • Over 2 years: Bracing alone will not fix a dislocated hip; surgery is often needed then bracing protects progress.
  • Hip stability on exam
    • Unstable or dislocated: Start bracing right away.
    • Stable but shallow: Short trial of observation may be safe with close scans.

What to expect with timing:

  • Immediate start if the hip is unstable or out.
  • Monitoring every 2 to 4 weeks with ultrasound early, then X-rays as bones harden.
  • Weaning once scans show a centered hip and the socket angle improves.

Success rates are high for early mild to moderate cases. Complications are uncommon when the hip is positioned and checked often.

Daily Life with a Hip Brace: Tips for Parents

The first fitting sets the tone. Your team adjusts the brace, checks leg position, and shows you daily care. You will learn how it should sit, how the skin should look, and what to watch between visits.

Practical tips that make each day easier:

  • Dressing: Choose loose onesies and wide-bottom pants. Diaper goes under the straps. Skip tight swaddles. Keep the legs in an “M” position.
  • Carrying: Hold your baby with hips apart, like a gentle squat. A soft carrier that supports the thighs works well if it keeps the hips flexed and apart.
  • Bathing: Ask if brief removal is allowed. If not, try sponge baths. Keep straps/brace dry. Pat skin dry after cleaning.
  • Sleeping: Back sleeping stays safest. Use a wearable blanket with extra hip room. Place pillows near the feet only for comfort if your team approves.
  • Skin care: Check shoulders, behind knees, and strap edges twice a day. Keep skin dry. Watch for rubbing or blisters.

Monitoring progress helps you see wins:

  • Ultrasounds every 2 to 4 weeks in early treatment.
  • Clinic checks to adjust the brace as your child grows.
  • Weaning off once scans stay stable. Many teams switch to nights only for several weeks before stopping.

When to call your doctor:

  • New redness or sores that do not fade after 30 minutes out of the brace.
  • Fever, swelling, or unusual fussiness that does not match normal patterns.
  • Cold or pale toes, or color changes in the feet.
  • Straps that slip or a brace that no longer fits snugly.

Emotional support matters too:

  • It is temporary. Most babies finish bracing within a few months.
  • Join parent groups for DDH. Shared tips lighten the load and reduce stress.
  • Stay active with floor play and cuddles. Babies adjust fast.

Looking ahead:

  • We expect the kids will walk normally and keep active lives.
  • Your team may follow your child until age 5 to confirm the hip matures well.
  • Complications are uncommon with careful positioning and steady follow-up. Early action gives the best results.

Conclusion

Early detection sets the pace for success. Most babies do well with simple bracing, and the Pavlik harness helps many in the first months. As children grow, abduction braces guide the hip as needed, and casts or surgery support the small group with tougher cases. The big idea is simple, choose the lightest touch that keeps the hip centered, then monitor and adjust.

If this post helped you understand hip dysplasia bracing options for children, take the next step. Schedule a visit with a pediatric orthopedist, bring your questions, and ask about follow-up scans and weaning plans. Explore our FAQs for quick answers, then save this page for reference.

Disclaimer:

OPSB products should be used under the guidance of a qualified healthcare professional. Individual results may vary. Please consult your pediatrician or orthopedic specialist for professional advice. This article is for informational purposes only and does not constitute medical advice. Always follow your doctor’s recommendations and instructions.

MAM-MM-134

https://family.opsb.com/wp-content/uploads/sites/2/2026/03/1X6A0064.jpg 683 1024 mhoff /wp-content/uploads/sites/2/2026/03/family-resource-hub-logo.png mhoff2026-03-06 16:56:442026-03-27 17:17:46Hip Dysplasia Bracing Options for Children: When Each Is Used

Signs and Symptoms of Hip Dysplasia in Infants

You’re changing a diaper or watching tummy time, and something with your baby’s hips feels off. Maybe one leg doesn’t move as freely, or the skin folds on each leg aren’t lining up. Your baby seems fine, yet your instinct is telling you to take a closer look. You’re not alone, and you’re right to pay attention.

Hip dysplasia means the hip joint didn’t form as it should. The thigh, or femur, bone doesn’t sit snug in the hip socket, which can affect movement and growth. It’s more common than most parents think, affecting about 1 in 1,000 babies. The positive news is early care often leads to full, healthy hips.

Catching it early can help prevent future pain, potential surgery, or early arthritis. Simple checks, like noticing leg differences during diaper changes or hearing a soft click, can be helpful clues. Pediatricians also screen for it at well visits.

In this article, you’ll learn what can raise the odds, what signs to watch for at home, how doctors diagnose it, and what treatment looks like. We’ll keep it clear and calm, so you know what steps to take and when to call your doctor. You’ve got this, and your baby does too.

Key Signs and Symptoms of Hip Dysplasia to Spot Early

Parents often spot the first clues during everyday care. You may notice uneven skin folds, a leg that looks shorter, or a hip that does not open as wide. These are common hip dysplasia symptoms that you might notice in your newborn at home, however some babies show no obvious signs. That is why routine checkups matter. Pediatricians screen at birth and at well visits, so small issues get caught early. For older infants, watch for a limp or a toe-walking pattern when they start to stand and cruise. Early detection usually means easier fixes, shorter treatment, and better long-term hip health.

Visual Clues During Everyday Baby Care

Look for asymmetry during diaper changes and tummy time, especially in the first 3 to 6 months. You might see more creases on one thigh compared to the other. On your baby’s back, the buttock folds may sit at different heights. A helpful mental image for the blog: one leg shows two neat folds, the other shows three deeper, uneven folds that do not line up.

Gentle home checks can guide what to mention at your next visit:

  • Gently spread the legs into a froggy position when your baby is calm. If one hip does not open as wide, note which side and when you noticed it.
  • Compare leg length by lining up the heels when the knees are bent. A lower knee can suggest the shorter side.
  • During tummy time, see if one thigh stays tucked in or seems tighter.

Keep it safe and soft. Do not force movement or try to diagnose. Take photos of the folds or leg position on different days, then share them with your pediatrician.

Sounds and Sensations That Signal Trouble

Some parents notice a soft click or a firm clunk when moving their baby’s legs during diaper changes. This can come from hip instability. Doctors check for this with the Ortolani and Barlow maneuvers, gentle tests that feel if the hip slides out and then back in. A positive test is when the hip relocates into the socket with light pressure. It is usually painless for the baby, which is why it can be missed at home. These sounds are one reason pediatricians screen hips at birth and at early visits, so small shifts do not become bigger problems.

When to Seek Help: Diagnosis and Early Treatment Options

Worried about your baby’s hips? Here is when to act, how hip dysplasia diagnosis in infants works, and the early treatments that set hips up for normal growth. Talk to your pediatrician now.

Standard Screening and Tests for Infants

Every newborn gets a hip check at birth, then typically at 2, 4, and 6 months during well visits. The doctor gently bends and opens the legs, feeling for smooth motion and a stable socket. If risk factors are present, such as breech position, family history, or physical symptoms during exam, an ultrasound is ordered. Ultrasound is safe for babies, it uses sound waves, not radiation. The process is simple: warm gel goes on the skin, a small wand glides over each hip, and images appear in real time. Many clinics repeat the scan around 4 to 6 weeks to confirm the hip sits deep in the socket. X-rays come later only if needed, usually after 3 to 4 months when bones show better on film. Early checks matter because treatment before 6 months works best, helps the socket mold correctly, and avoids longer care later for most affected infants.

Effective Treatments to Correct Hip Dysplasia

Most babies start with a Pavlik harness, a fabric brace that holds the hips in a flexed, open position. It is worn 23-24/7 at first, usually for a few weeks, then for naps and nights as the hip stabilizes. Your care team checks fit and progress often, with exams and repeat ultrasounds or X-rays. If the hip stays loose, a closed reduction in the operating room may follow. The surgeon gently places the ball back in the socket under anesthesia, confirms position with arthrography-guided imaging, then applies a spica body cast to keep it in place. Some older infants may need a small surgery to release tight tissues or reshape the socket. Most babies adjust quickly to harnesses and casts. Parents get training, supplies, and tips for diapering, bathing, and car seats. When treatment begins by 6 months, success rates are high and hips usually develop normally with early care.

Conclusion

Hip dysplasia is common, and it is treatable when caught early. The signs are usually simple to spot in daily care, like uneven thigh folds, a leg that looks shorter, or a hip that does not open as wide. Soft clicks or a firm clunk during diaper changes can also point to a loose joint. Add known risks like breech birth or family history, and you have a clear plan to watch closely.

Stay on schedule with well visits, since exams and imaging confirm what you see at home. If something feels off, call your pediatrician, share notes or photos, and ask about an ultrasound or next steps. Early care often means a harness, short follow up, and strong long term hip health. Most babies do very well, then move, crawl, and walk with confidence.

Keep trusting your instincts. Put the next checkup on your calendar, review your baby’s photos for any changes, and talk with your care team about what you notice. For reliable guidance, review parent resources from the American Academy of Pediatrics, and keep this list of signs handy. Share what you have learned with a partner or caregiver so everyone knows what to watch.

Your attention today helps your child stay active, comfortable, and ready to grow.

Disclaimer:

OPSB products should be used under the guidance of a qualified healthcare professional. Individual results may vary. Please consult your pediatrician or orthopedic specialist for professional advice. This article is for informational purposes only and does not constitute medical advice. Always follow your doctor’s recommendations and instructions.

MAM-MM-135

https://family.opsb.com/wp-content/uploads/sites/2/2026/03/9.png 1072 934 mhoff /wp-content/uploads/sites/2/2026/03/family-resource-hub-logo.png mhoff2026-03-06 16:53:402026-03-11 18:02:17Signs and Symptoms of Hip Dysplasia in Infants

What Causes Hip Dysplasia in Babies? Guide for New Parents

Hip dysplasia in babies means the hip joint doesn’t form quite right, so the ball and socket don’t fit well. With early care, most babies do great.

What causes it? It often comes from a mix of factors, like family history, a breech position late in pregnancy, being the firstborn, or tight space in the womb. Girls are affected more often. Swaddling with straight legs, especially when done tightly, can raise risk too. Sometimes it happens with no clear cause.

Knowing what to look for can help you spot signs early and get the right care. Early detection and treatment help protect the hip joint as your baby grows and crawls, then walks. Simple checks, done by your pediatrician, can catch it early.

This guide simplifies what you need to know. You’ll learn the common causes and risk factors, from genetics to breech birth. You’ll see early signs to watch for, like uneven leg creases or limited hip movement. You’ll understand how doctors confirm a diagnosis with exams and imaging.

We’ll cover treatment options, from watchful waiting and bracing to surgery. You’ll also get prevention tips, including safe swaddling and healthy hip positions for carriers. Each section aims to reduce worry and help you feel prepared.

Clear steps and timely checkup can protect your baby’s hips and support strong, steady movement.

Understanding Hip Dysplasia: The Basics Every Parent Should Know

Think of the hip joint as a golf ball sitting in a small cup. The ball is the top of the thigh bone, and the cup is the hip socket. For smooth movement, the ball needs to sit snugly in the cup. In hip dysplasia, that fit is loose or off-center. Sometimes the socket is shallow, so the ball slides around. In rare cases, the ball slips out. Doctors call this a dislocation.

Hip dysplasia ranges from mild looseness to full dislocation. It affects about 1 in 1,000 babies, and mild forms are even more common. It shows up more in girls and firstborns. Because the early months shape the joint, hospitals screen newborns at birth and again at early checkups. This helps catch small issues before crawling and walking put stress on the joint.

How the Hip Joint Develops in Newborns

In the womb, a baby’s hip is mostly cartilage. The socket, called the acetabulum, deepens as the ball stays centered. The more time the ball sits in the socket, the better the fit. Late in pregnancy, space gets tight. Hips often rest in a bent and turned-out position, which protects them while the bones and socket shape up.

Right after birth, the ligaments around the hip are still loose. Maternal hormones, such as relaxin, can make tissues more flexible. That is helpful for birth, but it can leave a baby’s hip a bit wobbly. The bones then harden over months, and ligaments tighten with normal movement.

Some babies start life with a socket that is a little shallow. If the ball does not sit deep and centered, the socket may not shape well. That is why the first three to six months matter so much. Centered contact tells the socket to grow deeper and stronger.

What are doctors looking for in those early checks?

  • Stable fit: The ball stays in place with gentle pressure.
  • Smooth motion: Hips open wide without stiffness or clicks.
  • Even look: Leg lengths and thigh creases appear symmetrical.

When these are off, your pediatrician may order an ultrasound. Ultrasounds are painless and show how the ball sits in the socket while the bones are still soft.

Why It’s More Common in Certain Babies

Some babies have a higher chance of hip dysplasia because of how their bodies respond to hormones and growth patterns.

  • Girls: Baby girls are affected more often. Their ligaments can be looser due to hormonal effects around birth, which makes the hip less stable.
  • Firstborns: First babies tend to have less room in the uterus. Tighter space can limit hip movement, which may affect how the socket shapes.
  • Family history: If a parent or sibling had hip dysplasia, the risk rises. Genes and shared body traits can influence ligament looseness and socket shape.

These patterns guide screening. If your baby is a girl, a firstborn, or has a family history, your doctor may watch more closely. Early checks and, if needed, early treatment help the hip form a deep, secure socket.

Types of Hip Dysplasia

Hip dysplasia is a spectrum. Some babies have hips that are a bit loose, others have a shallow socket, and a few are born with a hip already out of place. Knowing the types helps you understand timing, cause, and what treatment may look like.

Developmental Hip Dysplasia

Developmental hip dysplasia, often called DDH, starts around birth and can change during the first year. The hip is not fully formed yet, so the ball may not sit deep in the socket. With growth, the fit can improve or worsen, which is why follow-up matters.

What it looks like:

  • Mild instability: The hip feels a little loose on exam.
  • Shallow socket: The cup is not deep enough to hold the ball well.
  • Late-onset issues: A hip that was stable at birth can become unstable later.

Why it happens:

  • Body traits: Looser ligaments and a softer socket in early months.
  • Positioning: Tight swaddling with straight legs can push the ball up and out.
  • Shared risks: Family history, firstborn status, and being breech increase risk.

How it is found:

  • Newborn and infant exams by your pediatrician.
  • Ultrasound in the first 6 months, then X-ray as bones harden.

Congenital Hip Dislocation

Congenital hip dislocation is present at birth. The ball sits outside the socket from day one. This term is older, but doctors still use it to describe a hip that is truly dislocated at birth.

What it looks like:

  • Out of the socket: The head of the thigh bone rests outside the cup.
  • Limited motion: The hip may not open wide during diaper changes.
  • Asymmetry: One leg may look shorter or turn out.

Why it happens:

  • In‑womb pressure: Limited space late in pregnancy can push the hip out.
  • Ligament laxity: Hormones around birth make tissues looser.
  • Genetic influence: Family patterns in socket shape and ligament stretch.

How it is found:

  • Exam right after birth, often followed by ultrasound.
  • Early referral to a pediatric orthopedist.

Developmental vs. Congenital: What’s the Difference?

Use this quick guide to sort the terms.

TypeWhen it startsWhat happensHow it is foundCommon triggers
Developmental hip dysplasia (DDH)Around birth through infancyLoose hip or shallow socket that may change with growthNewborn checks, repeat exams, ultrasoundFamily history, breech, firstborn, female sex, tight leg-straight swaddling
Congenital hip dislocationPresent at birthHip is already out of the socketNewborn exam, early imagingBreech late in pregnancy, tight uterine space, ligament laxity, family history

A simple way to remember it: DDH can develop or improve over time, congenital dislocation starts out of place and needs early correction.

Causes of Congenital Hip Dislocation

Several factors in late pregnancy and birth raise the chance of a hip being dislocated at birth. These do not mean you did anything wrong. They reflect how a baby grows and fits in the uterus.

  • Breech position: Hips straight and knees extended in a breech baby put pressure on the socket.
  • Limited uterine space: First pregnancies, twins, or low amniotic fluid give the hips less room to move.
  • Hormone-related looseness: Maternal hormones can make a baby’s ligaments more flexible.
  • Family history: Parents or siblings with hip dysplasia suggest shared traits in bone shape or tissue stretch.
  • Linked conditions: Torticollis or foot deformities, like metatarsus adductus, often appear with hip issues.

Key takeaway: developmental problems can evolve after birth, while congenital dislocation is there from day one. Both benefit from early checks and, when needed, early treatment.

Key Causes of Hip Dysplasia in Babies

Hip dysplasia rarely stems from a single cause. It usually reflects a mix of genetics, position in late pregnancy, and how soft tissues respond to hormones and space. Knowing these roots helps you focus on smart screening and everyday habits that protect growing hips.

Common drivers include:

  • Family history, which raises the baseline risk.
  • Breech position, especially with legs extended.
  • Hormonal and environmental factors, such as low amniotic fluid and tight swaddling.

Genetic and Family History Factors

Family history matters. If a parent or sibling had hip dysplasia, the risk for a baby rises sharply. Studies show the chance can increase up to 20 times compared with families without a history.

Why genetics play a role:

  • Genes guide joint formation. They influence how the socket shapes and how round the ball of the hip becomes.
  • Ligament traits run in families. Some babies inherit looser connective tissue, which can let the hip shift more than it should.

Helpful context:

  • Higher risk is not a guarantee. Many babies with a family history never develop hip dysplasia.
  • Targeted screening helps. If hip issues run in your family, ask for early and repeat checks, often an ultrasound in the first months.

Breech Position During Pregnancy

Breech means a baby is positioned feet first or butt first near delivery. In many breech babies, the hips are straight and the knees extended. That posture can stress the socket and push the ball upward, especially late in pregnancy when space is tight.

Key points to know:

  • Risk is higher in breech babies. Research reports that about 20 to 30 percent of breech babies show some form of hip dysplasia.
  • Delivery type matters, but not completely. A C-section can lower stress on the hips during birth, but it does not remove the risk.
  • Late pregnancy breech counts most. Hips shaped in the last weeks are more affected by limited motion and extended legs.

What to do if your baby was breech:

  • Ask your pediatrician about a hip ultrasound at 4 to 6 weeks.
  • Keep legs free to bend and open in carriers and during diapering.

Hormonal and Environmental Influences

Hormones and space shape how the hip stabilizes in early life. Around birth, maternal hormones, such as relaxin, can make a baby’s ligaments more flexible. That flexibility helps with delivery, but it can also allow the hip to shift if the socket is shallow.

Other influences that raise risk:

  • Low amniotic fluid (oligohydramnios). Less fluid means less space to move, which limits healthy hip motion.
  • Tight quarters. Firstborns or multiples may have less room, which can keep hips straighter than ideal.
  • Swaddling style. Straight-leg, tight swaddling can push the ball up and out. This has increased risk in populations where legs are bound down after birth.

Protective habits to consider:

  • Hip-friendly swaddling. Wrap the arms snug, keep the legs loose and bent. Think “M” shape for the hips.
  • Ergonomic carriers. Choose carriers that support thighs and let hips spread, like a seat instead of a narrow sling.

Big picture: genetics set the stage, breech position adds pressure, and hormones plus space tune the final result. With awareness and simple habits, you can reduce avoidable stress on your baby’s hips.

Recognizing Symptoms and Getting an Early Diagnosis

Catching hip dysplasia early protects the joint and supports strong movement. The signs can be subtle, so a calm, steady look at everyday routines helps. Think diaper changes, bath time, and how your baby moves on the floor. When something feels off, a quick chat with your pediatrician sets the path forward. Early diagnosis lowers the risk of long-term pain and early arthritis.

Common Signs to Look For in Your Baby

You can spot clues during simple daily care. Not every baby shows symptoms, and many look completely typical. That is why routine checks with your pediatrician matter.

Watch for:

  • Clicking or popping in the hips during diaper changes or gentle leg movement.
  • Uneven thigh or buttock creases, especially when legs are stretched out.
  • Limited hip opening when you gently spread the legs for a diaper.
  • One leg appearing shorter or a foot that points outward more than the other.
  • Asymmetry when standing later, like one knee lower or a lean to one side.

Example: during a diaper change, one hip opens wide and the other stops early. That difference is a reason to call your pediatrician. Even small changes can matter.

Key reminder: many babies have no obvious signs. Regular hip checks at newborn monthly visits are essential.

Diagnostic Tests and What to Expect

The process is simple, quick, and gentle. Exams and images help confirm how the hip sits in the socket.

What usually happens:

  1. Hands-on exam. Your pediatrician moves each hip to feel stability and range.
    • The Ortolani maneuver gently opens the hip to see if it slides into place.
    • The Barlow test applies light pressure to check if a hip can slip out.
    • These moves are careful and brief. Babies may fuss, but it is not painful.
  2. Ultrasound. If the exam is unclear or risk is higher, the next step is imaging.
    • Best used in the first months, usually at 4 to 6 weeks.
    • Shows how the ball sits in the socket while bones are still soft.
    • The scan is painless. Gel on the skin, a small probe, and it is done.
  3. X-ray for older babies. As bones harden around 3 to 4 months, X-rays provide detail.
    • Quick images while your baby is positioned safely.
    • Very short exposure with standard safety steps.

If imaging confirms dysplasia, you may get a referral to a pediatric orthopedist. Early treatment, like a soft brace, often fixes the issue and protects future hip health. Early care reduces the chance of uneven gait, hip pain, and arthritis later in life.

If you notice any signs or feel unsure, call your pediatrician. Trust your instincts. A fast check now can save years of trouble later.

Simple Prevention Tips for New Parents

You can support healthy hips with a few daily habits. These steps are easy to use from day one.

  • Use hip-healthy carriers: Look for a seat that supports the thighs and lets the knees sit higher than the hips. Think “frog-leg” or “M” position. Baby’s hips should be bent and gently spread.
  • Swaddle smart: Keep the chest snug and the legs loose. Hips should bend and move. Avoid straight-leg, tight wrapping.
  • Follow AAP guidance: Review hip-safe swaddling and safe babywearing tips. Your pediatrician and the American Academy of Pediatrics offer clear, parent-friendly advice.
  • Go to every checkup: Routine hip exams at newborn, 1-, 2-, 4-, and 6-month visits catch small issues early. Ask for an ultrasound if your baby was breech or there is a family history.

Start simple, stay consistent, and keep those legs free to move. With early checks and hip-friendly habits, most babies develop strong, healthy hips.

Conclusion

Hip dysplasia often comes from a mix of genetics, breech position, and being first born. You can lower risk with hip-friendly swaddling, supportive carriers, regular checkups, and an ultrasound risk factors are present like breech birth or family history. Most cases are found early and respond well to gentle treatment, which protects long-term hip health.

Stay in close touch with your pediatrician, and consider joining a parent support group for tips and encouragement.

Disclaimer:

OPSB products should be used under the guidance of a qualified healthcare professional. Individual results may vary. Please consult your pediatrician or orthopedic specialist for professional advice. This article is for informational purposes only and does not constitute medical advice. Always follow your doctor’s recommendations and instructions.

MAM-MM-137

https://family.opsb.com/wp-content/uploads/sites/2/2026/03/15.png 1118 853 mhoff /wp-content/uploads/sites/2/2026/03/family-resource-hub-logo.png mhoff2026-03-06 16:50:492026-03-11 17:46:48What Causes Hip Dysplasia in Babies? Guide for New Parents

Pediatric Broken Femur Treatment Options

A broken thigh bone can stop a busy day in a second. The femur, or thigh bone, is the large bone from the hip to the knee. It carries body weight, helps kids stand, and powers every step. A pediatric broken femur, or femur fracture, is serious, but modern care works very well.

Kids heal fast, often faster than adults. With the right plan, most children return to school, play, and sports within a few months. The best treatment depends on age, weight, where the bone broke, skin and muscle condition, and what your family can manage at home.

This guide walks through what to expect. You will see symptom clues and when to go to the ER. You will learn how doctors choose between non-surgical and surgical care, how pain is managed, and what the recovery timeline looks like. You will also get helpful questions to ask your child’s team.

Pediatric Femur Fractures 101: Types, Symptoms, and When to Go to the ER

The femur can break in the middle, or shaft, at the top near the hip, or at the bottom near the knee. Doctors are trained to look at pediatric fractures to see if there is growth plate involvement or not which will help them decide on care options. The force that caused the injury also guides care. A fall from a monkey bar is different from a high-speed crash. A significant twisting motion in some toddlers is enough to cause a femur fracture as well.

Doctors use simple labels for location of these fractures. Terms you may hear are:

  • Shaft fracture: the middle part of the femur.
  • Proximal fracture: near the hip joint.
  • Distal fracture: near the knee joint.
  • Growth plate fracture: involves the physis and needs close follow-up.

Common causes in babies, kids, and teens

  • Babies and infants: short falls from beds or sofas, twisting motions, car crashes. In very young infants, especially ones not walking yet, doctors sometimes screen for possible non-accidental trauma, which means an injury that does not match the story.
  • School-age kids: playground falls, trampoline injuries, bike and scooter crashes.
  • Teens: contact sports injuries and high-speed car or ATV crashes.

Bone health problems are rare in kids. Good vitamin D, calcium, and balanced nutrition still help bones heal well.

Where the break happens matters

  • Shaft fractures are most common. These guide many treatment choices.
  • Proximal or distal fractures can involve the hip or knee. Joints need a smooth surface for motion and comfort.
  • Growth plate involvement means closer follow-up to watch for growth changes.

Signs and symptoms you should watch for

  • Severe thigh pain, swelling, or a visible deformity.
  • Refusal to stand or walk on the leg.
  • The injured leg looks shorter or rotated compared to the other side.
  • Numb toes, cool toes, or color changes in the foot.

Emergency red flags and first aid before the hospital

  • Call 911 for a deformed leg, an open wound over the bone, or if your child looks very ill.
  • Keep the leg still. Do not try to straighten it.
  • If trained, support the leg with a pillow, blanket roll, or a soft splint.
  • Do not give food or drink. Sedation or surgery may be needed.

How Doctors Diagnose and Choose the Best Treatment Plan

Exam and imaging: X-ray first, sometimes MRI or CT

Doctors check the skin, muscles, blood flow, and nerves. They will test movement and feeling in the foot and ankle. Usually, two X-ray views of the entire femur are standard. Images usually include the hip and knee to spot injuries near the joints.

CT or MRI may be used when the fracture sits near a joint, the pattern is not clear, or the surgeon needs more detail for planning. Teams try to limit radiation. That is why they pick the fewest images that give safe answers.

What guides the plan: age, weight, fracture pattern, and skin condition

  • Age and size: Babies and young kids heal fast and often do well in casts or braces like DF2®. Older or heavier children may need surgery for better alignment and mobility.
  • Fracture pattern: Displaced- when the bone is broken, or fracture, and the ends are not lined up. Nondisplaced- when the bone is broken, or fractured, but the ends are lined up.
  • Open versus closed fracture: An open fracture means the bone breaks and pokes through the skin. Antibiotics are required and surgery is commonly required. A closed fracture is when the broken bone does not come through the skin.
  • Other injuries: Head, chest, belly, or other bone injuries change timing and choices.
  • Family support at home: casting/bracing care and mobility help affect the plan.

These factors point toward a non-surgical or surgical path.

Pain control and safe sedation for reduction or casting

Strong pain may get treated early with IV medicines. Many children need procedural sedation to line up the bone and apply a cast. Sedation is monitored by trained staff. Common side effects are sleepiness or mild nausea that fade.

For open fractures, when the bone come through the skin, antibiotics are usually given immediately.

Shared decision making: questions to ask your orthopedic surgeon

  • Why is this treatment best for my child’s age and fracture type?
  • How long until weight bearing and normal walking?
  • What are the risks and how often do they happen?
  • How will pain be managed at home?
  • How many follow-up visits and X-rays will we need?

Non-surgical Treatments That Work for Many Children

Many young kids heal very well without an operation. The core idea is simple. Line up the bone to an acceptable alignment determined by your doctor, hold it steady in a cast or brace, manage pain, and let the child’s healing abilities take over.

Spica cast: when it is used, pros and cons, home care tips

A spica cast covers the waist and the injured leg, and sometimes part of the other leg. It is common for children about 6 months to 5 years old with a stable shaft fracture. The cast is often placed soon after the bone is aligned.

  • Pros: avoids surgery, high healing rates, strong support.
  • Cons: heavy cast, hard diapering, car seat challenges, skin care issues, typically requires a general anesthesia to apply.

Home tips:

  • Double-diapering for infants helps keep the cast clean.
  • Keep the cast dry. Sponge baths are used while the spica cast is on, using care not to get any water inside of the cast.
  • Check the skin around the edges each day. Look for redness or sores.
  • Plan for a special car seat or a spica car seat. Your hospital team can help with rentals.
  • Use pillows to position for sleep. A small wedge under the calf helps reduce swelling.

Pavlik harness for infants under 6 months

For simple, stable shaft fractures in very young infants, some doctors use a soft Pavlik harness which can hold the hip and thigh in a safe position.

  • Pros: lighter than a cast, easier diapering, less skin rubbing.
  • Follow-up: frequent checks and X-rays to confirm alignment, plus strap adjustments as your child grows.

Functional Fracture Brace

A functional femoral fracture brace, like the DF2®, is a rigid shell that wraps around the thigh and calf with an optional ankle piece, has a semi-rigid pelvic section that wraps around the waist and a hip joint to allow adjustable positioning of the affected leg.  

  • Pros: lighter than a spica cast, easier hygiene, simpler car travel, fewer skin problems when fitted well, is adjustable to provide constant compression and ability to realign the fracture if needed. Does not need general anesthesia to apply.
  • Cons: must fit well to prevent sliding, needs monitor for proper tightness, needs fracture sock changes, follow up appointments and skin checks.
Home tips:
  • Wear a fracture sock under the brace to reduce rubbing.
  • Check skin for irritation, especially around the edges.
  • Keep the brace dry and clean. Clean the inside when changing the fracture sock.
  • Do gentle ankle pumps and toe wiggles to help circulation.
Medications and comfort care at home while healing in a cast or a brace
  • Pain medications as needed that are prescribed and/or recommended by your doctor,
  • Elevate the leg that is in the cast or brace, but take care to not create pressure on the back of the heel. If the leg is elevated, the heel should be suspended in the air with nothing under it as this area is prone to skin breakdown. A good way to do this is to use a small pillow or folded up towel placed under the calf section leaving the heel suspended in the air.
  • Keep ice packs around cast or brace edges to reduce swelling, taking care to not get the skin inside the cast or brace wet.
  • Keep toes moving and check color and warmth.
Watch for red flags:
  • Pain that does not respond to medicine.
  • Numb toes, blue or cold foot.
  • Fever, foul smell, or a wet or cracked cast, or wet fracture sock under the brace.
  • Excessive swelling that does not reduce or is getting bigger.
  • Discoloration of the skin when using the cast or brace.

Conclusion

Most children with a broken femur heal well and get back to normal activity within a few months after the fracture. The right treatment depends on age, fracture type, and what your family can manage at home. Recent studies have proven that bracing with a specialized pediatric femoral fracture brace, like the DF2®, for pediatric femur fractures in the 1-5 year old population works as well as the hip spica cast but with less complications. Link to Casey and Andras 2025 Study here.  Stay engaged, ask clear questions, and work closely with your team. With consistent follow-up, smart pain care, and steady rehab, your child’s recovery can be strong.

Disclaimer

OrthoPediatrics Corp. products should be used under the guidance of qualified healthcare professional. Individual results may vary. The DF2® brace is intended for femur fracture fixation and post-operative stabilization in pediatric patients from approximately 6 months to 5 years of age by providing immobilization of the femur, knee, and hip. Please consult your pediatrician or orthopedic specialist for professional advice, including product warnings, precautions, side effects and contraindications. This article is for informational purposes only and does not constitute medical advice. Always follow your doctor’s recommendations and instructions.

MAM-MM-097

https://family.opsb.com/wp-content/uploads/sites/2/2026/03/UM-01-8000-001-Rev-A-DF2-Fitting-Instructions-Final-July-2023.remini-enhanced-small.png 800 444 mhoff /wp-content/uploads/sites/2/2026/03/family-resource-hub-logo.png mhoff2026-03-06 16:44:102026-03-27 17:14:25Pediatric Broken Femur Treatment Options

Using a Brace for Femur Fracture Treatment

Child's leg in a sock being placed into a femur fracture brace

When the femur breaks, pain is sharp and movement feels impossible. The femur is your thigh bone, the largest and strongest bone in your body. It carries your weight, so high force or a direct hit often causes fractures. However sometimes in younger children a twist or fall that may not seem significant can cause a femur fracture as well.

Not every femur fracture needs surgery, in fact children under 5 years of age usually do not get surgery to treat a femur fracture.. In some cases, using a fracture brace, like the DF2® brace, for femur fracture treatment is a safe, effective path. A brace supports the bone, keeps it aligned, and allows controlled movement while you heal. It can reduce the need for a full cast, which many people find heavy and limiting, and many times is applied without a general anesthetic.

This approach helps protect the injury while you start gentle activity sooner. It can adjust for swelling, improve comfort, and make daily tasks more manageable. With the right fit and plan from your care team, a femoral fracture brace supports healing and helps you stay engaged in life.

In this post, you’ll learn how femoral fracture braces work, who they suit, and what to expect day to day. We’ll cover benefits, common types, and simple tips to wear and care for your brace. You’ll also find guidance on pain control, mobility, and red flags to watch for. If you or a loved one is facing this injury, take a breath, there’s a clear path forward.

What Is a Femur Fracture and Why Choose a Brace?

The femur is your thigh bone. It supports your body and powers your steps. A femur fracture means this strong bone has cracked or broken. Breaks range from small hairline cracks to clean breaks. The type of fracture and where it sits on the bone guide treatment. In select cases, a brace is a safe, active way to heal. It holds the bone steady, is adjustable, reduces pain, and lets you move with care while the bone heals. Children tend to heal much faster than adults given their bone-making ability and remodeling due to growth.

Common Causes of Femur Breaks

Everyday life can load the thigh bone with sudden or repeated force. These are the most common triggers you should know:

  • Car or bike accidents: High-speed impact can snap the femur.
  • Sports collisions: Football, soccer, or rugby hits can cause breaks.
  • Skiing or snowboarding falls: Twists and high force on the thigh.

When Is a Brace the Best Option?

Not every femur fracture needs surgery. In fact children under 5 usually do not require surgery to treat a femur fracture. Your doctor may determine that a brace, like the DF2® brace, is the proper treatment plan for your child.

Doctors often choose a brace when:

  • The fracture is stable: Bone ends line up well and stay put.
  • The location allows control: Many mid-thigh or less complex patterns.
  • The patient can comply: You can limit weight, wear the brace, and attend checkups.

How a brace compares:

  • Versus a cast: A brace is lighter, adjustable, and allows skin care and swelling control. It can be removed for hygiene, with guidance. A standard car seat can be used for transportation many times with a brace but not with a cast.
  • Versus surgery: Avoids anesthesia and hardware. Best for stable patterns that will heal without plates or rods.

Who benefits most:

  • Kids: Bones heal fast and remodel well, so braces often work.

Why choose it:

  • Adjustable to maintain constant compression over the fracture
  • Immobilizes the bone to hold alignment.
  • Reduces pain by limiting motion at the break.
  • Allows some mobility so you can start gentle activity sooner.
  • Supports a steady recovery with close follow-up and repeat X-rays.

Typical timelines:

  • Kids femur fractures usually heal in 4-6 weeks

The decision blends fracture type, location, age, bone health, and your ability to follow the plan. When these line up, a femoral fracture brace can be a smart, effective choice.

Types of Braces for Femur Fracture Treatment

Braces are chosen based on where the femur is broken; upper, mid, or lower. The right design limits motion at the fracture site while allowing safe activity. Most modern options use lightweight thermoplastics, fracture socks, and easy straps for comfort and control. Fitting is done by healthcare professional who measures, molds, and adjusts your brace so it supports the bone and protects skin.

The DF2® brace was specifically developed to treat femur fractures in children 6 months to 5 years old.

How to Use a Brace Effectively During Recovery

A well-fitted brace protects your femur while you build strength and confidence. Most people wear a brace full time for 4 to 6 weeks, then taper use as healing shows on X-rays. Fit, routine checks, and smart activity matter just as much as the brace itself.

Look for proper positioning each time you put it on. The thigh shell sits flat, and straps are snug without cutting into the skin. You should feel firm, even pressure, not pinching or numbness. No slipping, twisting, or gapping throughout brace wear.

Daily Care and Maintenance Tips

Small habits keep your brace safe, clean, and comfortable. Build these into your morning and night routine.

Cleaning: Wipe the shell and straps as allowed by your doctor with a damp cloth and mild soap. Pat dry. Remove liners if they are designed to come out, then hand wash and air dry. Avoid heat sources like hair dryers or radiators.

Skin checks: Look at the skin under the edges twice a day. Once can do this without entirely removing the brace. Ask your care team how to check the skin without entirely removing the brace, especially at the beginning of care right after the fracture has occurred. Stop and call your care team if you see blisters, open areas, rash, foul odor, or redness that lasts.

Strap setup: Tighten then recheck. Use the two-finger rule. You should slide two fingers under a strap with gentle effort. If the brace slides, tighten a little more.

Positioning: Center the thigh shell and align the knee with the contour for the knee in the brace before you fasten straps. The brace should not rotate when you sit.

Water and bathing: Sponge baths are used when the brace is on. Use a standard bath only if given permission by your doctor since the brace will need to be removed for a full bath. Usually a standard bath is permitted towards the end of treatment time in the 4th or 5th week.

Sleeping: Most people sleep on their back with a pillow under the calf and ankle. Side sleepers can place a pillow between the knees and ankles to keep the leg in line. Avoid lying on the brace edges.

Wear time: The brace will be worn full time for 4-6 weeks for pediatric femur fractures. Only remove the brace if allowed by your doctor.

Red flags: Call your provider if you notice increasing pain at rest, numbness, cold or blue toes, sudden swelling, fever, drainage, a hot spot under the brace, or any new deformity.

Family support: Ask a partner or friend to help with strap checks, skin checks, rides to appointments, and simple tasks. A second set of eyes catches issues early.

Schedule follow-ups as directed by your healthcare provider. Bring your brace to every appointment for adjustments.

What to Watch Out For and How to Avoid Complications

Bracing is safe when monitored. Problems usually start small, then grow. Early checks stop most issues before they matter.

Simple prevention steps that work:

  • Do skin checks twice a day. This can be done without removing the brace, unless allowed by your doctor. Redness that fades in 20 to 30 minutes is common. Call if redness lasts, blisters appear, or you see drainage.
  • Keep straps snug but not tight. Use the two-finger rule for proper tightness and recheck frequently.
  • Elevate the leg when resting to manage swelling. Toes above heart level helps.
  • Keep the brace clean and dry. Wash liners per instructions. Moist skin breaks down faster.
  • Attend all follow-ups. X-rays confirm alignment. Your team will adjust straps, pads, or hinge settings.
  • Use meds as prescribed. Pain control supports better breathing, sleep, and movement.

Call your doctor now if you notice:

  • New or worsening pain at rest, or pain that feels different
  • Numbness, tingling, or cold, pale, or blue toes
  • Hot spots, foul odor, or drainage under the brace
  • Sudden swelling in the calf
  • The brace no longer fits or keeps sliding

Conclusion

Recent studies show that femur fracture braces, like the DF2®, heal pediatric femur fractures the same as spica casts but with added benefits like adjustability, no general anesthesia, continued ability to use existing car seat, etc.

Additional Resources:

Functional Bracing of Femur Fractures in Young Children Avoids Anesthesia and Spica Casting with Equivalent
Outcomes: A Randomized Prospective Study

Disclaimer

OrthoPediatrics Corp. products should be used under the guidance of qualified healthcare professional. Individual results may vary. The DF2® brace is intended for femur fracture fixation and post-operative stabilization in pediatric patients from approximately 6 months to 5 years of age by providing immobilization of the femur, knee, and hip. Please consult your pediatrician or orthopedic specialist for professional advice, including product warnings, precautions, side effects and contraindications. This article is for informational purposes only and does not constitute medical advice. Always follow your doctor’s recommendations and instructions.

MAM-MM-098

https://family.opsb.com/wp-content/uploads/sites/2/2026/03/Screenshot-2025-02-28-112849.png 713 1145 mhoff /wp-content/uploads/sites/2/2026/03/family-resource-hub-logo.png mhoff2026-03-06 16:39:542026-04-30 10:06:17Using a Brace for Femur Fracture Treatment

Common Pediatric Femur Fracture Types and Causes Explained

You just heard that your child has a femur fracture, and your heart dropped.
Is walking going to be the same? Will this affect growth? How serious is it?

The femur is the big thigh bone that helps your child run, jump, and keep up with life. When it breaks, it sounds scary. The good news is that in children, most femur fractures are painful and serious in the moment, but with proper care, they are usually very treatable and heal well.

Kids’ bones are not just smaller adult bones. They grow, bend, and break in different ways, so injuries and treatments are different too.

This guide walks you through the most common types of pediatric femur fractures, the usual causes like falls, sports, and car crashes, and what parents should know right away. The goal is clear information that helps you feel calmer, more prepared, and more confident as you support your child.

What Is the Femur and Why Do Kids Break It?

Where the femur is in the body and what it does

The femur is the thigh bone. It runs from the hip to the knee.

You can think of it as a strong support beam. It holds up much of the body when a child stands, walks, runs, or jumps. It also helps with:

  • Hip and knee movement
  • Balance and posture
  • Absorbing impact when the foot hits the ground

It is the longest and strongest bone in the body. That might make you wonder how it can break at all. The simple answer is that even very strong bones can break if the force is big enough or if it hits just the wrong way.

How children’s bones differ from adult bones

Kids’ bones are still growing, so they act differently from adult bones.

A few key differences:

Growth plates:
At the ends of children’s bones are growth plates, also called physes. These are softer areas of cartilage where new bone forms. They let the leg get longer and help shape the bone as a child grows. Adults do not have growth plates since they have completed their growth.

Softer and more flexible bone:
Children’s bones bend more than adult bones. Because of this, a bone may bend and crack on one side, instead of breaking clean all the way through. That is why some fracture types, like greenstick and buckle fractures, are mostly seen in children.

Faster healing:
The same features that make bones easier to bend or break can also help them heal faster. Kids often grow new bone quickly, especially when they are younger.

All these differences change how fractures look on X rays, how they are treated, and what doctors watch for later.

Why femur fractures in children are serious but usually treatable

The femur carries a lot of the body’s weight. It sits close to large blood vessels and important muscles. When it breaks, it usually hurts a lot, and most children cannot stand or walk.

Femur fractures in children are serious because:

  • They can be very painful and upsetting
  • They often need hospital care
  • They can affect hip, knee, or leg growth if near a growth plate
  • They sometimes happen with other injuries, especially after big accidents

At the same time, there is real reason for hope. With proper treatment and follow up:

  • Most children heal well
  • Many return to normal activities and sports
  • The bone often becomes strong again
  • Growth and remodeling capabilities unique to kids will reshape the fracture back to the normal bone shape.

Understanding the type of fracture and how it happened can help parents follow the plan, ask good questions, and watch for problems early.

Common Pediatric Femur Fracture Types Explained in Plain Language

Doctors use many terms to describe femur fractures. Below are the main types you may hear about, explained in everyday language.

Diaphyseal (shaft) femur fractures in kids

The shaft of the femur is the long, straight middle part of the thigh bone. Fractures in this section are the most common femur fractures in children.

The break can look different on X rays:

  • Transverse fracture: a straight line across the bone, almost like a clean cut
  • Oblique fracture: a diagonal line, like a slanted crack
  • Spiral fracture: a twist around the bone, like the pattern on a candy cane

These fractures usually happen from strong forces, such as:

  • Falls from a height
  • High speed sports injuries
  • Car crashes or being hit by a vehicle
  • Twisting motions that could seem minor, especially in younger children

Treatment depends on the child’s age, the exact pattern of the break, and how far the pieces are out of place.

Common treatment options include:

  • Spica cast (a body and leg cast) for younger children
  • Femoral fracture brace, like the DF2®, another option for younger children
  • Surgery with flexible nails, rods, or plates in older children or in very unstable fractures

Children often need pain control, time in the hospital, and follow up X rays to watch healing.

Proximal femur fractures near the hip

The proximal femur is the top part of the thigh bone near the hip joint. This includes the femoral neck, which connects the ball of the hip joint to the shaft.

Proximal femur fractures usually come from high energy trauma, such as:

  • Car crashes
  • Falls from a significant height
  • Strong direct blows to the hip area

Most of these fractures need close follow up. Doctors will watch healing on X rays and often monitor the hip for months or even years.

Distal femur fractures near the knee

The distal femur is the end of the thigh bone near the knee. This area contains a growth plate and the smooth joint surface where the femur meets the shinbone.

Fractures here can affect:

  • The joint surface, which needs to stay smooth for the knee to bend well
  • The growth plate, which helps the lower thigh grow in length and alignment

Common causes include:

  • Sports injuries, especially contact sports
  • Direct hits to the knee, like a helmet or ground impact
  • Falls, sometimes with the knee twisted or bent

Treatment often focuses on:

  • Lining up the joint surface so the knee stays stable and smooth
  • Protecting the growth plate as much as possible
  • Using casts, braces, or surgery with screws or plates, depending on the pattern

Because of the growth plate, children with distal femur fractures usually need long term follow up to watch leg length and knee alignment.

Growth plate (physeal) femur fractures

Growth plates sit at both ends of the femur, near the hip and knee. A growth plate fracture involves this active growing area. For growth plate injuries, your doctor will determine the involvement of the growth plate and treat as necessary.

Because of the long term risks, follow up with a pediatric orthopedic specialist is very important. Parents may be asked to bring their child in for repeat checks over a few years.

Greenstick and buckle femur fractures in younger children

Younger children’s bones bend more before they break. That is why incomplete fractures are fairly common.

Two classic types are:

Greenstick fracture:
Think of a fresh green twig. When you try to break it, one side cracks while the other side stays mostly together and bends. A greenstick fracture is like that. The bone cracks on one side, but does not break all the way through.

Buckle (torus) fracture:
This happens when the bone is compressed. Instead of snapping, it wrinkles or bulges, like a crushed paper cup. The bone is still in one piece but has a small bump or buckle.

These types of fractures:

  • Most common in wrists in your kids after a fall on an outstretched hand
  • Are more stable than full breaks
  • Can still be painful and limit walking
  • Often heal faster than complete fractures

Treatment usually involves a cast or brace and rest. Surgery is rarely needed for these patterns in the femur.

What Causes Femur Fractures in Children and When to Worry

Understanding how a femur fracture happened can help you make sense of the diagnosis and what comes next.

Falls, play, and sports injuries that lead to thigh bone breaks

Children move a lot. They climb, run, jump, and sometimes crash in ways that make adults wince.

Common everyday causes of femur fractures include:

  • Falls from playground equipment or trees
  • Bike or scooter crashes
  • Skateboard or rollerblade accidents
  • Trampoline falls, especially with multiple kids jumping
  • Hard hits during contact sports, like football or soccer
  • Unique twisting motions can cause a femur fracture in younger children

These usually cause shaft fractures or injuries near the knee. The risk goes up with:

  • Greater height of the fall
  • Higher speed
  • Landing on a hard surface
  • Landing on a twisted leg

Most of the time, these injuries are accidents that happen during normal play. They still need quick medical care.

High energy trauma from car crashes and serious accidents

Some femur fractures are part of big, high impact events, such as:

  • Car crashes
  • Being hit by a car as a pedestrian or cyclist
  • ATV or motorbike accidents
  • Falls from significant heights

These forces can:

  • Break the femur in several places
  • Involve the hip or knee joint
  • Cause open fractures where bone pushes through the skin

High energy injuries often come with other serious problems, such as head injuries or internal organ damage. Emergency care is critical. Doctors will focus first on life threatening issues, then on stabilizing the femur and other bones.

Twisting injuries and spiral fractures of the femur

A spiral fracture wraps around the bone like a corkscrew. It happens when a twisting force hits the leg.

Examples include:

  • A foot stuck in a hole or between bars while the body spins
  • A child sliding with a leg caught at the bottom
  • The leg twisting while falling

In older kids and teens, these are often sports injuries. In very young children, especially babies and toddlers who are not walking yet, a spiral fracture can raise concern if the story does not match the injury. In those cases, doctors look more closely at how the injury happened, to rule out harm from an adult.

Fragile bones from medical conditions like osteogenesis imperfecta

Some children have bones that break more easily because of underlying health issues.

Conditions that can weaken bones include:

  • Osteogenesis imperfecta (brittle bone disease)
  • Severe vitamin D deficiency or rickets
  • Some metabolic or endocrine disorders
  • Long term use of certain medications, such as steroids

In these children, even mild trauma, such as a simple stumble or fall from standing, can cause a femur fracture. When a fracture seems more severe than the reported accident, doctors may order blood tests, genetic tests, or bone density studies to look for these conditions.

How Pediatric Femur Fractures Are Diagnosed, Treated, and Helped to Heal

Once you suspect a femur fracture, the next questions are usually, “What now?” and “What can we expect?”

Symptoms of a femur fracture parents should look for

A femur fracture usually causes strong and obvious symptoms. Common signs include:

  • Sudden thigh pain after a fall or accident
  • Swelling or bruising along the thigh
  • Refusal or inability to walk or stand
  • A leg that looks shorter than the other
  • A leg that seems turned outward or inward
  • Extreme pain with any movement of the leg

Trust your instincts. If your child has a big fall or accident, and something about the leg does not look right, seek urgent care.

How doctors diagnose pediatric femur fractures

In the clinic or emergency room, the team will:

  1. Ask about what happened
    They will want to know how the injury occurred, how your child acted afterward, and any past injuries or medical problems.
  2. Do a physical exam
    The doctor will look at leg shape, swelling, bruising, skin condition, and circulation. They may gently move the leg, if safe, to see what hurts.
  3. Order imaging, usually X rays
    X rays are the main tool. They show:
    • Where the fracture is
    • What type it is (transverse, oblique, spiral, etc.)
    • Whether the bone pieces are lined up or shifted

In complex cases, or when the growth plate or joint is involved, doctors may also use:

  • CT scan to get more detail of the bone
  • MRI to look at cartilage, growth plates, or soft tissue

You can ask to see the images and have the doctor point out the fracture. Many parents find that helpful.

Common treatment options from casts to surgery

Treatment plans depend on several factors:

  • Child’s age and size
  • Location and type of fracture
  • How far the bone pieces are out of place
  • Whether the skin is broken
  • Whether there are other injuries

Common approaches include:

Spica cast:
For younger children, an option is a hip spica cast. This is a large cast that covers the waist and goes down one or both legs. It holds the femur still so it can heal in a good position.

Fracture brace:
Another option for younger children may be a functional femoral fracture brace, like the DF2®, which is a rigid shell that wraps around the thigh and calf with an optional ankle piece, has a semi-rigid pelvic section that wraps around the waist and a hip joint to allow adjustable positioning of the affected leg

Surgery:
Older children and teens, or children with very unstable fractures, may need surgery. Pediatric orthopedic surgeons use methods such as:

  • Flexible nails inside the bone
  • Rigid rods for bigger kids or teens
  • Plates and screws on the outside of the bone

The goal is to stabilize the bone while respecting growth plates and future leg function. Surgeons choose methods that give the best healing and the best chance for normal activity later.

Healing time, recovery, and long term outlook

Healing time varies with age and fracture type.

In general:

  • Young children can show solid healing in about 4 to 6 weeks
  • Older kids and teens may take 8 to 12 weeks or more
  • Complex fractures or those near joints may need longer recovery

Parents can expect:

  • Follow up visits with repeat X rays to watch healing
  • Casting or braces for several weeks
  • Limits on weight bearing, sports, and rough play for a period
  • Possible physical therapy to restore strength and motion

Possible long term issues include:

  • Leg length difference
  • Slight angulation or bowing of the leg
  • Hip or knee stiffness

Many of these can improve with growth, therapy, or, rarely, later surgery if needed. Most children return to walking, running, and playing, and many go back to their previous sports.

Your orthopedic team will guide you on what activities are safe, when your child can go back to school, and how to handle daily care like bathing, lifting, and transport.

Conclusion: Helping Your Child Through a Femur Fracture

A broken femur sounds frightening, especially when it is your child. The femur is strong, yet it can still break with enough force from falls, sports, or accidents. Common pediatric femur fracture types include shaft fractures, hip area fractures, knee area fractures, growth plate injuries, and incomplete fractures like greenstick and buckle patterns.

Most children with a pediatric femur fracture heal well with the right treatment and follow up. Your job is to seek prompt care, ask questions, and stay involved in each step of the plan. Do not hesitate to speak up if something worries you along the way.

The more you understand about your child’s injury, the more you can advocate, stay calm, and support healing. With time, care, and patience, many kids return to doing what they love, often with a great story to tell about the day they broke their thigh bone and came back strong.

Disclaimer

OrthoPediatrics Corp. products should be used under the guidance of qualified healthcare professional. Individual results may vary. The DF2® brace is intended for femur fracture fixation and post-operative stabilization in pediatric patients from approximately 6 months to 5 years of age by providing immobilization of the femur, knee, and hip. Please consult your pediatrician or orthopedic specialist for professional advice, including product warnings, precautions, side effects and contraindications. This article is for informational purposes only and does not constitute medical advice. Always follow your doctor’s recommendations and instructions.

MAM-MM-096

https://family.opsb.com/wp-content/uploads/sites/2/2026/03/Picture6.png 159 197 mhoff /wp-content/uploads/sites/2/2026/03/family-resource-hub-logo.png mhoff2026-03-06 16:35:382026-03-27 17:15:36Common Pediatric Femur Fracture Types and Causes Explained

Barlow and Ortolani Tests Explained for Infant Hip Dysplasia

Worried about your baby’s hips during those first checkups? You’re not alone. Many new parents hear terms like hip dysplasia and feel concerned, needing more information.

Hip dysplasia means the hip joint didn’t form right. The ball and socket are not fitting well, which can make the joint loose or unstable. It’s common in newborns, often mild, and highly treatable when caught early.

That’s where the Barlow test and Ortolani test come in. These are quick, gentle exams doctors use to find signs of an unstable hip. They don’t hurt, and they help spot issues before a baby starts to crawl or walk.

In this post, you’ll get the basics of hip dysplasia in plain language. You’ll learn what each test checks, how a doctor performs them, and what the results mean. You’ll also see why early detection leads to simple solutions, like a soft harness, instead of surgery later.

Take a breath, you’re doing the right thing by learning now. With early screening, most babies grow strong hips and hit their milestones on time. Your role is simple, keep appointments, ask questions, and know what to expect.

If you’ve heard a click, felt unsure, or just want clarity, you’re in the right place. Let’s make sense of these tests, step by step, so you can feel confident at your child’s next visit.

What Is Hip Dysplasia and Why Spot It Early?

Hip dysplasia in infants means the ball of the thigh bone does not sit snug in the hip socket. Think of a loose puzzle piece that does not click in place. The joint can be wobbly or out of position, which makes movement less stable.

This is common. About 1 in 1,000 babies has hip dysplasia that needs treatment. Many more have mild looseness that settles with growth and monitoring. When untreated, the joint can wear faster, which may lead to pain, a limp, or early arthritis later in life.

The good news is simple. When spotted early, most cases respond to a soft brace or a gentle cast. These hold the hips in a healthy position while the socket grows. That means more play and less worry by the time walking starts.

You are building a foundation before we get into the Barlow and Ortolani tests. Knowing the signs and risks will help you ask clear questions and feel confident during checkups about developmental hip issues.

Signs and Symptoms to Watch For in Your Baby

You can spot a few early clues at home. These hints are not always obvious, so regular visits matter. Your pediatrician checks for hip dysplasia in infants at every well-baby exam.

  • Uneven thigh or buttock folds: Skin creases do not line up from side to side, meaning are not the same when comparing one side to the other.
  • One leg looks shorter: The knees sit at different heights when both hips and knees are bent.
  • Limited hip movement: One hip opens less during diaper changes.
  • Clicks or clunks with movement: A shift you can feel or hear when spreading the legs.

These signs do not confirm a problem, and many babies with hip dysplasia show none at all. That is why routine checks, including the Barlow and Ortolani exams, are key. Your doctor’s hands can feel subtle looseness long before it affects crawling or walking. We will expand on what each sign means as we walk through the tests later in the post.

Risk Factors That Increase the Chances

Some babies have a higher chance of developmental hip issues. These do not cause dysplasia on their own, but they raise awareness and guide early screening.

  • Breech position in late pregnancy or at delivery: Hips may press upward, which can loosen the joint.
  • Family history: A parent or sibling with hip dysplasia raises the odds.
  • First-born and female: Tighter space in the uterus and hormonal effects can play a role.
  • Tight swaddling with legs straight: Hips need room to bend and open.

These factors do not mean your baby will have hip dysplasia. They do mean timing matters. Share pregnancy details and family history with your pediatrician, and ask about hip-safe swaddling. Early awareness leads to simple checks, quick imaging when needed, and fast treatment that keeps your child on track.

Breaking Down the Barlow Test for Hip Stability

The Barlow test is the first of the two key checks for infant hip stability. It is a gentle part of the infant hip exam, used from birth through about 6 months. Named after Dr. Thomas Barlow, this quick maneuver looks for a hip that can slip out of the socket. That kind of hip is called dislocatable. Finding it early guides simple care that protects healthy growth.

Step-by-Step: How Doctors Perform the Barlow Test

Here is the Barlow test procedure your doctor follows during a routine newborn check. There is no special prep for parents or baby. Your child stays calm, often swaddled or soothed with a pacifier.

  1. Your baby lies on the back on a firm, warm surface.
  2. The hips and knees are gently bent to about 90 degrees.
  3. The doctor holds one thigh with one hand, steadying the pelvis with the other.
  4. With light pressure, the doctor presses the knee down towards the table.
  5. The doctor feels for a small shift as the hip moves backwards within the socket.
  6. The same steps are done on the other side.

This is a soft, controlled movement, not a forceful push. Most babies relax through it. The goal is to see if the ball of the hip can be nudged out of place, even for a moment. If it can, the joint is unstable and needs a closer look.

Key points parents find helpful:

  • Routine check: Done in the hospital and at early visits.
  • No pain: It is quick and gentle, usually well under a minute.
  • Age window: Most useful from newborn to 6 months, while the hip is still flexible.

What a Positive Barlow Test Means for Your Baby

A Barlow test is positive when the hip briefly dislocates during the maneuver. That signals potential dysplasia, which means the joint is loose or the socket is shallow. Your doctor will arrange an ultrasound to confirm, often within a few weeks. Early action keeps treatment simple.

A negative Barlow is good news. It means the hip stays stable with gentle pressure. Your pediatrician will still monitor the hips at checkups, since growth can change how the joint behaves.

What happens next if the test is positive?

  • Imaging: Ultrasound to see the hip in motion and measure stability. X-ray if the baby is older.
  • Referral: to pediatric orthopedic specialist.
  • Follow-up plan: Close monitoring in the first months of life.
  • Treatment: Many babies do well with a Pavlik harness, a soft brace that holds the hips in a safe position while the socket matures.

False positives are uncommon with trained hands, and repeat exams help confirm what was felt. The outlook is strong. When found early, most babies need only a brace and no surgery. Your role is simple, keep appointments, ask questions, and feel good that this careful check caught a fixable issue at the right time.

The Ortolani Test: Reducing and Diagnosing Dislocations

Think of the Ortolani as the companion to Barlow. If Barlow checks whether a hip can slip, Ortolani checks whether a slipped hip can go back in. Named after Dr. Marino Ortolani, this maneuver helps detect a reducible hip dislocation (one where the hip is displaced, but can be put back into the socket). In simple terms, the doctor gently feels for a loose joint that clicks back into place. Used together, these exams screen most cases of hip dislocation in newborns. Here is the Ortolani test explained in clear steps.

Performing the Ortolani Test: A Gentle Check

The Ortolani test is calm, controlled, and quick. Babies tolerate it well when handled softly.

Steps your clinician follows:

  • Your baby lies supine on a warm, flat surface.
  • Both hips and knees are gently flexed to about 90 degrees.
  • The doctor steadies the pelvis with one hand.
  • With the other hand, the doctor abducts (spreads) the thigh, opening the hip outward while lifting the thigh anteriorly (towards the ceiling).
  • A true positive is a smooth, clunk felt by the doctor, not a snap or crackle. That clunk is the ball sliding back into the socket.
  • Each hip is checked separately, with slow, even movements.

Key points:

  • Age window: Most useful under 3 months, when the hips are flexible and easier to assess.
  • Gentle approach: The goal is to reduce a dislocated hip, not to force movement.
  • Comfort matters: A quiet room, warm hands, and soft voice help avoid startling your baby.

What parents can expect during the visit:

  • The exam takes less than a minute per hip.
  • Your baby may suck a pacifier for comfort.
  • You may hear the word clunk described, but you might not hear it yourself. It is usually something the clinician feels more than hears.
  • If the exam suggests looseness, your doctor will outline next steps right away.

Interpreting Ortolani Results and Next Steps

A result is positive if the examiner feels a distinct clunk as the hip reduces. That means the hip was out and then went in. A positive Ortolani prompts ultrasound imaging to confirm anatomy and stability. A negative result means the hips feel stable and move smoothly without a reduction event.

What happens after a positive Ortolani:

  • Imaging: Ultrasound gives a clear picture in early infancy. It helps guide the plan without radiation.
  • Follow-up: Early referral to pediatric orthopedics is common when reduction is felt.
  • Treatment:
    • Monitoring for mild cases when the hip is borderline but improves on repeat exams.
    • Bracing with a Pavlik harness or similar device for most reducible dislocations.
    • Surgery only when bracing does not work or diagnosis is delayed.

Early action works. With prompt bracing in young infants, success rates are around 90%, which avoids invasive care later and supports normal growth. Combined with the Barlow test, the Ortolani helps clinicians sort out which hips are unstable and which are already dislocated but reducible. That partnership keeps screening efficient, decisions clear, and treatment simple when started early.

Why These Tests Are Game-Changers for Hip Health

Barlow and Ortolani work as a team. Together, they spot hip instability early, when the joint is still moldable and easy to guide into a healthy position. This is the heart of early detection of hip dysplasia. Quick, gentle exams, zero radiation, and decisions you can act on right away.

These screenings are part of standard newborn care. Every baby gets a physical hip exam, and at-risk infants get an ultrasound. The approach is simple, cost-effective, non-invasive, and accurate in skilled hands. Catching a loose hip in the first months prevents pain, limping, and early arthritis later in life.

If any result is unclear, your pediatrician will recheck or order imaging. Bring questions to each visit. A short talk now can save your child from bigger procedures later.

When and How Often Should Screenings Happen?

Routine hip checks happen during:

  • Birth hospitalization, before discharge.
  • The 2-month well visit.
  • The 4-month well visit.

Your pediatrician keeps checking hips at each visit in the first year, and again when your baby starts walking. This follows guidance from the American Academy of Pediatrics, which supports regular physical exams for all infants and targeted imaging for those at higher risk.

Who is high risk? Breech position in late pregnancy or delivery, a first-degree family history, or a positive or inconclusive exam. These babies get an ultrasound at about 6 weeks, after newborn laxity settles, to confirm hip stability.

Quick guide for parents:

  • All babies: physical exam at birth and well visits.
  • High-risk or abnormal exam: hip ultrasound at around 6 weeks.
  • Ongoing follow-up: repeat exams to track growth and movement.
Baby statusScreening plan
No risk factors, normal examPhysical exams at routine visits
Breech, family history, or concerning examUltrasound at ~6 weeks, plus physical exams

Ask your clinician to show you what they felt. A short demo builds confidence and helps you know what to watch for at home.

Treatment Options if Dysplasia Is Found

Most infants do not need surgery. Early, non-surgical care works in the great majority of cases.

Common, effective options:

  • Pavlik harness or similar brace for 6 to 12 weeks. It holds hips in a safe, flexed, open position while the socket matures.
  • Regular check-ins with ultrasound or X-ray, depending on age, to confirm progress.
  • Gentle positioning tips at home, like hip-friendly swaddling and safe babywearing.

Success rates are high when treatment starts early, often over 90 percent for reducible hips. Babies in harnesses still feed, sleep, and play. Most go on to sit, crawl, and walk on time.

What if bracing does not work, or diagnosis comes after 6 months?

  • Closed reduction (putting the hip back in the socket under anesthesia) with a spica (body) cast may be used.
  • Surgery is rare, and usually reserved for severe or late-detected cases.
  • Even then, children typically catch up well with the right follow-up.

Here is the good news. The combined power of the Barlow and Ortolani tests during routine screenings guides fast, simple care that protects hip growth. If you have concerns, talk with your pediatrician. Early action sets your child up for strong, pain-free movement.

Conclusion

Hip dysplasia is common, and when found early it is very treatable. The Barlow test checks if a hip can slip, and the Ortolani test checks if a slipped hip can go back in. Together, these simple exams catch unstable hips before walking starts, which protects growth and comfort.

Screening leads to clear next steps, often a short time in a soft brace. Most infants respond quickly, avoid surgery, and reach milestones on time. Trust the process, keep your well-baby visits, and speak up if something feels off.

If you have concerns, contact your pediatrician or a pediatric orthopedic specialist.. What you do today shapes strong hips for years to come.

Thank you for reading and caring about early detection. Stay curious, ask for a quick hip check at each visit, and use these insights to support your child with confidence.

Disclaimer:

OPSB products should be used under the guidance of a qualified healthcare professional. Individual results may vary. Please consult your pediatrician or orthopedic specialist for professional advice. This article is for informational purposes only and does not constitute medical advice. Always follow your doctor’s recommendations and instructions.

MAM-MM-138

https://family.opsb.com/wp-content/uploads/sites/2/2026/03/10.png 818 931 mhoff /wp-content/uploads/sites/2/2026/03/family-resource-hub-logo.png mhoff2026-03-06 16:29:212026-03-11 18:07:43Barlow and Ortolani Tests Explained for Infant Hip Dysplasia

Self Care Tips for Kids and Teens With Scoliosis Bracing

Wearing a scoliosis brace can bring change to a young person’s daily routine. But like any change, getting into a new routine takes time. The right self-care tips can make bracing more bearable, help manage their emotions, and boost confidence. This guide offers practical ways for young people and families to handle the challenges and thrive while living with a brace.

Physical Self-Care Strategies for Wearing a Scoliosis Brace

Wearing a brace every day takes time to become part of the daily routine. Many kids and teens deal with skin changes, sore muscles, and less freedom to move the way they want. Good physical self-care can help you avoid most issues and stay as comfortable as possible. Here are some ways you can take great care of your body while wearing your brace.

Skin Care and Hygiene Tips

Keeping your skin healthy under a scoliosis brace starts with a strong daily routine. The skin underneath a brace can get sweaty, sore, and even itchy, which makes care important.

  • Wash your skin every day. Use lukewarm water and a gentle, unscented soap. This helps keep sweat and bacteria from building up.
  • Dry your skin fully before putting the brace back on. Trapped moisture can cause red spots or rashes.
  • Check your skin for changes. Look for red patches that do not go away after 20 mins. These could mean the brace needs an adjustment.
  • Wear a tight, breathable shirt (like a cotton tee or seamless tank) under the brace. Avoid thick seams or tags that can rub your skin.
  • Change the undershirt if you get sweaty to keep skin dry and cool.

A simple table below can help you remember these steps:

Skin Care StepWhy It Helps
Daily washingRemoves sweat and bacteria
Using mild soapPrevents irritation
Drying before braceStops rashes and discomfort
Soft, fitted shirtReduces rubbing and friction
Regular skin checksSpots trouble early

Listen to your body. If skin issues stick around, talk with your doctor or orthotist as soon as possible.

Managing Skin Discomfort

Bracing brings changes to how your body feels, especially when you’re getting used to it. There are ways to help your body adjust without missing out on things you love.

  • Ease in gradually. Follow the provided break in wear schedule to allow your body to adapt to the brace. If your doctor says it’s okay, build up brace wear time a little each day when you first start.
  • Keep skin dry. Wet, sweaty skin is more likely to be sore.

See your healthcare provider if you have pain that won’t go away, numbness, or deep red spots that don’t fade within 30 minutes after taking off your brace.

Safe and Fun Ways to Stay Active

Exercise keeps muscles strong and flexible, which is good for anyone wearing a brace. You don’t need to skip activity, but picking the right movements makes a big difference.

Talk with your healthcare provider (physician/orthotist) about continuing in your sport/dance/theater/recreational activities.  Keep active. Some activities require the brace not be worn – this will be your time out of brace.

Here are some kid- and teen-friendly activities that work well with bracing:

  • Swimming: The water takes pressure off your joints and helps your whole body move. Try gentle laps or water games.
  • Stretching routines: Daily stretches improve flexibility, ease stiffnes.
  • Walking: Going for walks (with or without your brace, as advised by your doctor) is gentle but keeps you moving.
  • Yoga for kids/teens: Look for simple yoga videos made for scoliosis or beginners. Many basic poses are safe but always double-check with your specialist.

Try different activities to see what fits your needs and feels fun. Stay safe, follow guidance from your doctor, orthotist, or therapist, and remember: movement is part of caring for both body and mind.

Boosting Emotional Well-Being While Wearing a Brace

Living with a scoliosis brace affects more than just your body, it can stir up lots of feelings each day. Feeling different, worrying about what others might think, or managing frustration and stress are all normal. Emotional health is just as important as physical comfort, and there are simple tools and ideas that can make a big difference. Taking care of your mind can help you stay strong, positive, and connected to what matters most.

Building Confidence With Your Brace

Adjusting to a brace often means learning to see yourself in a new way. Confidence doesn’t happen overnight, but you can grow it, step by step.

  • Reframe your thoughts: Instead of seeing the brace only as a challenge, remind yourself that it’s a tool helping you get stronger. Every time you wear it, you show courage.
  • Own your story: It’s okay to feel awkward at first. Sharing your story—maybe with close friends or through art, journaling, or social media—can help you take pride in what you’re facing.
  • Set small wins: Celebrate each success, like wearing the brace for a full day or finding a comfortable shirt. Little victories add up.
  • Find your style: Make your brace your own! Use colored straps, covers, or stickers (with your orthotist’s okay) to show off your personality.
  • Remember, everyone has something: Most people deal with something unique, even if it’s not visible. Your brace is just one part of your story.

Building confidence takes practice. Start with one tip, keep going, and you’ll find your own strength shining through.

Coping With Teasing and Social Situations

Social moments can feel tricky when your brace is noticeable. Worries about teasing or awkward questions are common for kids and teens, but you can handle them with simple strategies.

  • Plan your answer: Practice a calm, short way to explain your brace if someone asks. For example: “It helps my back stay healthy” or “I’ve got scoliosis and this keeps my spine straight.”
  • Stay calm: If teasing happens, take a deep breath. Try not to react right away. Save your energy for people who treat you well.
  • Find your supporters: Stick close to friends who treat you with kindness. Trusted adults—like parents, teachers, or counselors—can also help if teasing or bullying gets serious.
  • Let adults know: If bullying continues, tell a teacher or school counselor right away. You don’t have to handle it alone.
  • Join a group: Connecting with others who wear braces (online or in person) can help you feel less alone and offer space to share tips.

You deserve kindness and respect. Speak up when you need help, seek out supportive friends, and remind yourself that bravery looks different for everyone.

Practicing Mindfulness and Relaxation

Big feelings can build up when you’re adjusting to your brace. Mindfulness and relaxation can help settle tough emotions and give you fresh energy for each day.

Here are a few easy exercises to try anytime:

  • Belly Breathing: Sit or lie down comfortably. Place your hands on your belly. Breathe in slowly through your nose, feel your belly rise, then breathe out through your mouth. Try for 5 slow breaths.
  • Muscle Relaxation: Squeeze one body part at a time—for example, your hands or shoulders—hold for a count of five, then let go. Notice the difference as each part relaxes.
  • Body Scan: Starting at your toes, slowly notice each part of your body, moving up to the top of your head. Imagine sending warmth or calm to any spots that feel tense.
  • Mindful Moments: Focus on something you enjoy, like listening to music or drawing, and pay close attention to how it feels or sounds. Let your mind rest on that peaceful moment.

Practicing these exercises once or twice a day helps train your mind to handle stress and find calm even when things get tough. Keep trying, you may discover your own favorite ways to relax and recharge.

Involving Family, Friends, and School in Self-Care

Finding support from people around you is key to thriving while wearing a scoliosis brace. Friends, family members, and teachers all play an important role in helping kids and teens feel understood and cared for. Building your own support team takes honesty and a little creativity. Reaching out can make daily life easier, both at home and at school.

Talking to Family and Asking for Help

Open conversation is the foundation of strong support at home. Sharing your day-to-day feelings and needs can lighten the load and help everyone in your family understand how to help.

It’s normal to need extra comfort or a helping hand with things like putting on your brace, carrying a heavy backpack, or dealing with tough moments. Telling your family how you feel, instead of keeping it inside, builds trust and brings you closer together.

Here are practical ways to start talking and get support:

  • Share how you feel, honestly. If you’re sore, frustrated, or just need to talk, let your family know. Say something like, “Wearing my brace is making me tired today. Can we talk about it?”
  • Ask for specific help. Be clear about what you need. You might say, “Could you help me adjust my brace?” or “Can someone drive me to my appointment?”
  • Let others know how they can cheer you up. Sometimes, you just want to be distracted. Suggest playing a favorite game, watching a fun movie, or having your favorite meal together.
  • Set aside check-in times. A regular family chat, even ten minutes at dinner, gives everyone a chance to listen and support you.

Being open about your needs turns your family into a team, working together to make each day better.

Navigating School With a Scoliosis Brace

School brings its own challenges when wearing a brace. Talking to teachers, administration, the school nurse, and/or counselors and asking for fair adjustments helps you succeed and feel more comfortable in class.

Most teachers want to help, but they may not know exactly what you need unless you tell them. Don’t be shy about speaking up for yourself. You have a right to feel safe and included at school.

Consider these steps for a smoother school day:

  • Meet with your teachers early. Explain why you wear a brace and what kinds of tasks might be harder, sitting at certain desks, or joining P.E.
  • Request simple accommodations. Ask for extra time to dress for PE, a comfortable seat. If you need privacy to adjust your brace, talk to the nurse or counselor.
  • Mark calendar reminders for brace care. Set a quiet alarm on your phone to check or adjust your brace throughout the day, if needed.
  • Reach out for support. Trusted friends, a school nurse, or a guidance counselor can all help if you’re feeling overwhelmed or face teasing.

Bringing others into your self-care routine, both at home and at school, helps you feel less alone. A network of caring people can make your journey with a scoliosis brace easier, kinder, and more positive.

Fun and Creative Ways to Personalize Your Brace

Personalizing a scoliosis brace turns something medical into something meaningful and even fun. When your brace feels like it reflects who you are, wearing it each day can get a little easier. There are many ways to add color, style, and smiles to your brace. Kids and teens have found that owning their look boosts confidence and makes the process feel less clinical, sometimes, it can even feel like adding their own “armor” for the day. Celebrate your creativity by making your brace truly yours.

Decorating and Customizing Your Brace: Safe, Brace-Friendly Ideas

Take pride in your brace by trying out some safe decorating tips. Always check with your doctor or orthotist before making big changes, but many small touches are both brace-safe and simple. Here are some popular ways to decorate:

  • Removable stickers or decals: Pick your favorite themes, from animals to superheroes to sports. Make sure stickers are easy to remove and not too thick, so they don’t stop the brace from fitting right.
  • Fabric brace covers: These are sleeves made just for scoliosis braces. They slip on easily, come in bright colors and patterns, and feel soft against your skin. Some kids even have a few covers to match to their outfit or mood each day.
  • Washi tape or medical tape: Use on the hard plastic (not on foam padding) for a pop of color. Try stripes, zigzags, or layer different tapes for a unique look. Replace weekly so tape stays clean and doesn’t peel.
  • Safe paint or vinyl wraps: Some clinics offer custom brace painting, or you can use vinyl wraps designed for plastic. Always choose non-toxic, brace-safe products. If you plan to paint, let your orthotist apply a sealant for easy cleaning.
  • Pins, patches, or charms: Soft, sew-on patches can go on brace covers. Clip-on charms can attach to straps or cover edges (just avoid anything bulky that could catch on clothing).
  • Glow-in-the-dark decorations: Some kids love adding a little glow, especially if they wear their brace at night.

Personalizing isn’t just about looks. It’s a way to make the brace part of your world, not just something you carry along. Here’s a quick table with things you can safely use and things to skip:

Safe to UseBest to Avoid
Removable stickers/decalsSuper glue or permanent adhesive
Fabric brace covers/sleevesMetal studs or sharp pins
Medical or washi tapeAnything thick that changes fit
Colored straps (with approval)Paints with strong smells or toxins
Clip-on, soft charmsHeavy or bulky items

Get creative and show off your interests, favorite colors, or even supportive messages. Decorating your brace can spark conversation and help friends understand your journey, too.

If you enjoy drawing, ask for a blank brace cover you can decorate with fabric markers. Or make a design wall in your room with old cover pieces. The options are endless. Expressing yourself makes the brace less of a stranger and more like a teammate in your daily life.

Conclusion

Taking care of your body and mind is possible while wearing a scoliosis brace. Small steps—like practicing good skin care, staying active, and seeking support from others—add up to big improvements in comfort and confidence. Personalizing your brace can even bring a bit of fun to the process.

With the right tools, a strong routine, and the help of family and friends, kids and teens can handle the daily challenges of bracing and grow stronger through the experience. Every act of self-care is a sign of courage and progress.

Disclaimer:

OPSB products should be used under the guidance of a qualified healthcare professional. Individual results may vary. Please consult your pediatrician or orthopedic specialist for professional advice. This article is for informational purposes only and does not constitute medical advice. Always follow your doctor’s recommendations and instructions.

https://family.opsb.com/wp-content/uploads/sites/2/2026/03/1X6A0936-scaled.jpg 1707 2560 mhoff /wp-content/uploads/sites/2/2026/03/family-resource-hub-logo.png mhoff2026-03-06 16:09:182026-03-06 18:44:55Self Care Tips for Kids and Teens With Scoliosis Bracing

Tips for Adjusting to a Scoliosis Brace

Getting a scoliosis brace can feel like a big change, both for your body and your mindset. These braces help keep your spine healthy and support your treatment, but getting used to wearing one isn’t always easy. Many people deal with sore spots, discomfort, or worry about how the brace will affect daily life.

Adjusting takes patience and a few smart strategies. This guide shares practical tips that can ease the process, boost your comfort, and help you feel more confident from day one.

Understanding Your Scoliosis Brace

Switching to life with a scoliosis brace takes some getting used to, both physically and emotionally. Knowing what your brace does and why it was chosen helps set clear expectations from the start. Each brace is designed for your body and your curve, so recognizing the differences can help you feel more confident as you begin.

Types of Scoliosis Braces

Scoliosis braces come in several shapes, each with a purpose. Your doctor picks a style that matches your age, spinal curve, and activity level. Here’s a look at the most common types you may hear about:

Brace TypeWorn WhenKey FeaturesWho It’s For
Boston Brace 3D®Day and nightCustom from Scan, hides under clothes, build in correction forcesMost common for children/teens
Wilmington BraceDay and nightCustom-molded, Velcro fastenersChildren and teens
Charleston Bending BraceNight onlyFlexible, worn lying down, overcorrectionKids with flexible curves
Providence/Boston Night BraceNight onlyHypercorrection, Designed for sleepingMild to moderate curves
    

Doctors select a brace based on:

  • Where your curve is located on your spine.
  • How much you’re still growing.
  • Your lifestyle and preferences.

Knowing which brace you have and why it was recommended helps you feel more in control during treatment.

What to Expect When You Start Wearing a Brace

The first time you wear your brace, it might feel stiff or awkward. Most people notice it feels snug around their torso, hips, or shoulders (depending on the type). You may feel warmer than usual or notice new pressure points as your body adjusts.

Common early sensations include:

  • Some mild discomfort or rubbing.
  • Tightness while sitting or moving.
  • The urge to “break in” the brace by removing it more often.

Remember, your skin and muscles will get used to the brace over time. Wearing a thin, moisture-wicking shirt under the brace can help with comfort in the first days.

Common Feelings When Wearing a Brace

Getting a brace can bring up all kinds of feelings. You might feel nervous or even embarrassed at first, especially if you worry about how it will look under your clothes. Some people feel proud—they know they are taking action to support their health. Others feel frustrated by soreness, sweating, or limited movement.

Every feeling is normal. Change always comes with a mix of reactions. What matters is knowing that your brace is only temporary, and it’s helping protect your spine while you grow and your body will adjust to having the brace on over the first few weeks of wear.

The Goals of Bracing

Wearing a scoliosis brace isn’t about changing the way you look or move every day. The main goal is to stop your curve from getting worse as you grow. For many, bracing can keep a mild or moderate curve from needing surgery later and for some it can improve the curve. The brace supports your bones and muscles so you can stay active and focus on doing what you love.

Keeping these goals in mind can help you stay motivated, even on tougher days. Each hour you wear your brace brings you closer to your healthiest future.

Getting Comfortable Physically

Physical comfort is key when you first start wearing a scoliosis brace. Getting used to the brace means thinking about what you wear and how you treat your skin each day. A few simple changes can make a big difference, helping you avoid sore spots and making the brace feel less like a chore. This section will show you how to boost your comfort by making smart choices with clothing and daily routines.

Choosing the Right Clothing

What you wear under and over your brace affects how it feels on your body. The right layers can help you forget you even have it on.

  • Soft, Seamless Undergarments: Pick underwear, tank tops, or undershirts without thick seams, lace, or scratchy tags. Fabric should be soft and smooth against your skin to prevent rubbing and pressure marks.
  • Loose-Fitting Outerwear: Go for shirts, hoodies, and pants with a relaxed fit. Stretchy or forgiving waistbands help you feel less pinched during long days.
  • Avoiding Trouble Spots: Skip clothing with tight belts, fitted waistbands, or bulky seams that can press or bunch up under the brace. Look for dresses, athletic shorts, or sweatpants that glide smoothly over the brace.
  • Layers Matter: Light layers help keep sweat and heat from getting trapped under the brace. Moisture-wicking shirts made of materials like bamboo, cotton blends, or athletic fabrics keep you cool and dry better than thick cotton alone.

Here are some good fabric choices and tips for daily outfits:

Clothing ItemWhat to Look ForWhat to Avoid
UndershirtsSeamless, soft, moisture-wickingThick seams, lace, tight fit
OuterwearLoose, stretchy, lightweightBulky seams, fitted waist
Pants/ShortsElastic waist, soft fabricTight jeans, stiff belts
Dresses/SkirtsFlowy, comfortable, no hard hardwareZippers, heavy fabrics

Switching up what you wear as the weather changes also helps. In the summer, thin and breathable fabrics help prevent sweat rashes. In cooler months, layers add warmth without crowding the brace.

Preventing and Managing Skin Issues

Skin health can make or break your experience with a scoliosis brace. Soreness, red marks, or itchy patches are common when starting out, but you can keep problems at bay with a little daily care.

  • Check Your Skin Every Day: Look for small red spots or sore areas when you remove the brace. Early spots often go away overnight, but ongoing pain means you should tell your doctor or orthotist.
  • Clean Inside the Brace: Wipe the inside of the brace with mild soap and water and dry out completely to prevent dirt build up inside the brace.
  • Stick to a Gentle Skin Care Routine: Wash with mild, unscented soap and pat dry before putting the brace back on. A clean layer of skin helps prevent irritation and rashes.
  • Moisturize Smartly: Use a fragrance-free, non-greasy lotion on dry skin, but only after bathing and with enough time for it to fully absorb before putting the brace on. Skip powders and ointments that could rub off on the brace padding.
  • Beat the Heat: On warm days, choose highly breathable or sweat-wicking undershirts. Carry a backup undershirt if you get sweaty or damp. If the brace feels hot, try brief cool-down breaks if your wear time allows. Avoid keeping the brace in the car during the summer months as it can cause damage to the brace if it overheats.

Small steps can keep your skin healthy:

  1. Wash and dry your skin daily.
  2. Use soft, dry, seamless underclothes.
  3. Moisturize dry or itchy spots before strapping in.
  4. Air out the skin during brace-free times if possible.
  5. Report any lasting redness or sores to your care team.

Think of your skin as the main barrier between you and the brace. A little attention each day builds resilience, keeps friction low, and helps you focus on active, healthy living.

Adjusting Emotions and Building Confidence

Wearing a scoliosis brace can create a lot of mixed emotions. Some days you may feel strong and motivated. Other days, you might feel awkward, anxious, or frustrated. This is normal. Over time, you can shape your emotional response just like you’re shaping your spine. With steady support, honest conversations, and a focus on what makes you unique, you can build real confidence.

Staying Positive and Getting Support

Support makes everything easier, especially when you start something new. You don’t have to go through this alone. Many people want to help, listen, and encourage you as you adjust to life with a brace.

Reach out to these sources for connection and strength:

  • Family: Family can be a daily source of comfort. Let them know how you’re feeling, both on tough days and on days when things feel easier. If your brace rubs wrong or you feel down, tell them. The people who see you every day can notice changes and help address any problems that come up.
  • Friends: Good friends care about your well-being. Share what’s helpful and what’s hard for you right now. If someone asks about your brace, try to answer honestly, even if you keep it simple. Remind yourself: real friends support you no matter what.
  • In-Person Support Groups: Many hospitals and communities offer support groups for kids or teens with scoliosis. Sharing tips, stories, and struggles with people who “get it” can boost your spirits. Sometimes just seeing someone else in a brace can help. Ask your doctor, nurse, or school counselor if there’s a group near you.
  • Online Communities: Online forums and social media groups connect you with people worldwide who use scoliosis braces. Popular options include the Curvy Girls Scoliosis Support Group, Reddit’s r/Scoliosis, and Facebook groups dedicated to brace wearers. These spaces are good for advice and friendship when you’re looking for understanding.

Here’s a quick table with ideas for finding support:

Support SourceHow It HelpsWhere to Start
FamilyComfort, help with routines, kindnessShare stories at meals
FriendsFun, distraction, encouragementInvite them to learn with you
In-person Support GroupsPeer advice, sense of belongingAsk your doctor’s office
Online CommunitiesTips, emotional support, privacySearch forums and Facebook

Tips for Talking About Your Brace:

Sometimes, the hardest part is telling others about your brace. Here’s how to make these conversations easier:

  • Keep it simple: Try, “It’s a brace for my back. It helps my spine stay strong,” if you want a quick answer.
  • Share what you want: It’s always up to you what details to share. You can say, “I’m still getting used to it, but it’s part of my treatment.”
  • Answer with confidence: Remember, your brace is a medical tool, just like glasses or braces for teeth. Most people are curious, not judgmental.
  • Find your style: Express yourself with fun shirts, jewelry, or hairstyles you love. Personal style can help shift focus away from the brace itself—and show everyone you’re still you.
  • Encourage self-acceptance: Remind yourself every day that a brace won’t change who you are inside. Write notes or reminders you can see, like “Strong and Proud” or “I’m more than my brace.” You deserve to feel proud of your strength.

It can help to connect with others who wear a brace, especially on those rough days. Shared experiences and new friendships make the journey easier. Over time, you’ll discover that your brace doesn’t define you—it supports you. Your confidence will grow as you focus on what you can do, not just what you wear.

Sticking With the Treatment Plan

Wearing a scoliosis brace is a big commitment, but following your treatment plan brings the best results. It’s not just about the hours in the brace. It’s also about regular check-ins, seeing progress, and building habits that support your spine health. Small daily choices and a few smart tricks can help you stick with your schedule and feel proud of what you’re achieving.

Creating a Wear-Time Tracking Habit

Hitting your daily brace goals starts with knowing exactly how long you have it on. Keeping track helps you stay honest, spot small wins, and notice trends. Everyone has their own style, so use the method that’s easiest for you.

Some popular ways to track brace wear time:

  • Wear-Time Apps: Many braces now come with built-in sensors that sync with mobile apps for easy tracking. If yours doesn’t, try a timer or a simple app like Clockify, Streaks, or Habitica.
  • Printable Charts: Hang a chart in your room or on the fridge. Color in each hour you wear your brace to see progress at a glance. This creates a visual reward and can spark motivation.
  • Journals or Notebooks: Write down your daily wear hours, noting how you felt and any issues. This can also help you remember questions for your next appointment.
  • Reminders and Alarms: Use your phone or a smartwatch to set gentle reminders for when it’s time to put your brace on, or when you can take a break.

Here’s a quick look at the pros of each method:

Tracking MethodStays PrivateEasy to UpdateMotivates Progress
Mobile AppYesVery easyYes, built-in badges
Chart/VisualNoEasyYes: colorful cues
Journal/NotebookYesEasyGood for reflection
Reminders/AlarmsYesAuto-repeatKeeps you on track

By finding a method you enjoy, you’ll build a steady routine and keep up with your treatment goals.

Using Reminders and Setting Yourself Up for Success

Life gets busy. Even with the best motivation, it’s easy to lose track of time or forget to put on your brace, especially at first. Building reminders into your day helps make brace wear part of your routine instead of a chore.

Here are some simple ways to set reminders:

  • Set phone alarms that repeat daily at brace “on” and “off” times.
  • Pair brace time with everyday tasks (put it on after brushing your teeth or before starting homework).
  • Ask family members to check in or remind you, especially in the beginning.
  • Put sticky notes in places where you’ll see them—on the bathroom mirror, fridge, or your bedroom door.
  • Leave your brace in a visible spot as a visual cue.

Making wear time predictable removes stress. When it becomes part of your rhythm, you free up mental space for more enjoyable things.

Attending Follow-Up Appointments

Appointments with your doctor or orthotist are just as important as wearing your brace. These check-ins make sure everything fits right and that your treatment is on the right path.

Key reasons to keep follow-up appointments:

  • Fit Adjustments: Growth, weight changes, or daily wear can shift how the brace sits. Minor tweaks keep it comfortable and effective.
  • Progress Checks: X-rays or physical exams help your team see if your curve is staying stable or improving.
  • Answering Questions: Bring a list of concerns or questions from your brace journal. Your team is there to help.
  • Spotting Problems Early: If a sore spot or discomfort pops up, early help keeps small issues from getting worse.

Don’t hesitate to speak up about any problems at appointments. Open communication is a sign you’re engaged in your own care.

Celebrating Small Wins and Progress

Adjusting to a brace takes patience, but every day you stick to your plan is a win. Celebrate each milestone, whether it’s a full week of hitting your wear-time goal, surviving a hot summer day, or making it through gym class with confidence.

Meaningful ways to celebrate:

  • Share your progress with family or close friends when you hit a new goal.
  • Treat yourself to a favorite snack, playlist, or short movie night for meeting wear-time targets.
  • Record achievements in your journal—“Wore my brace for 18 hours,” “No red spots today,” or “First time I wore it to a friend’s house.”
  • Make a “brace milestone” board with stickers, drawings, or notes for each accomplishment.

Small celebrations boost your motivation and remind you how far you’ve come. The journey might feel long, but each step counts.

Conclusion

Getting used to a scoliosis brace brings both physical and emotional changes, but each small step you take makes a difference. Remember the value of comfortable clothing, daily skin care, honest conversations, and steady routines. Support from loved ones and tracking your progress can lighten tough days and celebrate your wins.

Adjusting gets easier with time. Every hour you wear your brace helps your future health and shows real strength. Keep going, trust your process, and be proud of how far you have come.

Disclaimer:

OPSB products should be used under the guidance of a qualified healthcare professional. Individual results may vary. Please consult your pediatrician or orthopedic specialist for professional advice. This article is for informational purposes only and does not constitute medical advice. Always follow your doctor’s recommendations and instructions.

MAM-MM-126

https://family.opsb.com/wp-content/uploads/sites/2/2026/03/1X6A9009-scaled.jpg 1707 2560 mhoff /wp-content/uploads/sites/2/2026/03/family-resource-hub-logo.png mhoff2026-03-06 14:04:392026-03-10 15:07:22Tips for Adjusting to a Scoliosis Brace

Stelios’s Cranial Helmet Journey

https://family.opsb.com/wp-content/uploads/sites/2/2026/03/stelios-cranial-helmet-journey-5.jpg 1080 1920 competenow /wp-content/uploads/sites/2/2026/03/family-resource-hub-logo.png competenow2026-03-06 03:44:022026-04-03 16:56:43Stelios’s Cranial Helmet Journey
Page 3 of 41234

Pages

  • Home
  • Accessibility Statement
  • Publicity and Data Use Authorization & Release Policy
  • Cookie Policy
  • Terms of Use
  • Privacy Policy
  • Medical Disclaimer
  • About
  • Blogs
  • Product Resources
  • Scoliosis
  • Clubfoot
  • Lower Limb Bracing
  • Hip Dysplasia
  • Plagiocephaly
  • Femur Fracture
  • Prosthetics & Limb Difference
  • Surgical Resources
  • Connect with OP Specialty Bracing

Categories

  • Uncategorized
  • Stories
  • Condition
  • Clubfoot
  • Plagiocephaly
  • Femur Fracture
  • Prosthetics
  • Experience
  • About
  • Scoliosis
  • Hip Dysplasia
  • Lower Limb
  • Surgical Resources
  • Featured Stories

Archive

  • May 2026
  • April 2026
  • March 2026
  • February 2026
  • December 2025
  • October 2025

This website is for educational purposes only and does not constitute medical advice or replace consultation with your healthcare provider. PLEASE CONSULT YOUR PEDIATRICIAN OR ORTHOPEDIC SPECIALIST FOR PROFESSIONAL ADVICE REGARDING DIAGNOSIS AND TREATMENT OPTIONS. OPSB products should be used under the guidance of healthcare professionals. Full prescribing information can be found in product labeling. Individual results may vary.

Medical Disclaimer

©2026 OrthoPediatrics Corp.
OrthoPediatrics Specialty Bracing

Privacy Policy | Terms of Use | Cookie Policy | Accessibility Statement

Contact Us

Phone: 877-766-7384
Email: info@mdorthopaedics.com

Quick Links

  • Scoliosis
  • Clubfoot
  • Lower Limb
  • Hip Dysplasia
  • Plagiocephaly
  • Femur Fracture
  • Prosthetics & Limb Difference
  • Surgical Resources
Visit the OP Specialty Bracing website

Design and development by RainCastle Communications

  • Scoliosis
  • Clubfoot
  • Lower Limb
  • Hip Dysplasia
  • Plagiocephaly
  • Femur Fracture
  • Prosthetics & Limb Difference
  • Surgical Resources

    Quick Links

  • About
  • For Providers
  • Product Resources
  • Blogs
  • Find a Clinic